Televes zAshd Скачать руководство пользователя страница 14

14

High Defi nition TV Satellite Receiver
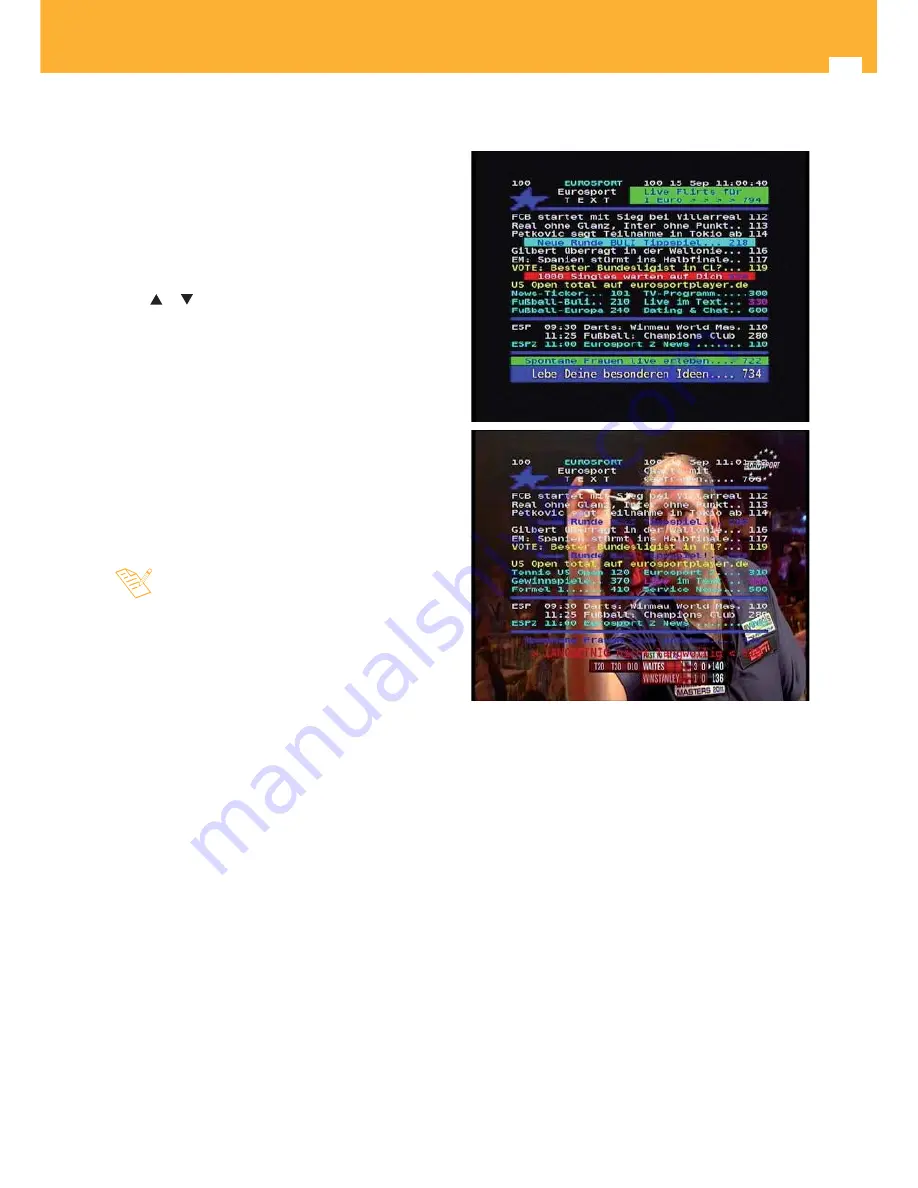
6.6. Teletext

The 

ZAS HD SAT

 allows you to select all teletext services 

provided by the service provider.

  To activate Teletext, press the 

TXT

 key on the remote 

control unit.

  A second press of the key 

TXT

, makes the background 

transparent to see the image at the same time as the 
Teletext.


Teletext services are displayed in the usual way. Use 
the 


 or   keys to move forward or backward page by 

page, or directly enter the page number on the keypad.

  On pages that run automatically, press the 

OK

 key to 

stop the progress and see the page longer. The  “

=

” 

indication is displayed beside the page number. Press 

OK

 again to run the page.


The control of the 

ZAS HD SAT 

features coloured 

buttons that facilitate fast access to teletext pages.

  Even if your TV does not have Teletext decoder, you can 

view it on the screen since the 

ZAS HD SAT

 is able to 

generate the teletext automatically.



To exit teletext, press the

 TXT

 until it disappears from 

the screen.

-  If you are using the TimeShift function, or playing 

a previously recorded program on the hard drive, 
teletext will not be available.

Содержание zAshd

Страница 1: ...High Definition TV Satellite Receiver Ref 717501 User Manual w w w t e l e v e s c o m SATELLITE...

Страница 2: ......

Страница 3: ...6 6 Teletext 14 7 Electronic Program Guide EPG 15 8 Main menu 16 9 Channel list menu 17 9 1 FTA TV channels 17 9 2 FTA Radio channels 17 9 3 Complete TV list 17 9 4 Complete Radio list 18 9 5 Favorite...

Страница 4: ...lace containers with water on or near the equipment if it is not adequately protected SMALL OBJECTS Avoid proximity of small metallic objects They may enter the slots or connectors on the receiver and...

Страница 5: ...channel list 6 List of Favourites A B C D E F Up to 5000 programmes can be stored Quick and easy software upgrading via USB port Timer function for programmes recording Electronic Programme Guide EPG...

Страница 6: ...te powering 2 LED Operating LED Red Standby Green power ON 3 IR IR sensor No Name Function description 1 RF OUT RF output signal loop for connecting another receiver 2 RF IN Input signal from the sate...

Страница 7: ...completely In normal mode return to the previous channel Lets you move through the different options in each menu Changes channel UP DOWN in TV or Radio modes Lets you choose from different configura...

Страница 8: ...for higher image quality is recommended that you select RGB if your TV is compatible with these signals To change configuration settings from CVBS to RGB do so via the menu Format Scart Video see Sec...

Страница 9: ...t because of this data depends a correct indication of the time displayed on the menus Select one of these options using the cursor keys or and in each one change the value using the cursor keys or Pr...

Страница 10: ...the value using the cursor keys or The level bars will show you if you have satellite signal and what is the strength and quality for each TV channel The automatic channel searching starts This proce...

Страница 11: ...can return to the last program you were watching by pressing EXIT 6 3 Program information Each time you change your program you will see information about it for a few seconds at the bottom of the scr...

Страница 12: ...EPG information is only available when provided by the supplier Press EXIT to go out 6 4 Volume Mute control Volume control To increase or decrease the volume use keys VOL VOL or of your remote contr...

Страница 13: ...hen changes are not allowed By default this option is disabled Audio language Select the audio language from those available through the o keys If transmission has not several audios then the default...

Страница 14: ...he page number on the keypad On pages that run automatically press the OK key to stop the progress and see the page longer The indication is displayed beside the page number Press OK again to run the...

Страница 15: ...ist and program list use keys or By using red and green keys you can access information regarding coming days After selecting a program pressing the OK key will display a screen where you see the exte...

Страница 16: ...ludes six submenus as shown in the picture Channel Lists Timers Installation and Setup System Information Recording Assistant Media Browser Select from the menu options with the keys or and press OK t...

Страница 17: ...e key to enter the edition menu To move a channel from its position on the list press OK on the desired channel This one will be shown between the signs With the keys or place the channel on its new p...

Страница 18: ...le lists press the red keys previous list and green following list Once the list of favourite channels has been made its channels can be ordered to your convenience by moving their position To do this...

Страница 19: ...ate for the event Starting Time Enter the starting time for recording Ending Time Enter the time off for recording Repeat Indicate whether this process is performed only once No Repeat Everyday or Eve...

Страница 20: ...usts the signal to the maximum resolution that gives the TV See your TV manual for more information SCART video format Select the video output mode between CVBS or RGB using the keys or Aspect ratio S...

Страница 21: ...the screen the default language for audio and the language for subtitles Menu language Select with or the language in which menus are displayed onscreen after press the MENU key Available languages a...

Страница 22: ...d Default password is 0 0 0 0 Locking Unlocking channels Select the option Lock Unlock Channels and press OK To select the channels from the list that will be locked scroll through it and press OK on...

Страница 23: ...time you access this menu you are prompted to enter your password The password is entered with the numeric keypad 0 9 on the remote control The parental lock affects the access control menus channel s...

Страница 24: ...dify the offset of the LNB 1 V By pressing the blue key displays the submenu where you can select Advanced Settings values Auto 1 2 3 4 and 5 for the Repeat DiSEqC option 2 way splitter Your installat...

Страница 25: ...e strength and quality for each TV channel By pressing the yellow key is shown the LNB Setup submenu where you can modify the offset of the LNB 1 V By pressing the blue key displays the submenu where...

Страница 26: ...LNB Setup submenu where you can modify the offset of the LNB 1 V By pressing the blue key displays the submenu where you can select Advanced Settings values Auto 1 2 3 4 and 5 for the Repeat DiSEqC o...

Страница 27: ...system Indicate whether the modulation of the transponder to look for is DVB S or DVB S2 Network searching This type of search the receiver reads the NIT and list all channels that appear in it Updat...

Страница 28: ...nd press OK Select the list you want to export and press OK Move the cursor to YES and press OK The ZAS HD SAT shall record the channel list of the memory stick The recording may take a few moments Pl...

Страница 29: ...ill look for the update and proceed with its installation The update may take a few moments Please wait This operation involves losing all data and configurations on the receiver Factory Settings This...

Страница 30: ...information about the receiver such as name software and hardware versions serial number etc Select the System Information option using the or keys and press OK A screen with the current values is dis...

Страница 31: ...in time 30 sec key backward in time 30 sec key stops the picture press it again to resume playing Pressing the OK button while playing it displays a blinking cursor on the bottom right corner where yo...

Страница 32: ...ress of the key up to 4 hours From here each press will increase 1 hour to a maximum of 8 hours During recording if the signal level come down or disappear it would show the message No Signal and stop...

Страница 33: ...ogramme from the same point where it was paused press the key Use the keys if you wish to navigate the time bar to search for a particular scene If you press the key it pauses theTimeShift function an...

Страница 34: ...vie from the list by pressing the yellow key To play a movie select it and press the key or OK If you want to play all movies in cascade press the green button If the USB device is not compatible with...

Страница 35: ...o the next track the button jumps to the previous track and the key stops playing To stop playing at any time press the key or EXIT Photos By using the keys or select the Photos parameter and press OK...

Страница 36: ...for recording digital TV SPDIF Sony Philips Digital Interface Format Hardware level protocol for transmission of PCM modulated digital stereo audio signals between devices and stereo components LNB L...

Страница 37: ...delay Digital audio Regional Settings Country Timezone Selection Language Settings Language menu Language 1 subtitles Language 2 subtitles Subtitles Language 1 audio Language 2 audio Audio Access cont...

Страница 38: ...coder MPEG MusiCam Layer I II AC3 AAC AAC Dolby Dolby digital Teletext DVB Compatible Memory Flash memory 32 Mb RAM memory 512 Mb A V input output SCART x 1 RGB video output 1 x SCART socket CVBS vide...

Страница 39: ...ou have connected the cable from the LNB to the receiver input connector and the options selected in the Setting antenna menu correspond to the installation Ther is no picture I The receiver is OFF II...

Страница 40: ...e the connections between all interconnected devices are correctly and securely made Sometimes the image appears distorted or moved sideways I Display format set to 4 3 When a program is being broadca...

Страница 41: ...ealth and safety that could derivefrominappropriatehandlingofthisproduct Recyclingmaterials helps preserve natural resources To receive detailed information on recycling this product please contact yo...

Страница 42: ...42 High Definition TV Satellite Receiver...

Страница 43: ......

Страница 44: ......

Отзывы: