Telefunken TF-RS9200 Скачать руководство пользователя страница 19

- 18 -

Automatic channel scan

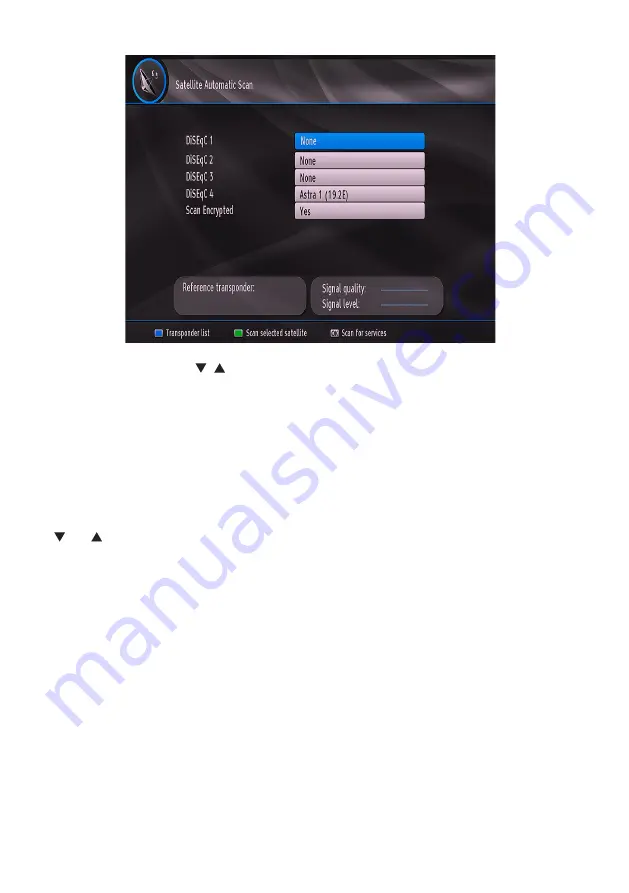
With this menu, you can search selected or all satellites. To do this, select “Automatic channel scan” in the 

Installation menu, by using the “ ”/“ ” buttons. If you press 

OK 

button, the “Automatic channel scan” menu 

will appear. Settings in this screen may vary in accordance with antenna type selection defined in first time 

installation. You can set satellite values as desired. Press 

GREEN

 button to scan selected satellite. Press 

BLUE

 button to view transponder list. You can use 

OK

 button to scan all satellites.

You can choose to load Pre-Programmed List or perform Regular Scan. Refer to the explanations in the Fist 

Time Installation section for more details.

Antenna Installation

Settings in this screen may vary in accordance with antenna type selection defined in first time installation.

You can set satellite values as desired by using the navigation buttons. 

Satellite List

Use “ ” or “ ” button to select Satellite List and then press 

OK

 button to see listed satellites on your set-top 

box. You can use 

Up/Down

 or 

RED/GREEN

 buttons to navigate in Satellite List menu. If you want to add a new 

satellite press 

YELLOW

 button and enter the details of the desired satellite. To delete a satellite in the list press 

BLUE

 button. A message will appear asking you whether to delete the selected satellite. Select 

Yes

 and press 

OK

 button to delete. To edit a satellite in the list press 

OK

 button and 

Edit Satellite

 screen will be displayed. You 

can change the name, orbital position and reference transponder for the selected satellite from this screen. Press 

the 

EXIT

 button on the remote control to exit.

First Time Installation

This section is same with initial installation part. Please refer to Menu interface/First time installation section 

for more information.

Configuration

You can configure the settings of your set-top box. Select Configuration from Setup menu and press “

OK

” to view 

this menu. Press the “

EXIT

” button on the remote control to exit.

Содержание TF-RS9200

Страница 1: ...DIGITAL HD SATELLITE RECEIVER TF RS9200 TF RS9200...

Страница 2: ...8 USB Disk Connection 8 USB Disk Connection 8 Menu Interface First Time Installation 9 Electronic Programme Guide EPG 10 Changing Channels 10 Adjusting the Volume 10 Volume Up Down 10 Mute 10 On Scree...

Страница 3: ...support Digital audio output optic Teletext function support DVB Resetting to factory settings option Selectable satellite configurations Presets ASTRA HOTBIRD EUTELSAT 16B TURKSAT 2A 3A etc plus use...

Страница 4: ...a place subject to direct sun light excessive dust or mechanical shock or in a location near heat sources The device should be placed on a solid and safe base Do not place the apparatus on a soft sur...

Страница 5: ...th the supply wiring Hazardous Live Terminal The marked terminal s is are hazardous live under normal operating conditions Caution See Operating Instructions The marked area s contain s user replaceab...

Страница 6: ...s a list of favourite channels 13 Coloured buttons 14 Displays the audio language setup menu 15 Fast backward 16 No Function 17 Pause 18 Play 19 Stop 20 Fast forward 21 Displays the subtitle setup men...

Страница 7: ...on cable 6 SPDIF Audio Out You can use this connector to output the digital audio to an external device See your audio system instruction book for further information 7 SCART VIDEO OUTPUT TV SCART con...

Страница 8: ...ote control it is probable that the batteries are exhausted If so you can still use the local buttons of the receiver You can replace batteries after they are exhausted 1 2 3 Note Remove the batteries...

Страница 9: ...n You can connect a USB hard disk drive or USB memory stick to your box by using the USB input This feature allows you to play files stored in a USB drive 2 5 and 3 5 inch hdd with external power supp...

Страница 10: ...with and pressing OK Then Country Time Zone Setting TV type Display Format and HD output resolution selections screen will be shown Do your selections using buttons and press OK to continue After pres...

Страница 11: ...a DiSEqC switch select this antenna type After selecting DiSEqC switch another menu screen will be displayed You can set four DiSEqC options if available A message will appear asking you whether to l...

Страница 12: ...Electronic Programme Guide EPG You can view the electronic programme guide EPG to view information about available programmes Press GUIDE button to view the EPG menu screen Press or buttons to navigat...

Страница 13: ...ff and on again until you change volume again The audio volume adjustment for the receiver is independent of the volume control on your TV set IMPORTANT You should be careful that both volume controls...

Страница 14: ...ess the OK button to display Channel List or you can press the OK button during watching programme and get to the Channel List directly Navigating the Entire Channel List Press or button for selecting...

Страница 15: ...menu Select the channel to be locked by highlighting it and select Lock option by pressing or button Press OK button Afterwards a dialog OSD asking for the password will be displayed Enter the passwo...

Страница 16: ...the Channels in the Channel List Press or button to select the channel that should be deleted Press or button to select the Delete item on Channel List menu Press the OK button to delete the highlight...

Страница 17: ...the current character i e b character becomes a by and c by Pressing numeric buttons 0 9 replaces the highlighted character with the characters printed above the button one by one as the button is pr...

Страница 18: ...er frequency the signal level and quality will be reflected in the signal strength bars Signal Level and Signal Quality bars at the bottom of the menu Signal Level bar shows the strength of the satell...

Страница 19: ...s Satellite List Use or button to select Satellite List and then press OK button to see listed satellites on your set top box You can use Up Down or RED GREEN buttons to navigate in Satellite List men...

Страница 20: ...broadcasts are displayed correctly Highlight the TV Type line in the Configuration menu and use the keys to select 4 3 if you have a standard TV set connected or 16 9 if it is a widescreen TV This fu...

Страница 21: ...delay Note This function will be available while using Optical Audio out only Receiver Upgrade To ensure that your STB always has the most up to date information Please ensure that after use it is set...

Страница 22: ...rs INSTALLATION Installation menu is locked So the user can t add channels Changes will be updated after exiting Configuration Menu Maturity Rating If this option is set TV gets the maturity informati...

Страница 23: ...nd changed after this process Please activate Standby Search setting in order to enable your TV for automatically updating the broadcast frequency of the broadcaster broadcast definition and similar c...

Страница 24: ...ic video and picture files from a USB memory stick Note Some USB compliant devices may not be supported Note If the USB stick is not recognized after power off on or First Time Installation first plug...

Страница 25: ...y files Pauses the playback Stop button Stop the playing file LANG Sets subtitle or audio YELLOW Sets subtitle time correction BLUE Sets subtitle size Rewind button Goes backward Fast Forward button G...

Страница 26: ...down Slideshow Options Select USB device option from the main media browser screen Select PHOTOS option using the Up or Down buttons press OK button and all available PHOTO files will be displayed Pr...

Страница 27: ...Pause playing file Stop button Stop the playing file LANG Sorts files INFO Activates loop shuffle mode BLUE Changes media type Green To move up Red To move down Previous Next buttons Jumps to previous...

Страница 28: ...e is entered via the Left Right and the numeric buttons Start Starting time is entered via the Left Right and the numeric buttons End Ending time is entered via the Left Right and the numeric buttons...

Страница 29: ...be displayed showing the number of possible audio languages for TV and tracks for radio programs available You can navigate using or buttons and select with OK button If an audio language supports Do...

Страница 30: ...ange 16 bit resolution Mpeg 1 Mpeg 2 Layer I II MP3 AC 3 LNB POWER SUPPLY Vertical 13 14 Volt Horizontal 17 18 Volt Max Output Current 300mA Short circuit protected 22 kHz Tone Frequency 22KHz 2 KHz A...

Страница 31: ...ng to standby You see the on screen error message related with LNB short circuit protection mode The dish installation is not correct or cable connections have been made incorrect Check the connection...

Страница 32: ...e environment and human health which could otherwise be caused by inappropriate waste handling of this product For more detailed information about recycling of this product please contact your local c...

Отзывы: