background image

Operation

11

11

Operation

of the image.

•  

Clock

: adjust the image frequency 

manually.

• 

 Phase

: adjust the phase manually.

USB operation

General playback information

•  Insert a USB drive into the USB port. 

Select Media source and press ENTER button. 
The screen will show a USB playback window, 
in which you can select Music, Photo, Movie 
and Text contents to play by pressing LEFT/
RIGHT cursor buttons and ENTER button.

•  USB file systems supported: FAT16, 

FAT32, 2.0 USB version is supported; maximum 
capacity 1 TB. For correct and satisfactory 
operation, licensed USB devices of well-known 
brands should be used. Avoid using USB 
devices of unknown brands. Playback of some 
file formats cannot be supported.

•  This unit supports playback of video files 

with ASF, AVI, MKV, MPG extension, with 
video codecs WMV9, DIVX, H263, MPEG-4, 
MPEGII, XVID and audio codecs WMA, MP3, 
DD(AC3). 

  The above list of extensions and codecs 

is for information only and is not a guarantee 
that all files having the above extensions and 
codecs sohuld be read by this unit.

•  Some AVI files cannot be played due to 

their parameters and recording conditions. 
Video files with AVI extension exceeding 2 GB 
in size may be played partially.

According to the USB 1.1/2.0 Standard, 

usage of a USB device with power current 
consumption exceeding 500 mA is not 
recommended without supplementary power 
supply. Failure to use supplementary power for 
connected USB drives with power consumption 
exceeding this value as well as defective 
USB drives may cause mechanical or thermal 
changes of elements of this unit as well as 
failure of internal elements of the USB port. 
Such damages are not warranty cases.

Warning:

 usage of external USB drives 

containing BIN files in the root directory may 
cause malfunction of the unit or damage to the 
software.

Operations of file playback

•  Press cursor buttons to select Return 

option and press ENTER button if you want to 
go back to the previous menu.

•  In the content menu, press cursor buttons 

to select folder, press ENTER button or   
button to enter it, then press cursor buttons to 
select the file you want to watch or to listen to. 
When highlighting the file, the file information 
will appear on the right (not available for text 
files) and picture will be previewed in the center 
(not available for music and text files). Press 
ENTER button or   button to play the selected 
file.

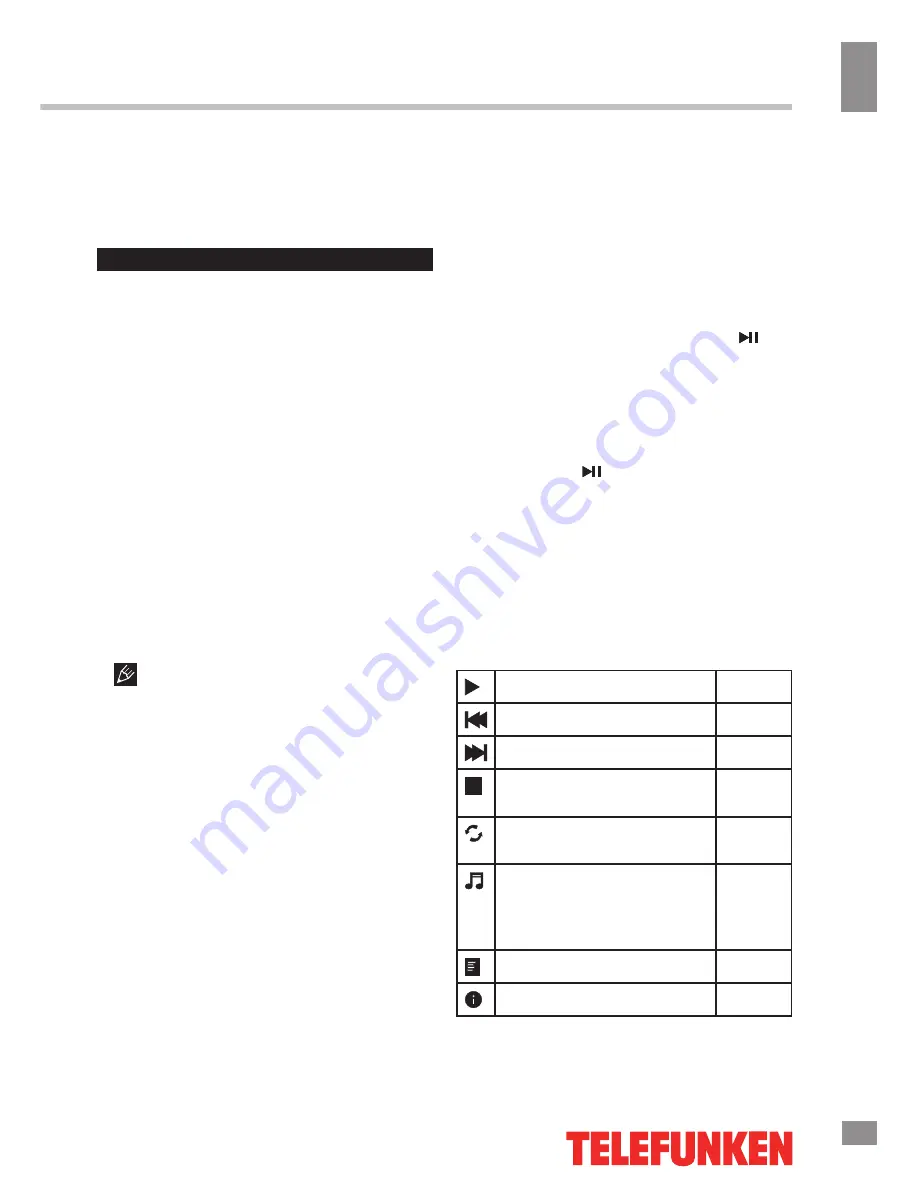
•  While playback, press ENTER button; the 

bottom of the screen will show playback menu 
in which you can select an operation by LEFT/
RIGHT cursor buttons or perform this operation 
by pressing ENTER button. The operations are 
as follows:

Play or pause playback

All files

Select previous file

All files

Select next file

All files

Stop plabyack and return to 
previous menu

All files

Select repeat playback 
mode

All files

Play music in background 
mode when photo or text 
file is being browsed (you 
should select music file first)

Photo 
and 
Text

Show playlist

All files

Show file information

All files

Содержание TF-LED28S14

Страница 1: ...Table of contents 3 LED TV Телевизор цветного изображения c жидкокристаллическим экраном TF LED28S14 Instruction manual Руководство по эксплуатации ...

Страница 2: ... OSD operation Channel setting Picture setting Sound setting Timer setting Option setting Screen setting USB operation General playback information Operations of file playback General information Troubleshooting Causes of interference Accessories Specifications Dear customer Thank you for purchasing our product For safety it is strongly recommended to read this manual carefully before connecting o...

Страница 3: ...orts when the unit is unused for long periods of time When unplugging the plug always hold the wide slot do not touch the metal part and do not destroy twist pull or heat the power cord Please contact the service center immediately if you found that the cable core is bare or has been broken Please replace the AC outlet if the metal plug cannot be inserted into the power socket completely or it can...

Страница 4: ...r connection terminal which may cause fire electric shock or breakdown Make sure that 2 persons or more carry the device heavier than 18 kg Dropping or tipping over the device may damage it The temperature of the product s body becomes a little higher after a long period of use This indicates that heat exchange is in normal working mode thus please do not let children or anyone who is sensitive to...

Страница 5: ...Connect the power cord to the power socket of this unit When using the LED as a computer screen connect the PC to the VGA jack from the monitor using the VGA cable not included This unit has PC audio in jack Connect this jack to PC main unit with related audio cable in PC mode and adjust the volume to what you want If the video source has a HDMI output jack you can connect the signal to the monito...

Страница 6: ...button 11 POWER STANDBY button 12 Power plug 13 Video output 14 HDMI 1 15 HDMI 2 16 PC VGA input 17 PC audio input 18 TVRF input 19 YPbPr input 20 AV input 21 USB1 USB2 ports 22 Earphone output 19 20 13 14 15 16 17 18 3 3 3 3 12 5 6 7 8 9 10 11 1 2 4 VIDEO OUT HDMI 1 HDMI 2 PC VGA PCAUDI O RF IN Y Pb Pr VIDEO R L USB EARPHO NE 21 22 Positions of the Power switch power on power off ...

Страница 7: ... 20 TEXT Press one time to pause press again to playback 21 INDEX Stop the playback and return to filelist 22 P MODE Select the picture mode 23 ZOOM Zoom in or out the current picture Some pictrues or videos may not be operated 24 A B Setup repeat play segment 25 REPEAT Allows you to repeat single random shuffle and folder 26 REVEAL FB Fast Backward 27 SUBPAGE NEXT Next 28 HOLD FF Fast Forward 29 ...

Страница 8: ...r off Press FAV LIST button to show the favourite channel list Press UP DOWN to select next or previous favorite channel Press FAV to add a new channel to the list Signal sources Press SOURCE button then press DOWN UP cursor buttons on the RC or CH CH buttons on the panel to select a source from available source list TV AV YPBPR HDMI1 HDMI2 PC Media Press ENTER button on the RC or MENU button on t...

Страница 9: ... frequency AFC set On Off automatic frequency correction Search press LEFT RIGHT buttons the unit will search for next available channel downward or upward and save it under the current number Program Edit this item allows you to sort TV programs according to your preferences Enter into program edit menu Delete Select the channel you want to delete Press red button to delete the channel Rename Hig...

Страница 10: ...h the unit will automatically switch off if no operation is done OSD timer select the period of time after which the OSD will be hidden Option setting OPTION OSD language Aspect ratio Blue screen Key lock Reset Software upgrade USB Demo mode Move Menu OK Exit OSD Language select the language of the OSD menu Aspect ratio 4 3 16 9 Zoom1 Zoom2 The set of available aspects can vary depending on the cu...

Страница 11: ...tary power for connected USB drives with power consumption exceeding this value as well as defective USB drives may cause mechanical or thermal changes of elements of this unit as well as failure of internal elements of the USB port Such damages are not warranty cases Warning usage of external USB drives containing BIN files in the root directory may cause malfunction of the unit or damage to the ...

Страница 12: ...ovie Zoom out Movie Select aspect ratio Movie While playback press button to pause or resume playback Press button to stop playback When playing photo movie and music files you can press REPEAT button to select the repeat play mode Press ROOT button to go to the root menu of the storage When playing music files you can press buttons to fast reverse or forward You can press buttons to select the de...

Страница 13: ...sound No audio signal or the signal cord is improperly not connected Connect the audio signal cord properly Set the sound system properly The RC does not work Batteries are improperly installed or exhausted Make sure the positive and the negative polarities are correct Reattach the battery lid Replace the batteries Causes of interference Incorporated in your TV receiver are the most up to date dev...

Страница 14: ...minal voltage range 100 240 V 50 60 Hz Nominal voltage range AC 100 240 V 50 60 Hz Specific power rating in operation mode 0 02 W cm2 Power consumption in operation mode 60 W Power consumption in stand by mode 0 5W Unit dimensions without stand 635 x 42 x 146 mm with stand 635 x 380 5 x 69 mm Net weight 5 1 kg The LED panel is a high technology product with many thin film transistors that can give...

Страница 15: ...тену Подключение Подключение внешней антенны Прочие подключения Управление устройством Элементы управления Передняя панель Задняя панель Пульт дистанционного управления Установка батареек Общие операции Источники сигнала Операции с телетекстом Экранное меню Настройка каналов Настройка изображения Настройка звука Настройка таймера Настройка параметров Настройка экрана Операции с USB Общая информаци...

Страница 16: ...ет должным образом Данное изделие может подключаться к розетке питания как без заземляющего третьего контакта так и с заземляющим третьим контактом Во избежание поражения электричес ким током защищайте шнур питания от возможного нажатия на него или защемле ния особенно рядом с разъемами Не закрепляйте шнур питания метизами Если Вы не пользуетесь устройством длительное время или в случае грозы обяз...

Страница 17: ... нитного излучения может наблюдаться искажение изображения Не устанавливайте вблизи устройства источники открытого огня например свечи В случае их падения устройство может быть повреждено или может произойти возгора ние Установка телевизора в замкнутое пространство при эксплуатации может сократить срок службы устройства поэтому необходимо обеспечить минимальную дистанцию между LCD телевизором и вн...

Страница 18: ...пление на стену Перед установкой телевизора на стену отделите подставку от корпуса предвари тельно вывернув 3 шурупа фиксирующих подставку на нижней части корпуса Для крепления на стену на задней панели телевизора имеются 4 отверстия Для крепления следует использовать настенный кронштейн стандарта VESA в комплект поставки не входит и приобре тается отдельно Производитель не несет ответственности з...

Страница 19: ...тного видео сигнала от внешнего источника Разъем питания предназначен для под ключения телевизора к сети электрического питания с помощью сетевого адаптера Подсоедините VGA кабель в комплект не входит к VGA порту ПК и к VGA разъему телевизора затяните болты по часовой стрелке на обоих концах кабеля Компьютерный аудиовход служит для получения телевизором аудио сигнала с персонального компьютера Есл...

Страница 20: ... POWER STANDBY 12 Шнур питания 13 Видеовыход 14 Вход HDMI 1 15 Вход HDMI 2 16 Компьютерный видеовход VGA 17 Компютерный аудиовход 18 Разъем для антенны 19 Компонентный вход YPbPr 20 Аудиовидеовход 21 Порты USB1 USB2 22 Разъем для наушников 19 20 13 14 15 16 17 18 3 3 3 3 12 5 6 7 8 9 10 11 1 2 4 VIDEO OUT HDMI 1 HDMI 2 PC VGA PCAUDI O RF IN Y Pb Pr VIDEO R L USB EARPHO NE 21 22 Положение выключате...

Страница 21: ...ка воспроизведения 22 P MODE Выбрать режим изображения 23 ZOOM Приблизить изображение Доступно не для всех каналов файлов 24 A B Настройка фрагмента для повторного воспроизведения 25 REPEAT Повтор фрагмента при воспроизведении 26 REVEAL FB Сканирование назад 27 SUBPAGE NEXT След файл 28 HOLD FF Сканирование вперед 29 MIX PREV Пред файл 30 RED Выбор красного элемента 31 BLUE Выбор синего элемента 3...

Страница 22: ...иска любимых каналов Нажимай те кнопки ВВЕРХ ВНИЗ для выбора преды дущего или следующего любимого канала Нажмите FAV чтобы добавить новый канал в список Источники сигнала Нажмите кнопку SOURCE затем нажи майте кнопки курсора ВНИЗ ВВЕРХ на ПДУ или кнопки CH CH на панели чтобы выбрать один из доступных источников сиг нала TV AV YPBPR HDMI1 HDMI2 PC Media Нажмите кнопку ENTER на ПДУ или кнопку MENU н...

Страница 23: ...й канал выберите номер канала Система цвета выберите систему цветности PAL SECAM NTSC Система звука выберите систему звука DK BG I Точная настройка выполните точную под стройку текущей частоты АПЧ включите или отключите автомати ческую подстройку частоты Поиск нажмите кнопку курсора ВЛЕВО или ВПРАВО для запуска поиска ближай шего доступного канала вниз или вверх по диапазону и сохранения его под в...

Страница 24: ...ежду правым и левым динамиками АРУ звука включите или отключите автоматическую регулировку громкости При скачках громкости связанных с веща нием рекламных роликов или с переключе нием каналов громкость будет регулиро ваться автоматически Объемный звук вкл выключение объемного звучания Звук Nicam моно стерео Настройка таймера ВРЕМЯ Таймер отключения Автоотключение Таймер меню Двиг Меню ОК Выход Тай...

Страница 25: ... котором Вы можете выбрать с помощью кнопок курсора ВЛЕВО ВПРАВО и кнопки ENTER воспроиз ведение музыки фото видео или текстов Поддержка USB версия USB 2 0 фай ловые системы FAT16 FAT32 максималь ный объем накопителя 500 ГБ Корректная работа устройства гарантирована только при использовании лицензионных USB накопителей известных производителей Воспроизведение некоторых форматов аудио видео и изобр...

Страница 26: ...кнопку ENTER или кноп ку для запуска выбранного файла Во время воспроизведения нажмите кнопку ENTER в нижней части экрана отобразится меню управления воспроиз ведением в котором Вы можете выбирать операции с помощью кнопок курсора ВЛЕВО ВПРАВО и подтвердить выполнение этой операции кнопкой ENTER Операции представлены в таблице ниже Воспроизведение или пауза Все файлы Выбор предыдущего файла Все фа...

Страница 27: ...бы остановить воспроизведе ние При воспроизведении файлов с изобра жениями видео и аудиофайлов нажимайте кнопку REPEAT для выбора режима повтор ного воспроизведения При воспроизведении аудиофайлов нажимайте кнопки для ускоренного воспроизведения назад или вперед Для выбора предыдущего или следующего файла нажимайте кнопки При воспроизведении файлов с изображениями нажимайте кнопки для выбора преды...

Страница 28: ...ойте контрастность и цвет Установите правильную систему звука Изображение в режиме VGA некорректное Параметры разрешения на компьютере установлены непра вильно Отрегулируйте параметры раз решения компьютера Изображение заснеженное Сигнал низкого качества Используйте исправный и качес твенный кабель Синий фон Отсутствует видео сигнал или кабель плохо подсоединен не подсоединен Подсоедините кабель д...

Страница 29: ...бражения объясняется тем что телевизи онный сигнал отражается от окружающих построек холмов самолетов и других объектов Свести такой эффект к минимуму можно изменив направление антенны АВТОМОБИЛЬНЫЕ ДВИГАТЕЛИ Работающие неподалеку автомобильные двигатели и электромоторы могут создавать помехи в изображении в виде небольших полосок или дрожания изображения на экране Комплект поставки 1 Телевизор 1 ...

Страница 30: ...ребляемая мощность в режиме ожидания 0 5 Вт Размеры устройства без подставки 635 x 42 x 146 мм с подставкой 635 х 380 5 х 69 мм Масса нетто 5 1 кг ЖК панель является высокотехнологичным устройством содержащим множество тонкопленочных транзисторов которые дают четкие детали изображения В некоторых случаях могут появляться неактивные точки на экране которые имеют постоянный цвет синий зеленый красны...

Страница 31: ......

Отзывы: