background image

Operation

11

11

Operation

of the image.

•  

Clock

: adjust the image frequency 

manually.

• 

 Phase

: adjust the phase manually.

USB operation

General playback information

•  Insert a USB into the USB jack. Select 

Media source and press ENTER button. The 
screen will show a USB playback window, in 
which you can select Music, Photo, Movie and 
Text contents to play by pressing LEFT/RIGHT 
cursor buttons and ENTER button.

•  USB file systems supported: FAT16, FAT32, 

NTFS. 2.0 USB version is supported; maximum 
capacity 400 Gb. For correct and satisfactory 
operation, licensed USB devices of famous 
brands should be used with this unit. Avoid using 
USB devices of unknown brands. Playback of 
some file formates cannot be supported.

•  This unit supports playback of video files 

with ASF, AVI, MKV, MPG extension, with 
video codecs WMV9, DIVX, H263, MPEG-4, 
MPEGII, XVID and audio codecs WMA, MP3, 
DD(AC3). Video image resolution should not 
be more than 576x720.

  The above list of extensions and codecs 

is for information only and is not a guarantee 
that all files having the above extensions and 
codecs sohuld be read by this unit.

•  Some AVI files cannot be played due to 

their parameters and recording conditions. 
Video files more than 2 Gb having AVI 
extension can be played partially.

  According to the USB 1.1/2.0 Standard, 

usage of a USB device with power current 
consumption exceeding 500 mA is not 
recommended without supplementary power 
supply. Failure to use supplementary power for 
connected USB drives with power consumption 
exceeding this value as well as defective 
USB drives may cause mechanical or thermal 
changes of elements of this unit as well as 
failure of internal elements of the USB port. 

Such damages are not warrantee cases.

Warning:

 usage of external USB drives 

containing BIN files in the root directory may 
cause malfunction of the unit or damage to the 
software.

Operations of file playback

•  Press cursor buttons to select Return 

option and press ENTER button if you want to 
go back to the previous menu.

•  In the content menu, press cursor buttons 

to select folder, press ENTER button or 
CANCEL/  button to enter it, then press 
cursor buttons to select the file you want to 
watch or to listen to. When highlighting the 
file, the file information will appear on the right 
(not available for text files) and picture will be 
previewed in the center (not available for music 
and text files). Press ENTER button or CAN--
CEL/  button to play the selected file.

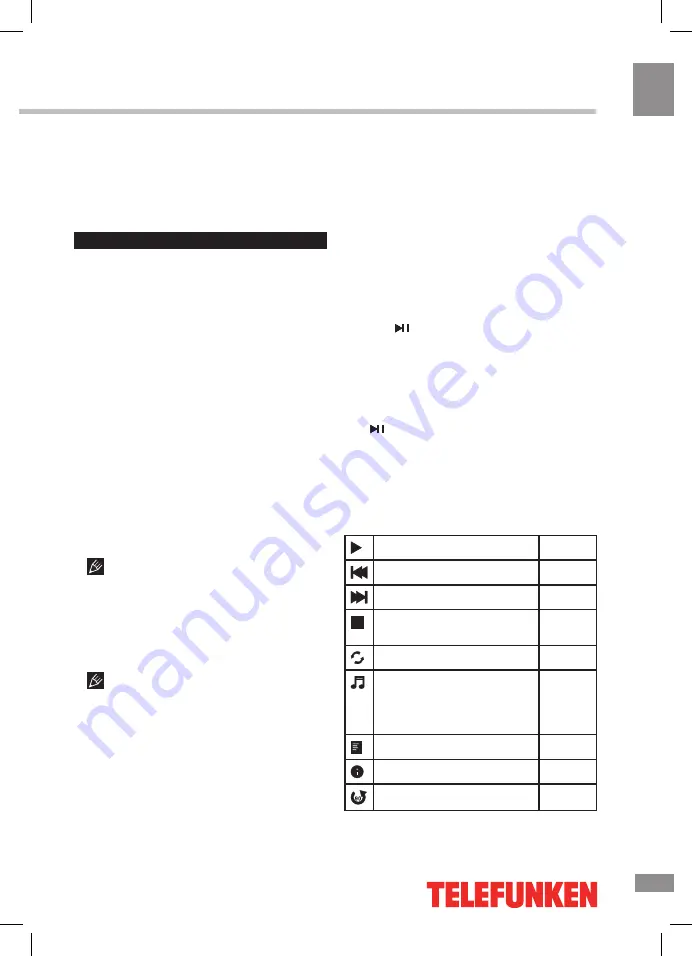
•  While playback, press ENTER button; the 

bottom of the screen will show playback menu 
in which you can select an operation by LEFT/
RIGHT cursor buttons on perform this opera-
tion by pressing ENTER button. The operations 
are as follows:

Play or pause playback

All files

Select previous file

All files

Select next file

All files

Stop plabyack and return to 
previous menu

All files

Select repat playback mode

All files

Play music in background 
mode when photo or text 
file is being browsed (you 
should select music file first)

Photo 
and 
Text

Show playlist

All files

Show file information

All files

Rotate image clockwise

Photo

Содержание TF-LED19S6

Страница 1: ...Table of contents 3 LED TV c TF LED19S6 Instruction manual...

Страница 2: ...nel setting Picture setting Sound setting Timer setting Option setting Screen setting USB operation General playback information Operations of file playback General information Troubleshooting Causes...

Страница 3: ...metal part and do not destroy twist pull or roast the power cord Please contact the service center immediately if you found that the core is showed in the air or has been broken Please replace the AC...

Страница 4: ...e connected damaged power cord connection cable or connection terminal may cause fire electric shock or breakdown 2 persons or more shall transport the device which is heavier than 18 kg If you drop o...

Страница 5: ...g the AC power cord into a power outlet When using the LED as a computer screen connect the PC to the VGA jack from the monitor by the relevant cable not included This unit has PC audio in jack Connec...

Страница 6: ...button 4 MENU button 5 POWER STANDBY button Control elements Back panel 1 AC adapter input 2 USB port 3 HDMI input 4 VGA input 5 Composite video input 6 PC audio input 7 RF antenna jack 8 Earphone jac...

Страница 7: ...ton 26 REPEAT button 27 GOTO button 28 FAV button 29 FREEZE button 30 SUB PG button 31 ON OFF button 32 MIX button 33 HOLD button 34 CYAN button 35 YELLOW button Changing the battery 1 Remove the batt...

Страница 8: ...s Signal sources Press SOURCE button then press DOWN UP cursor buttons on the RC or CH CH buttons on the panel to select a source from available source list TV AV SCART YPBPR HDMI PC Media Press ENTER...

Страница 9: ...hannel number Color System select corresponding color system PAL SECAM NTSC Sound System select corresponding sound system DK BG I Fine tune perform fine adjustment of the current frequency AFC set On...

Страница 10: ...ct the period of time after which the unit will automatically switch off if no operation is done OSD timer select the period of time after which the OSD will be hidden Option setting OPTION OSD langua...

Страница 11: ...pplementary power for connected USB drives with power consumption exceeding this value as well as defective USB drives may cause mechanical or thermal changes of elements of this unit as well as failu...

Страница 12: ...ect aspect ratio Movie While playback press CANCEL button to pause or resume playback Press INDEX button to stop playback When playing photo movie and music files you can press REPEAT button to select...

Страница 13: ...ound No audio signal or the signal cord is improperly not connected Connect the audio signal cord properly Set the sound system properly The RC does not work Batteries are improperly installed or exha...

Страница 14: ...1000 pages Electric shock protection class II Nominal voltage range of the LED TV 100 240 V 50 60 Hz Power consumption of the LED TV 36 W Unit dimensions without stand 473 4 x 51 3 x 261 6 mm with st...

Страница 15: ...15 15...

Страница 16: ...16 16 USB 15 16 16 16 18 18 18 19 19 19 20 20 20 20 21 21 22 22 22 23 23 24 24 24 24 25 25 25 25 28 28 28 29 30...

Страница 17: ...17 17 220...

Страница 18: ...18 18 LED 10 18 2...

Страница 19: ...19 19 3 4 8 4 VESA...

Страница 20: ...20 20 75 DVD CAMCORDER L R RCA Y Pb Pr VGA VGA VGA HDMI HDMI HDMI 75 ST AN DB Y...

Страница 21: ...21 21 1 VOL VOL 2 CH CH 3 SOURCE 4 MENU 5 POWER 1 2 USB 3 HDMI 4 VGA 5 6 7 8 9 YPbPr 1 2 3 4 5 2 1 3 4 5 6 7 8 9 AC 100 240V 50 60Hz...

Страница 22: ...POWER 2 3 P MODE 4 S MODE 5 MENU 6 ENTER 7 EXIT 8 MTS 9 VOL VOL 10 ROOT 11 FAV 12 FAV 13 CANCEL 14 INDEX 15 REVEAL 16 SIZE 17 RED 18 GREEN 19 MUTE 20 21 SLEEP 22 SOURCE 23 INFO 24 CH CH 25 ASPECT 26 R...

Страница 23: ...L VOL SLEEP 10 240 ASPECT 4 3 16 9 1 2 MUTE TV CH CH 0 9 P MODE S MODE INFO FREEZE FAV FAV FAV MTS TV Nicam SOURCE CH CH TV AV SCART YPBPR HDMI PC ENTER MENU TV CH CH ON OFF TEXT HOLD INDEX SIZE REVEA...

Страница 24: ...24 24 CANCEL CANCEL MIX 1 MENU 2 VOL 3 ENTER CH 4 CH 5 VOL CH 6 EXIT ENTER MENU EXIT ENTER PAL SECAM NTSC DK BG I ENTER...

Страница 25: ...25 25 FAV NTSC 10 240 USB...

Страница 26: ...26 4 3 16 9 1 2 USB PC c USB USB USB USB ENTER USB ENTER USB USB 2 0 FAT16 FAT32 NTFS 400 USB ASF AVI MKV MPG WMV9 DIVX H263 MPEG 4 MPEGII XVID WMA MP3 DD AC3 576x720 AVI AVI 2 USB 1 1 2 0 USB 500 USB...

Страница 27: ...27 27 USB USB BIN ENTER ENTER CANCEL ENTER CANCEL ENTER ENTER OK OK...

Страница 28: ...28 28 CANCEL INDEX REPEAT ROOT...

Страница 29: ...29 29 VGA...

Страница 30: ...30 30 1 1 2 1 3 1 4 1 5 7 6 1 7 1 8 1...

Страница 31: ...18 5 47 1366 x 768 16 9 20 PAL SECAM B G DK I NICAM 2 x 3 RCA VGA HDMI 3D 199 USB 1000 II 100 240 50 60 36 473 4 x 138 9 x 302 2 473 4 x 51 3 x 261 6 2 3 TF LED19S6_IM_01 31...

Отзывы: