


English
- 53 -
use the
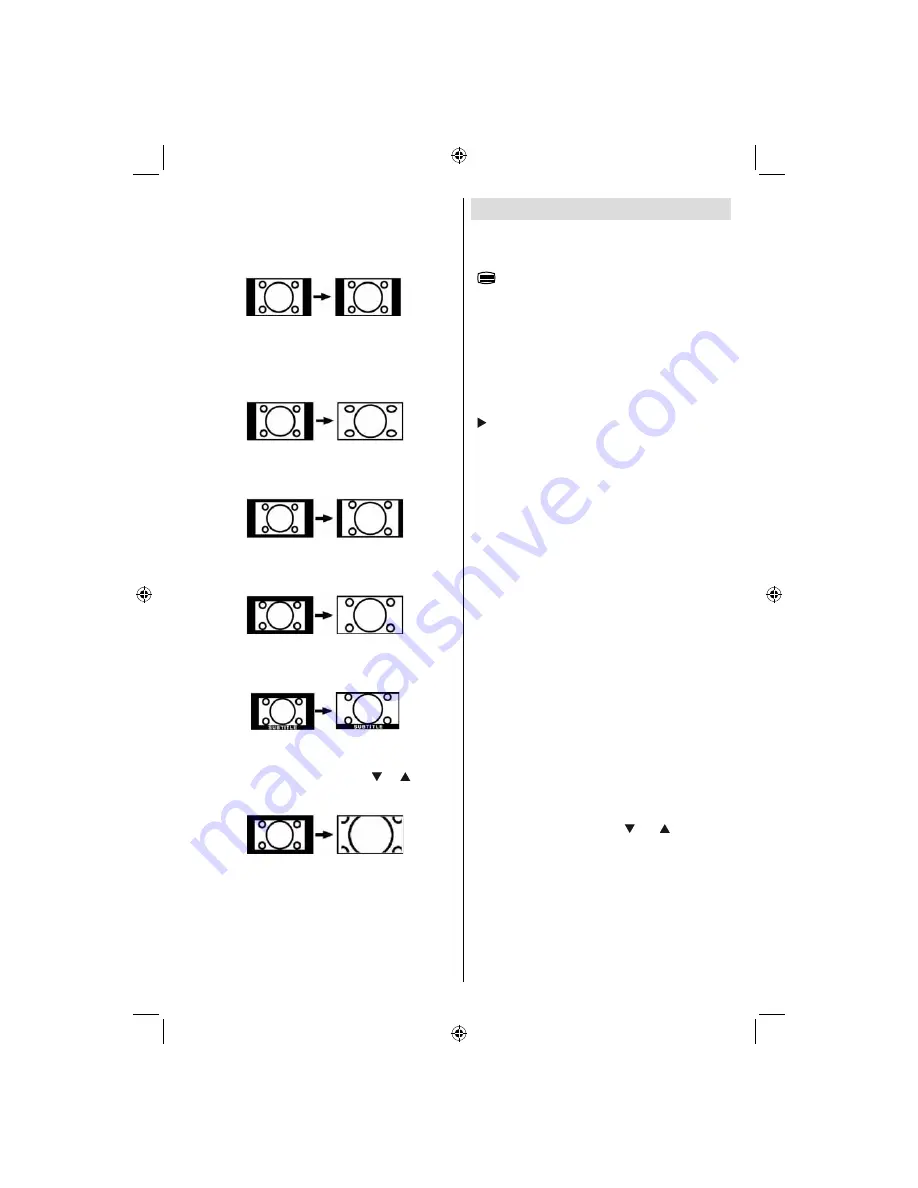
16:9
mode to restore the picture to its
original shape.
4:3
Use to view a normal picture (4:3 aspect ratio) as this
is its original size
.
Panoramic
This stretches the left and right sides of a normal
picture (4:3 aspect ratio) to fi ll the screen, without
making the picture appear unnatural.
The top and
bottom of the picture are slightly cut off.
14:9
This zooms up the wide picture (14:9 aspect ratio) to
the upper and lower limits of the screen.
Cinema
This zooms up the wide picture (16:9 aspect ratio) to
the full screen.
Subtitle
This zooms up the wide picture (16:9 aspect ratio)
with subtitles to the full screen.
Zoom
This option zooms to the picture.Note: You can shift
to screen up or down by pressing “
” / “
” buttons
while picture zoom is selected as panaromic, 14:9,
Cinema or Subtitle.
Teletext
Teletext system is available if your broadcaster
supports
Teletext function buttons are listed below:
“
” Teletext / Mix / PAT Mode
Activates teletext mode when pressed once.
Press again to place the teletext screen over the
programme (mix). Pressing this button again will
split the screen into two windows, one displaying the
teletext and the other displaying the current channel.
Pressing again will quit the teletext mode.
“RETURN” - Index
Selects the teletext index page.
“ ” Subcode Pages
Selects subcode pages if available when the teletext
is activated.
“INFO” - Reveal
Shows hidden information (e.g. solutions of games).
“SCREEN” - Expand
Press once to enlarge top half of the page, press again
to enlarge the bottom half of the page. Press again to
revert back to normal size.
P+ / P- and numbers (0-9)
Press to select a page.
Note : Most TV stations use code 100 for their index
pages.
Coloured Buttons
You can use coloured buttons in accordance with
the displayed functions. When
TOP text
system is
available, sections in a teletext page will become
colour-coded and can be selected by pressing the
coloured buttons. Press a coloured button that
corresponds to with your needs. The coloured writings
will appear, showing you which coloured buttons to
use when
FASTEXT
transmission is present.
Teletext Subtitle
If you press “
SUBTITLE
” button, teletext subtitle
information will be displayed on the bottom right part
of the screen (if available). You can set the desired
option by highlighting it using “
” or “
” button and
then by pressing OK button.
02_MB45M_[GB]_1810UK_IDTV_BRONZE14_26875W_10066977_50162051.indd 23
02_MB45M_[GB]_1810UK_IDTV_BRONZE14_26875W_10066977_50162051.indd 23
26.02.2010 19:33:29
26.02.2010 19:33:29


