background image

English

   - 31 -

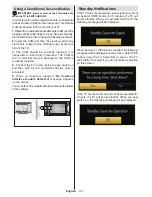
Installing the Batteries to the Remote

1.

 Lift the cover on the back of the remote upward 

gently.

2.

 Install two AAA batteries. Make sure to match the + 

and - ends of the batteries in the battery compartment 

(observe the correct polarity.

3.

 Replace the cover.

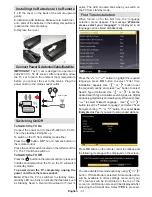
Connect Power & Antenna/Cable/Satellite

IMPORTANT:

 The TV set is designed to operate on 

220-240V AC, 50 Hz socket. After unpacking, allow 

the TV set to reach the ambient room temperature 

before you connect the set to the mains. Plug the 

power cable to the mains socket outlet.

SPDIF

VGA

13V dc /18V dc

3

00mAMax.

12V

Aerial or Cable

Satellite

DiSEqC

Switch


Switching On/Off

To Switch the TV On

Connect the power cord to the 220-240V AC, 50 Hz. 

Then the standby LED lights up.
To switch on the TV from standby mode either:
Press the “ ” button, 

CH ^/ v

 or a numeric button on 

the remote control.

Press the control switch located on the left side of the 

TV. The TV will then switch on.

To Switch the TV Off

Press the “ ” button on the remote control or press and 

hold the control switch on the TV, so the TV will switch 

to standby mode. 

To power down the TV completely, unplug the 

power cord from the mains socket.
Note:

 When the TV is switched to standby mode, 

standby LED can blink to indicate that features such 

as Standby Search, Over Air Download or Timer is 

active. The LED can also blink when you switch on 

the TV from standby mode.

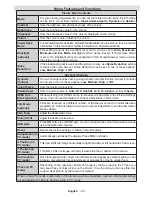
First Time Installation

When  turned  on  for  the  first  time,  the  “language 

selection” menu appears. The message “

Welcome 

please select your language!

” is displayed in all 

language options listed alphabetically. 

Press the “

” or “

” button to highlight the required 

language, press 

OK

 button to select. “First Time 

Installation” appears. Use “    ” or “   ” button to set 

the required country, and press “

” button to select 

Search Type (Optional). Use “   ” or “   ” to set the 

desired search type. Available search types are Digital 

and analog, digital only and analog only. When set, press 

” to select Teletext Language.   Use “   ” or “   ” 

button to set the “Teletext Language” and select “Scan 

Encrypted” using “

” or “

” button. You can set 

Scan 

Encrypted 

as 

Yes

 if you want to scan coded stations. 

Press 

OK

 button on the remote control to continue and 

the following message will be displayed on the screen.

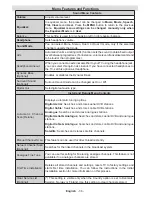
You can activate Store mode option by using “   ” or “   ” 

button. If Store Mode is selected, Store mode option 

will be available in other settings menu and your 

TV’s features will be illustrated on the top of the 

screen.A confirmation screen will be displayed after 

selecting the Store Mode. Select 

YES 

to proceed. 

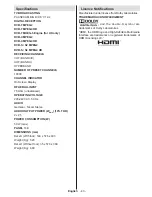
Содержание T22K970

Страница 1: ...LCD TV BEDIENUNGSANLEITUNG INSTRUCTION MANUAL MODE D EMPLOI T24K970LED CTS2 R ...

Страница 2: ...ng und oder Kenntnisse unbeaufsichtigt elektrische Gerät benutzen Kinder können Gefahren nicht richtig erkennen Das Verschlucken von Batterien kann tödlich sein Bewahren Sie Batterien stets außer Reichweite von Kindern auf Wenn eine Batterie verschluckt wurde sofort einen Arzt aufsuchen Bewahren Sie die Verpackung z B Folien außer Reichweite von Kindern auf Es besteht Erstickungsgefahr Stromquelle...

Страница 3: ...ine niemals Regen oder Wasser aus da dies gefährlich sein kann Stellen Sie keine mit Flüssigkeit gefüllten Behälter wie z B Blumenvasen auf das Gerät Meiden Sie Tropf und Spritzwasser Sollte ein harter Gegenstand auf das Gerät fallen oder Flüssigkeit in das Gerät eindringen müssen Sie das Gerät ausstecken und durch eine qualifizierte Fachkraft überprüfen lassen bevor es wieder betrieben werden kan...

Страница 4: ...Energieverbrauch zu senken empfehlen wir aber den Energiesparmodus zu verwenden Wir empfehlen daher auch das TV Gerät vom Netz trennen um Energie zu sparen wenn Sie es nicht verwenden Bitte helfen Sie uns die Umwelt zu schonen indem Sie wie folgt vorgehen Reparaturinformationen Überlassen Sie alle Wartungsarbeiten dem qualifizierten Kundendienstpersonal Das TV Gerät darf nur von qualifizierten Per...

Страница 5: ...die gespeicherten Kanäle durch Drücken der Taste nach oben oder unten TV ausschalten Drücken Sie die Mitte der Taste nach unten und halten Sie sie für ein paar Sekunden der Fernseher wird in den Standby Modus versetzt HINWEIS Sie können den Schalter nach oben oder unten bewegen um die Lautstärke zu ändern Wenn Sie den Kanal wechseln wollen drücken Sie einmal auf die Mitte des Schalters Position 3 ...

Страница 6: ...15 Keine Funktion 16 Pause im Medienbrowser Modus 17 Schneller Rücklauf im Medienbrowser Modus 18 Wiedergabe im Medienbrowser Modus 19 Taste Rot 20 Taste Grün 21 Auswahl Bildmodus 22 Keine Funktion 23 Teletex Mix im TXT Modus 24 Untertitel ein aus bei DVB Kanälen 25 Vorhergehendes Programm 26 AV Quelle 27 Menü Ein Aus 28 OK Bestätigen Halten im TXT Modus Kanalliste bearbeiten 29 Return Verlassen I...

Страница 7: ...dass Sie vor der Montage an der Wand alle Ihre Kabel an die Rückseite des Fernsehers anschließen Sie dürfen nur dann das CI Modul einsetzen oder herausnehmen wenn das TV Gerät ABGESCHALTET ist Weitere Informationen über die Einstellungen finden Sie in der Bedienungsanleitung des Moduls Stecken Sie das CAM Modul und die SmartCard in den Steckplatz der sich im Anschlussfach auf der Rückseite des TV ...

Страница 8: ... Gerät wieder an die Stromversorgung an schalten Sie ein und warten Sie einen Moment bis die Karte aktiviert wurde 5 Wenn kein Modul eingesetzt ist erscheint der Hinweis Es konnte kein Common Interface Modul gefunden werden Weitere Informationen über die Einstellungen finden Sie in der Bedienungsanleitung des Moduls CAM module Standby Meldungen Wenn das Fernsehgerät für 5 Minuten kein Eingangssign...

Страница 9: ...ziehen Sie den Netzstecker aus der Steckdose Hinweis Wenn das TV Gerät in den Standby Modus geschaltet wird kann die LED blinken um anzuzeigen dass bestimmte Funktionen wie die Standby Suche Download über Antenne oder ein Timer aktiv sind Die LED kann auch blinken wenn Sie das TV Gerät aus dem Standby Modus einschalten Erste Installation Nach dem Einschalten zum ersten Mal erscheint das Sprachausw...

Страница 10: ...en terrestrischen TV Sendern HINWEIS Sie können die Taste MENU drücken um abzubrechen Wenn alle Kanäle gespeichert sind wird die Kanalliste auf dem Bildschirm angezeigt Wenn Sie die Kanäle nach LCN sortieren wollen wählen Sie Ja und drücken Sie dann OK Drücken Sie die Taste OK um die Kanalliste zu schließen und fernzusehen LCN ist das logische Kanalnummer System welches verfügbare Sender laut eine...

Страница 11: ...en Sie eine USB Festplatte oder einen USB Speicherstick an das TV Gerät anschließen Mit dieser Funktion können Sie auf einem USB Laufwerk gespeicherte Dateien wiedergeben Es werden 2 5 und 3 5 Laufwerke Festplatten mit eigener Stromversorgung unterstützt WICHTIG Machen Sie gegebenenfalls Kopien von Ihren Dateien bevor Sie ein Gerät an das TV Gerät anschließen um mögliche Datenverluste zu vermeiden...

Страница 12: ...er Kanallistenoptionen diese Kanalliste bearbeiten Favoriten festlegen oder aktive Sender festlegen Drücken Sie die Taste MENU um in das Hauptmenü zu gelangen Wählen Sie die Option Kanalliste mit den Tasten Links oder Rechts aus Drücken Sie OK um den Menüinhalt anzuzeigen Wählen Sie Kanalliste bearbeiten um alle gespeicherten Kanäle zu verwalten Wählen Sie mit den Tasten Auf oder Ab und OK die Opt...

Страница 13: ...Bildzoom Stellt die Bildgröße auf Auto 16 9 Untertitel 14 9 14 9 Zoom 4 3 oder Kino H D M I Tr u e B l a c k optional Wenn Sie von der HDMI Quelle aus fernseh schauen ist diese Funktion im Bild Einstellungs Menü verfügbar Sie können diese Funktion verwenden um das Schwarz der Bilder zu verstärken Filmmodus optional Filme werden mit einer anderen Zahl von Einzelbildern pro Sekunde aufgenommen als n...

Страница 14: ...tiviert den Dynamic Bass Surround Sound optional Der Surround Modus kann auf Ein oder Aus gestellt werden Digitaler Ausgang Stellt den Audiotyp für den Digitalausgang ein Installieren und Neueinstellung des Menü Inhalts Automatic Channel Scan Retune Zeigt die Optionen für die automatische Kanalsuche an Digital Antenne Sucht und speichert DVB Sender von der Antenne Digitalkabel Sucht und speichert ...

Страница 15: ...endung dann nach den Benutzereinstellungen und schließlich nach der Zeitinformation vom Videotext Quellen Aktiviert oder deaktiviert die gewünschten Quellenoptionen Satelliteneinstellungen Legt die Satelliteneinstellungen fest Andere Einstellungen Zeigt weitere Einstellungsoptionen für das TV Gerät an Menü Zeitlimit Ändert die Anzeigezeit für den Menübildschirm Verschlüsselte Kanäle suchen Wenn di...

Страница 16: ...hen Shop Modus Wenn Sie das TV Gerät in einem Geschäft anzeigen können Sie diesen Modus aktivieren Während Shop Modus aktiviert ist können einige Artikel im TV Menü nicht eingestellt werden Power Up Modus Diese Einstellung konfiguriert die Auswahl des Einschalt Modus Immer Ein Das TV Gerät schaltet sich immer ein wenn die Haupt Ein Aus Taste gedrückt wird Standby Standby Wenn das TV Gerät in den S...

Страница 17: ...ine Seite an Um die Haltefunktion aufzuheben nochmals diese Taste drücken Unterseiten Wählt Unterseiten aus sofern verfügbar wenn der Teletext aktiv ist CH CH und Ziffern 0 9 Zum Auswählen einer Seite drücken Hinweis Die meisten TV Sender verwenden die Seitennummer 100 für die Indexseite Ihr TV Gerät unterstützt die Systeme FASTEXT und TOP text Wenn diese Systeme verfügbar sind werden die Seiten i...

Страница 18: ... das TV Gerät die letzten Initialisierung durch Dabei wird das Panel abgeschaltet und die Front LED zeigt die Aktivität durch Blinken an Nach etwa 5 Minuten schaltet sich das Gerät selbstständig mit der neu aktivierten Softwareversion ein Wenn das TV Gerät nach 10 Minuten noch immer nicht gestartet hat ziehen Sie den Netzstecker warten Sie 10 Minuten und stecken Sie ihn wieder ein Das TV Gerät sol...

Страница 19: ...hr TV Gerät kein Signal empfängt Haben Sie die richtigen Tasten auf der Fernbedienung betätigt Versuchen Sie es noch einmal Stellen Sie auch sicher dass die richtige Eingangsquelle ausgewählt ist 2 Ist die Antenne richtig angeschlossen 3 Sind die Stecker fest mit der Antennenbuchse verbunden 4 Ist das Antennenkabel beschädigt 5 Wurden geeignete Stecker verwendet um die Antenne anzuschließen 6 Wenn...

Страница 20: ...00 60Hz 11 800x600 70Hz 12 800x600 72Hz 13 800x600 75Hz 14 800x600 85Hz 15 832x624 75Hz 16 1024x768 60Hz 17 1024x768 66Hz 18 1024x768 70Hz 19 1024x768 72Hz 20 1024x768 75Hz 21 1024x768 85Hz 22 1152x864 60Hz 23 1152x864 70Hz 24 1152x864 75Hz 25 1152x864 85Hz 26 1152x870 75Hz 27 1280x768 60Hz 28 1360x768 60Hz 29 1280x768 75Hz 30 1280x768 85Hz 31 1280x960 60Hz 32 1280x960 75Hz 33 1280x960 85Hz 34 128...

Страница 21: ...ETRIEBSSPANNUNG 220 240V AC 50 Hz AUDIO Deutsch Nicam Stereo AUDIO AUSGANGSLEISTUNG WRMS 10 THD 2 x 2 5 LEISTUNGSAUFNAHME W 50W max PANEL 16 9 ABMESSUNGEN mm Breite x Höhe x Tiefe Mit Standfuß 576 x 403 x 149 Gewicht Kg 5 20 Breite x Höhe x Tiefe Ohne Standfuß 576x 368 x 35 Gewicht kg 4 80 Lizenzinformationen Hergestellt unter Lizenz der Dolby Laboratories INHABER DER MARKENZEICHEN und das Doppel ...

Страница 22: ... mp4 mov MPEG1 2 Layer 3 AAC HEAAC AC3 EAC3 LPCM ADPCM H 264 1080Px2 25fps1080P 50fps Andere 1080P 30fps 50Mbit Sek avi MPEG1 2 4 Xvid H 264 VC1 WMV3 Sorenson H 263 Motion JPEG MPEG1 2 Layer 1 2 3 AAC HEAAC AC3 EAC3 LPCM ADPCM WMA H 264 1080Px2 25fps 1080P 50fps Andere 1080P 30fps 50Mbit Sek flv H 264 Sorenson H 263 MPEG1 2 Layer 3 AAC HEAAC LPCM ADPCM H 264 1080Px2 25fps 1080P 50fps Andere 1080P ...

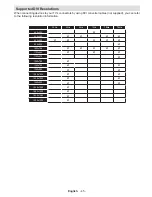
Страница 23: ...äts anschließen können Sie sich an die folgenden Auflösungsinformationen halten 56Hz 60Hz 66Hz 70Hz 72Hz 75Hz 640x400 þ 640x480 þ þ þ þ 800x600 þ þ þ þ þ 832x624 þ 1024x768 þ þ þ þ þ 1152x864 þ þ þ 1152x870 þ 1280x768 þ 1360x768 þ þ 1280x960 þ þ 1280x1024 þ þ 1400x1050 þ þ 1440x900 þ þ 1600x1200 þ 1680x1050 þ 1920x1080 þ 1920x1200 þ ...

Страница 24: ...deosignal setzt sich aus den Farbunterschieden und einem Luminanzsignal zusammen HDMI High Definition Multimedia Interface DieserAnschluss liefert ein unkomprimiertes digitales Video und Audiosignal hoher Qualität Dabei werden Audio und Videosignale über einen einzigen Anschluss ausgegeben NTSC Der in den USA verwendete Standard für Zeilen TV Signale der auch in einigen anderen Ländern verwendet w...

Страница 25: ...tteries always out of reach of small children If a battery is swallowed immediately seek medical attention Keep the packaging films out of reach of children Risk of suffocation Power source The TV should be operated only from a 220 240 V AC 50 Hz outlet Warning Do not leave your TV in standby or operating mode when you leave your house Positioning the TV For ventilation please leave a clear space ...

Страница 26: ...th liquids such as flower vases on top of the TV Avoid from dripping or splashing If any solid object or liquid falls into the cabinet unplug the TV and have it checked by qualified personnel before operating it any further Ventilation The slots and openings on the TV set are intended for ventilation and to ensure reliable operation To prevent overheating these openings must not be blocked or cove...

Страница 27: ...etting located in the Picture Settings menu If you set Power Save Mode as Eco the TV will switch to energy saving mode and luminance level of TV set will be decreased to optimum level Note that some picture settings will be unavailable to be changed when the TV is in Power Save Mode If Picture Off is selected Screen will be off in 15 seconds message will be displayed on the screen Select PROCEED a...

Страница 28: ...the button twice the source list will appear on screen Scroll through the available sources by pushing the button up or down To turn the TV off Press the middle of the button down and hold it down for a few seconds the TV will turn into standby mode NOTE You can move the switch upward or downward to change the volume If you want to change the channel press the middle of the switch once Position 3 ...

Страница 29: ...16 Pause in Media Browser mode 17 Rapid reverse in Media Browser mode 18 Play in Media Browser mode 19 Red button 20 Green button 21 Picture mode selecion 22 No function 23 Teletext Mix in TXT mode 24 Subtitle on off in DVB channels 25 Previous programme 26 AV Source selection 27 Menu on off 28 Okay Confirm Hold in TXT mode Channel List 29 Exit Return Index page in TXT mode 30 No function 31 Info ...

Страница 30: ...ting kit optional we recommend that you plug all your cables into the back of the TV before mounting on the wall Insert or remove the CI module only when the TV is SWITCHED OFF You should refer to the module instruction manual for details of the settings Insert the CAM and then the viewing card to the slot that is located in the terminal cover at the rear side of the TV The module should be correc...

Страница 31: ...rcefully inserted 4 Connect the TV to the mains supply switch on and then wait for few moments until the card is activated 5 When no module is inserted No Common Interface module detected message appears on the screen You can refer to the module instruction manual for details of the settings CAM module Standby Notifications If the TV does not receive any input signal e g From an aerial or HDMI sou...

Страница 32: ...et Note When the TV is switched to standby mode standby LED can blink to indicate that features such as Standby Search Over Air Download or Timer is active The LED can also blink when you switch on the TV from standby mode First Time Installation When turned on for the first time the language selection menu appears The message Welcome please select your language is displayed in all language option...

Страница 33: ...Cable Installation If you select CABLE option and press OK button on the remote control to continue the following message will be displayed on the screen To continue please select YES and press OK To cancel operation select NO and press OK You can select frequency ranges from this screen For highlighting lines you see use or button You can enter the frequency range manually by using the numeric bu...

Страница 34: ...e problems with the formatting process Quickly plugging and unplugging USB devices is a very hazardous operation Do not repeatedly quickly plug and unplug the drive This may cause physical damage to the USB player and USB device itself Do not pull out USB module while playing a file Media Browser Menu You can play photo music and movie files stored on a USB disk by connecting it to your TV and usi...

Страница 35: ...Down and OK buttons to select Edit Channel List Press Up or Down button to select the channel that will be processed Press Left or Right button to select a function on Channel List menu Use P P buttons to move page up or down Press MENU button to exit Sorting Channel List You can select broadcasts to be listed in the channel list To display specific types of broadcast you should use Active channel...

Страница 36: ...ze to Auto 16 9 Subtitle 14 9 14 9 Zoom 4 3 or Cinema HDMI True Black optional While watching from HDMI source this feature will be visible in the Picture Settings menu You can use this feature to enhance blackness in the picture Film Mode optional Films are recorded at a different number of frames per second to normal television programmes Turn this feature on when you are watching films to see t...

Страница 37: ...mode can be changed as On or Off Digital Out Sets digital out audio type Install and Retune Menu Contents Automatic Channel Scan Retune Displays automatic tuning options Digital Aerial Searches and stores aerial DVB stations Digital Cable Searches and stores cable DVB stations Analogue Searches and stores analogue stations Digital Aerial Analogue Searches and stores aerial DVB and analogue station...

Страница 38: ...search process will locate the encrypted channels as well If it is set as Off encrypted channels will not be located in automatic search or manual search Blue Background Activates or deactivates blue background system when the signal is weak or absent Software Upgrade To ensure that your TV always has the most update information you can use this setting In order for the proper operation please ens...

Страница 39: ...gures the power up mode preference Always On The TV always switches on when main on off button is pressed Standby The TV always powers up in Standby mode Last State The TV always switches on with the last selected channel source Biss Key Biss is a satellite signal scrambling system that is used for some broadcasts If you need to enter BISS key on a broadcast you can use Biss Key setting located in...

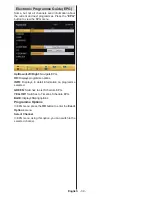
Страница 40: ...ight Navigate EPG OK Displays programme options INFO Displays in detail information on programme selected GREEN Switches to List Schedule EPG YELLOW Switches to Timeline Schedule EPG BLUE displays filtering options Programme Options In EPG menu press the OK button to enter the Event Options menu Select Channel In EPG menu using this option you can switch to the selected channel ...

Страница 41: ...in the first place You will be able to upload current services and related satellites transponders in TV to a USB device In addition to the uploading feature you will be able to download one of the satcodx files stored in USB device to the TV When you select one of these satcodx files all services and related satellites and transponders in the selected file will be stored in TV If there are any in...

Страница 42: ...Check if you have entered the correct frequency 5 Please retune the channels 6 The picture quality may degrade when two devices are connected to the TV at the same time In such a case disconnect one of the devices No picture 1 No Picture means that your TV is not receiving a transmission Have you selected the correct button on the remote control Try once more Also make sure the correct input sourc...

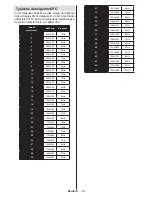
Страница 43: ...z 12 800x600 72Hz 13 800x600 75Hz 14 800x600 85Hz 15 832x624 75Hz 16 1024x768 60Hz 17 1024x768 66Hz 18 1024x768 70Hz 19 1024x768 72Hz 20 1024x768 75Hz 21 1024x768 85Hz 22 1152x864 60Hz 23 1152x864 70Hz 24 1152x864 75Hz 25 1152x864 85Hz 26 1152x870 75Hz 27 1280x768 60Hz 28 1360x768 60Hz 29 1280x768 75Hz 30 1280x768 85Hz 31 1280x960 60Hz 32 1280x960 75Hz 33 1280x960 85Hz 34 1280x1024 60Hz 35 1280x10...

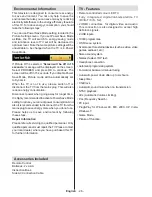
Страница 44: ...75 Ohm unbalanced OPERATING VOLTAGE 220 240V AC 50 Hz AUDIO German Nicam Stereo AUDIO OUTPUT POWER WRMS 10 THD 2 x2 5 POWER CONSUMPTION W 50 W max PANEL 16 9 DIMENSIONS mm DxLxH With foot 149 x 576 x 403 Weight Kg 5 20 DxLxH Without foot 35 x 576 x 368 Weight Kg 4 80 Licence Notifications Manufactured under license from Dolby Laboratories TRADEMARK ACKNOWLEDGMENT and the double D symbol are tradem...

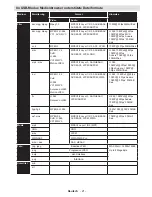
Страница 45: ...mov MPEG1 2 Layer 3 AAC HEAAC AC3 EAC3 LPCM ADPCM H 264 1080Px2 25fps 1080P 50fps Other 1080P 30fps 50Mbit sec avi MPEG1 2 4 Xvid H 264 VC1 WMV3 Sorenson H 263 Motion JPEG MPEG1 2 Layer 1 2 3 AAC HEAAC AC3 EAC3 LPCM ADPCM WMA H 264 1080Px2 25fps 1080P 50fps Other 1080P 30fps 50Mbit sec flv H 264 Sorenson H 263 MPEG1 2 Layer 3 AAC HEAAC LPCM ADPCM H 264 1080Px2 25fps 1080P 50fps Other 1080P 30fps 5...

Страница 46: ...t supplied you can refer to the following resolution information 56Hz 60Hz 66Hz 70Hz 72Hz 75Hz 640x400 þ 640x480 þ þ þ þ 800x600 þ þ þ þ þ 832x624 þ 1024x768 þ þ þ þ þ 1152x864 þ þ þ 1152x870 þ 1280x768 þ 1360x768 þ þ 1280x960 þ þ 1280x1024 þ þ 1400x1050 þ þ 1440x900 þ þ 1600x1200 þ 1680x1050 þ 1920x1080 þ 1920x1200 þ ...

Страница 47: ...nts peuvent ne pas être conscient du risque qu ils encourent Les piles peuvent s avérer dangereuses si elles sont avalées Toujours tenir les piles hors de portée des enfants Consultez immédiatement un médecin au cas où une personne avale une pile Tenir les films d emballage hors de portée des enfants Risque de suffocation Source D alimentation Ce téléviseur ne doit être raccordé qu à une prise de ...

Страница 48: ...r par un personnel qualifié avant de continuer à l utiliser Ventilation Les fentes et les orifices du téléviseur sont prévus pour la ventilation et pour assurer un fonctionnement fiable Pour éviter la surchauffe ces orifices ne doivent pas être obstrués ni couverts de quelque façon que ce soit Une source de chaleur et flammes N exposez pas le téléviseur directement à la lumière solaire ou à des so...

Страница 49: ... éteignera dans 15 secondes s affichera à l écran Sélectionnez l option POURSUIVRE et appuyez sur OK pour continuer L écran sera désactivé dans 15 secondes Si vous désactiver le mode Économie d énergie le mode d affichage sera automatiquement défini sur Dynamique Veuillez mettre le téléviseur hors tension et le débrancher du secteur lorsque vous ne vous en servez pas Cette bonne pratique vous perm...

Страница 50: ...tre à l écran la liste de sources Parcourrez les sources disponibles en appuyant sur le bouton Haut ou Bas Pour éteindre le téléviseur Appuyez au milieu du bouton Bas et maintenez le enfoncé pendant quelques secondes jusqu à ce que le téléviseur passe en mode Veille REMARQUE Vous pouvez déplacer le contacteur vers le haut ou vers le bas pour modifier le volume Si vous souhaitez changer de chaîne a...

Страница 51: ...mode vidéo du Navigateur média 17 Retour rapide en mode vidéo du Navigateur média 18 Lecture en mode vidéo du Navigateur média 19 Touche rouge 20 Touche verte 21 Sélection du mode image 22 Aucune fonction 23 Télétexte Mélanger en mode texte 24 Sous titre Activé Désactivé dans les chaînes DVB 25 Programme précédent 26 AV Sélection de la Source 27 Menu Marche Arrêt 28 Ok Confirmer Retenir en mode TX...

Страница 52: ...tilisez le kit de montage en option mural fourni Il est recommandé de brancher tous vos câbles à l arrière du téléviseur avant tout montage mural Insérez ou effacez le module CI uniquement lorsque le téléviseur est ETEINT Consultez le manuel d instructions du module pour plus d informations sur les réglages Insérez le module CAM puis la carte dans la fente située dans le couvercle du terminal à l ...

Страница 53: ... le premier est inséré avec une certaine pression 4 Branchez le téléviseur à la prise de courant allumez la et attendez un moment jusqu à ce que la carte soit activée 5 Lorsqu aucun module n est inséré le message Aucun module d interface commun détecté apparaît à l écran Consultez le manuel d utilisation du module pour les détails relatifs aux réglages CAM module Notifications de veille Lorsque le...

Страница 54: ...ssera ainsi en mode veille Pour éteindre complètement le téléviseur débranchez le cordon d alimentation de la prise secteur Remarque Lorsque le téléviseur est en mode de veille le voyant lumineux du mode veille clignote pour signifier que des options comme Recherche en mode veille téléchargement automatique ou Minuterie sont actives La LED peut également clignoter lorsque vous allumez le téléviseu...

Страница 55: ...UE Vous pouvez appuyer sur la touche MENU pour annuler Une fois toutes les stations disponibles enregistrées la liste des chaînes s affichera à l écran Si les chaînes retrouvées vous intéressent en fonction du LCN veuillez sélectionner Oui puis appuyez sur OK Appuyez sur le bouton OK pour quitter la liste des chaînes et regarder la télé LCN Système de numéro de chaîne logique qui organise les diff...

Страница 56: ...ernes de 2 5 et 3 5 pouces hdd avec alimentation externe sont pris en charge IMPORTANT Vous devez sauvegarder vos fichiers avant d effectuer tout branchement au téléviseur afin d éviter de probables pertes de données Veuillez remarquer que la responsabilité du fabricant ne saurait être engagée en cas de dommage de fichier ou de perte de données Il est possible que certains types de périphériques U...

Страница 57: ...liste de chaînes configurer les favoris ou les stations actives à inclure dans la liste en utilisant les options Liste de chaînes Pressez le bouton MENU pour afficher le menu Principal Sélectionnez la rubrique Liste des chaînes en utilisant le bouton Gauche ou Droite Appuyez sur OK pour afficher le contenu du menu Sélectionnez l option Modifier la liste des chaînes pour gérer toutes les chaînes mé...

Страница 58: ...option défini la taille de l image sur Auto 16 9 Sous titre 14 9 14 9 Zoom 4 3 ou Cinéma HDMI True Black en option Lorsque vous regardez le téléviseur à partir de la source HDMI cette option est visible dans le menu Paramètres de l image Vous pouvez utiliser cette option pour renforcer la noirceur de l image Mode Film en option Les films sont enregistrés à un nombre d images par seconde différent ...

Страница 59: ...ver le mode Son Surround Sortie Digitale Règle le type de sortie audio numérique Installation et Réglage Le Contenu du Menu Balayage de chaîne automatique Nouveau réglage Affiche les options de réglage automatique Antenne numérique Recherche et enregistre les chaînes DVB Câble numérique Recherche et enregistre les chaînes câblées DVB Analogique Recherche et mémorise les stations analogiques Antenn...

Страница 60: ...isera également les chaînes cryptées Si le réglage est paramétré sur Désactivé les chaînes cryptées ne seront pas localisées en recherche automatique ou manuelle Fond bleu Active ou désactive le système du fond bleu quand le signal est faible ou absent Mise à jour du logiciel Pour vous assurer que votre téléviseur dispose en permanence des dernières informations de mise à niveau vous pouvez utilis...

Страница 61: ...e de mise sous tension Toujours activé le téléviseur s allume toujours lorsque vous appuyez sur le bouton principal marche arrêt Veille le téléviseur s allume toujours en mode veille Dernier état le téléviseur s allume toujours sur la dernière chaîne source sélectionnée Clé Biss Le Biss est un système de codage de signal par satellite utilisé pour certaines émissions Si vous voulez activer la clé ...

Страница 62: ...Affiche les options de répétition INFO Affiche des informations détaillées sur le programme sélectionné VERT Permet de passer à la Liste des Programmes du menu EPG JAUNE Permet de passer à la Chronologie des Programmes du menu EPG BLEU Affiche les options de filtre Options du programme Dans le menu EPG appuyez sur la touche OK pour accéder au menu Options de l événement Sélectionner une chaîne Dan...

Страница 63: ...outon L information du télétexte numérique apparaît Utilisez les touches colorées les touches du curseur et la touche OK La méthode de fonctionnement peut différer selon le contenu du télétexte numérique Suivre les instructions affichées à l écran télétexte numérique Quand le bouton TXT est pressé encore la TV revient à la diffusion télévisée en utilisant Feature SatcoDX SatcoDX en option Vous pou...

Страница 64: ...limentation se ferme et le LED avant le signale par un clignotement Environ 5 minutes plus tard le téléviseur redémarre avec un nouveau logiciel activé Si celui ci ne démarre pas après 10 minutes débranchez le patientez 10 autres minutes puis branches à nouveau Il devrait s ouvrir en toute sécurité doté d un nouveau logiciel Si le téléviseur ne se remet toujours pas en marche veuillez encore débra...

Страница 65: ...ous avez essayé de brancher un appareil Informations applicables aux utilisateurs concernant la mise au rebut de l ancien appareil et des piles Seulement Union européenne Ce symbole indique que l équipement ne doit pas être éliminé comme un déchet domestique Si vous devez éliminer le poste ou les piles veuillez considérer les systèmes ou infrastructures de collecte pour un recyclage approprié Rema...

Страница 66: ...HYPERBANDE NOMBRE DE CANAUX PRÉRÉGLÉS 10000 INDICATEUR DE CHAÎNE Affichage à l écran ENTRÉE D ANTENNE RF 75 Ohms Non équilibré TENSION DE FONCTIONNEMENT 220 240V AC 50 Hz AUDIO German Nicam Stéréo APUISSANCE DE SORTIE WRMS 10 THD 2 x2 5 CONSOMMATION ÉLECTRIQUE W 50 W max PANNEAU 16 9 DIMENSIONS mm PxLxH Avec pied 149 x 576 x 403 Poids Kg 5 20 PxLxH Sans pied 35 x 576 x 368 Poids Kg 4 80 Notificati...

Страница 67: ...mov MPEG1 2 Layer 1 2 3 AAC HEAAC AC3 EAC3 LPCM ADPCM H 264 1080Px2 25fps1080P 50fps Autres 1080P 30fps 50Mbit sec avi MPEG1 2 4 Xvid H 264 VC1 WMV3 Sorenson H 263 Motion JPEG MPEG1 2 Layer 1 2 3 AAC HEAAC AC3 EAC3 LPCM ADPCM H 264 1080Px2 25fps 1080P 50fps Other 1080P 30fps 50Mbit sec flv H 264 Sorenson H 263 MPEG1 2 Layer 1 2 3 AAC HEAAC AC3 EAC3 LPCM ADPCM H 264 1080Px2 25fps 1080P 50fps Other ...

Страница 68: ...ecteurs à votre téléviseur à l aide des câbles DVI non fournis 56Hz 60Hz 66Hz 70Hz 72Hz 75Hz 640x400 þ 640x480 þ þ þ þ 800x600 þ þ þ þ þ 832x624 þ 1024x768 þ þ þ þ þ 1152x864 þ þ þ 1152x870 þ 1280x768 þ 1360x768 þ þ 1280x960 þ þ 1280x1024 þ þ 1400x1050 þ þ 1440x900 þ þ 1600x1200 þ 1680x1050 þ 1920x1080 þ 1920x1200 þ ...

Страница 69: ...GmbH Vertrieb Vestel Germany GmbH D 85748 Garching bei München 1 Die Marke TELEFUNKEN ist eine eingetragene Marke der TELEFUNKEN Licenses GmbH 1 TELEFUNKEN licensed by TELEFUNKEN Licenses GmbH Imported by Vestel Germany GmbH D 85748 Garching Munich ...

Отзывы: