background image

17

CHAP. 4   Operation

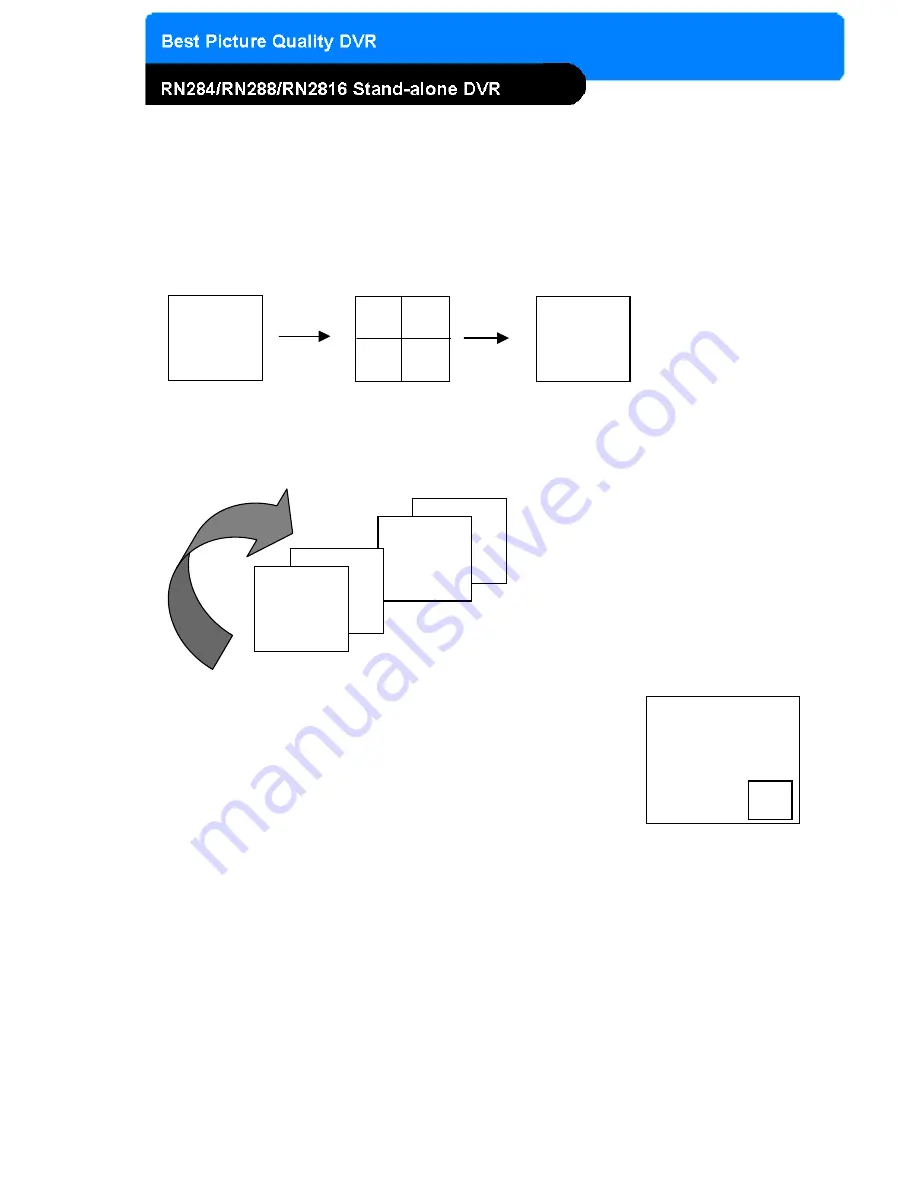
3) Picture in Picture(PIP View)

When it is in full screen display mode, you can see other camera in a small 
window by pressingping [PIP].The other camera in small window is rotating 
in sequence to next number of camera and you can set the rotating time 
interval as per the procedure in SYSTEM MENU-CONFIGURATION-
INTERVAL SETUP.

CAM-01

4) Freeze View

Full display mode : If you press the [FREEZE] button, the “F” character will be shown beside  

camera title, and live image will be frozen.

Split display mode : If you press the [FREEZE] button, press the channel button which you                

want to freeze.To release frozen image, press channel number of frozen 
image again and press [FREEZE] button to exit FRZ mode.

5) Zoom View

In full screen, press the [ZOOM] button and move the Selection Frame using direction keys to the 
area which you want to enlarge. And then press the [ENTER] button for 2-times enlarged picture.
To exit Zoom mode, just press [ZOOM] button again.

CH16

1) Full / Multiple View

Switch to multi-screen display by pressing [MODE]. For full image display, just press the channel button
which you want or [MODE] button again.

2) View in Sequence

Press [SEQ] button. It automatically displays full screen images in sequence.

4-5. Live View Setup

Full screen

Multi-screen

CH15

CH02

CH01

Full screen

[MODE]

[MODE] or Channel button

2

Содержание RN2816

Страница 1: ...Installation Safeguards User Manual TeleEye RN284 RN288 RN2816 Digital Video Recorder Before attempting to connect or operate this product please read this manual carefully and keep it for future use...

Страница 2: ...countries All other trademarks are the property of their respective owners Copyright c 2005 Signal Communications Limited A Member of TeleEye Group All rights reserved Version 1 0 Limits of Liability...

Страница 3: ...HDD Please follow these steps in order Before installing a second HDD ensure that the drive conforms to the specifications listed on the specifications page at the end of this manual When installing a...

Страница 4: ...17 Live View Setup 4 5 19 Search 4 8 15 Operation CHAP 4 14 RS 232C ASCII code 8 14 Connector Pin Assignment 7 13 Other External Device 6 13 VCR Video Printer 5 12 Power 4 12 Monitor 3 12 Camera 2 11...

Страница 5: ...Language Setup 5 8 32 FACTORY Default 5 7 31 Pan Tilt Zoom Setup 3 29 Holiday Setup 3 29 Schedule Setup 2 28 Record Configuration 1 28 Record Setup 5 4 27 Password Setup 7 27 Buzzer Setup 6 26 Alarm...

Страница 6: ...compression algorithm No mosaic effect Suitable for recording not only images but also text Various steps in Forward Playback Speed X1 16 X1 8 X1 4 X1 2 X2 X4 X16 X32 X64 Various steps in Backward Pla...

Страница 7: ...attaching Hard Disk Drive into DVR 8 Bolts Battery for remote controller 7 Battery Remote Viewer Software Back up CD player 6 Software CD User s Manual 5 User s Manual 12 V DC power supply to DVR mai...

Страница 8: ...O GOTO PRESET CLEAR CLEAR PRESET SET SET PRESET ENTER MENU SETUP SEARCH PLAY NEXT STOP REC Record Playback TELE ZOOM OUT WIDE ZOOM IN FAR FOCUS FAR NEAR FOCUS NEAR CLOSE IRIS CLOSE OPEN IRIS OPEN OFF...

Страница 9: ...e Jog or Shuttle Pressing Jog Shuttle button Ready for use Jog Shuttle In playback mode pressing J SHUTTLE button make images frozen Lock the key function Auto camera image sequencing in full screen m...

Страница 10: ...9 CHAP 2 Function of Each Button 2 2 REAR 4 Channel 8 Channel 16 Channel...

Страница 11: ...ternal device using RS 485 interface Pin 1 D Pin 2 D RS 485 POWER SWITCH DC Power VCR Output Power ON OFF DC power input DC12V 10A Not available in this version Connection with Composite Monitor Camer...

Страница 12: ...setting of HDD1 should be on Master and HDD2 should be on Slave if you install two HDDs Refer to the above figure 4 Stick the HDD absorber included in package on the bottom of case and then install th...

Страница 13: ...a input on rear panel of DVR marked CAMERA IN Connect the video output marked MONITOR to Video In of Main monitor 4 Power Insert the ADAPTER to the rear power socket of DVR ADAPTER specification Input...

Страница 14: ...SIREN PAN TILT CAMERA RS 232C Control DVR through RS 232C port by using PC RS 485 Control external device like PTZ Camera Pin 1 2 at Terminal Block RELAY Output Relay Output Pin 3 5 at Terminal Block...

Страница 15: ...Description No C o m m P o r t RS 232C 1 5 6 9 CH12 5 CH5 L J SHU U UP CH11 4 CH4 Q SEQ M MENU CH13 6 CH6 C KLOCK T PTZ J DOWN 0 CH10 3 CH3 I PIP 0x0d ENTER E SERCH CH16 9 CH9 2 CH2 D MODE N NEXT P PL...

Страница 16: ...1 to No 10 on the front of the DVR unit Maximum of 8 digits are available 3 After inputting the password press the ENTER button Administrator If the password entered matches previously set password LO...

Страница 17: ...guring or operation you must first set Time Date followed by setting the unit to the FACTORY DEFAULT settings lastly clearing the HDD Please follow these steps in order Improper operation may result i...

Страница 18: ...channel button which you want to freeze To release frozen image press channel number of frozen image again and press FREEZE button to exit FRZ mode 5 Zoom View In full screen press the ZOOM button an...

Страница 19: ...while entered in the menu or while it is in Playback mode No camera is connected HDD is full and Overwriting is off in the Record Setup menu Emergency Record RED Schedule Record GREEN 4 7 Playback On...

Страница 20: ...nding to set of data on the search bar 2 TIME DATE Search by time date Playback starts from the time date selected 3 EVENT LIST Search by event list Motion Alarm Video Loss SEARCH SEARCH BAR TIME DATE...

Страница 21: ...RT or SIZE sub menu and adjust using or button and move using LEFT and RIGHT button for next change After setting the time date and back up data size press the ENTER button again to exit End of back u...

Страница 22: ...t page Selection key Move to sub menu change status ON or OFF Enter into SYSTEM MENU Move to previous menu ESC MINUS RIGHT LEFT DOWN Reduce the option value Move to the right Move to the left UP NEXT...

Страница 23: ...menu which you would like to set using direction buttons and then change ON OFF with ENTER button 1 TIME DATE Display time date 2 DVR STATUS Display system setting status 3 REC PLAY BAR Display recor...

Страница 24: ...US NORMAL HDD CLEAR IN USE HDD SETUP On the HDD CLEAR sub menu press the ENTER button to delete all image data on HDD The system will ask password for verification After you clear all data on HDD stat...

Страница 25: ...en change the title using button When modification is finished press the ENTER button To exit to previous menu press the MENU button 2 COLOR Adjust image color Move to each element using UP DOWN butto...

Страница 26: ...Showing cells with motion detected differently from cells with no motion RECORD DURATION Whenever motion is detected and it is set at Motion Recording mode DVR system records for RECORD DURATION from...

Страница 27: ...or SEQ or PIP function 1 sec 99 sec FULL SCREEN set the sequencing switch time interval in live full screen PIP SCREEN set the sequencing switch time interval of PIP window EVENT UPDATE TIME Set the m...

Страница 28: ...ATION DVR system information including model number firmware version hardware version etc 6 BUZZER SETUP ON ON ON ON ON SELECT CHANGE VALUE ALL KEY BEEP VIDEO LOSS ALARM ACTIVE MOTION DETECT BUZZER SE...

Страница 29: ...mages in full screen mode in playback Recording in half or quad resolution is recommended for higher recoding speed 5 RECORD SPEED Set record speed of alarm motion continuous mode or skip rate 1 1x 1...

Страница 30: ...Schedule Recording set by manufacturer is recording continuously at its full recording speed and it means DVR system record continuously at 120 ips in total at 720x240 resolution To set Schedule Recor...

Страница 31: ...D check INPUT BLANK CD CD writer has no blank CD CD RW DOOR OPEN Open CD RW and insert blank CD R media into CD drive CD R MEDIA IS DETECTED Blank CD R media has been inserted and detected DVR system...

Страница 32: ...r to see live pictures and recorded pictures via the internet To use the TCP IP option user must assign IP ADDRESS GATEWAY SUBNETMASK into DVR in TCP IP SETUP MENU Also user must install the Remote vi...

Страница 33: ...e direction button to move and Press ENTER button to change parameters After move to RUN Press ENTER button for actual Factory Default setting SELECT MENU ENTER LANGUAGE ENGLISH EXTERNAL DEVICE FACTOR...

Страница 34: ...ible use a PC on the network to verify that an Internet connection can be made and that all current configurations on any equipment are up and working properly Do this before doing ANY configurations...

Страница 35: ...plicitly b For most situations please use the default 8000 for simplicity 4 SUBNET MASK 255 255 255 0 example a Assign the DVR the same exact subnet mask as your PC 5 GATEWAY 192 168 0 1 example a Ass...

Страница 36: ...eived from your Internet provider is the address that you will assign this DVR if you do not know this IP address please contact your provider c When configuring the DVR s IP address information the v...

Страница 37: ...d to assign the DVR an IP address just as you would a PC b The IP address you assign must be unique to your local network as well as match your local network For information on how to choose a unique...

Страница 38: ...ngs button As far as TCP IP connectivity is concerned only 4 entries need to be made 1 IP address Input the IP address that you assigned the DVR As in the above example I would input the private IP ad...

Страница 39: ...click on the Settings button As far as TCP IP connectivity is concerned only 4 entries need to be made For CASE D you have received a static IP from your Internet provider That static IP address is wh...

Страница 40: ...ifying you when the DVR will try to renew the IP address Typically it will try to receive the same IP but it is a good idea to check your IP on a continuous basis 11 Exit DHCP SETUP 12 Select IP ADDRE...

Страница 41: ...r button Select the channel that you want to view based on what Screen Division view is enabled Status window Display s the current time and date based The date is in the format Year Month Day You wil...

Страница 42: ...ines the speed at which the channels sequence when the SEQUENCE button is used from the main interface PTZ TYPE If using PTZ device or camera select the protocol your PTZ camera is using from the list...

Страница 43: ...me Time The recording time information of the pictures which is being played Channel selection Select each camera Time selection Select a time from which user want to see The playback will be started...

Страница 44: ...an rate or or Maximum playback speed of DVR is 60x 9 Command button a Save After pressing the Stop button you can save the currently viewed channels as an image jpg b Print After pressing the Stop but...

Страница 45: ...recommended to set recording mode of DVR unit in continuous recording mode If it is set at motion recording mode image transmission is done only when motion is detected and user only see still images...

Страница 46: ...Full 4 9 16 split screen 6 Page button This button is just working when screen division is 4 split in 8 ch DVR or 4 split or 8 split in 16 ch DVR Moves to next page 7 Operation button User can search...

Страница 47: ...Image size Command status 2 Function button a Save User can save an image in JPEG format It is saved in the folder where you installed back up CD player b Print User can print current image user selec...

Страница 48: ...47 6 6 6 6 4 4 4 4 Frequently Asked Questions Frequently Asked Questions Frequently Asked Questions Frequently Asked Questions CHAP 6 Network Setup...

Страница 49: ...48 CHAP 6 Network Setup...

Страница 50: ...49 CHAP 6 Network Setup...

Страница 51: ...50 CHAP 6 Network Setup...

Страница 52: ...g the DVMR remotely and placing the unit itself in playback mode which in turn disables recording in simplex mode When selecting a date time to play back First ensure that the stop button has been pre...

Страница 53: ...Time display Recording Recording Mode Time Motion schedule Alarm Search Search Event Search Date Time Search Jog Shuttle Search Recording Speed 4CH 60 Full mode 120 Dual mode 8 16CH 120 Full mode 240...

Отзывы: