background image


Testing


The operation of the luminaire shall be verified according to the requirements of the 

authorities. The battery duration of the self-contained types can be tested, by switching off 

mains supply voltage.  


Periodical checks and maintenance 


The fluorescent lamp of the luminaire must be changed when it is out of order. It is advisable 

to make a group replacement of fluorescent lamps in the same location when 10% of the 

lamps have reached the end of their lifetime. Outer surface of the luminaire must be cleaned 

regularly. In luminaires equipped with LED the light source should be changed when 

luminance no longer meets the requirements of standard EN 1838.  


In self contained units the battery shall be replaced when the specified duration time is not 

achieved. In normal conditions the lifetime of the battery is min. 4 years. 


The European standard EN 50172 specifies the following check and tests: 


- The user shall check the operation of the maintained luminaires daily 

- The battery mode operation is tested once a month 

- The full battery mode duration test shall be made once a year. 

- The performed tests shall be marked to the log book of the emergency lighting system and 

they shall be shown to the authorities if requested. 


Removing from usage 


Batteries and fluorescent lamps are hazardous waste. Metal parts should be recycled as steel 

or aluminium waste. Wires, connectors and circuit boards are electronics waste. Plastic parts 

should be recycled according to the material markings of them. 


POINTS TO NOTE WHEN INSTALLING -K TYPE LUMINAIRES 


The luminaire types that have their codes ending with -K are compatible with Teknoware 

Control central battery unit with addressable testing. These types of luminaries must be set up 

according to manual before installation. Neutral line of the luminaire groups shall not be 

grounded in any case.  


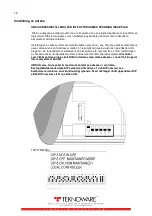
Setting the address  


NOTE: THE ADDRESS SHALL BE NOT SET WHEN THE SUPPLY VOLTAGE IS 

CONNECTED 


Setting the address takes place as follows:  


Open the luminaire as for installation. Inside the luminaire there is an address module 

TST1401B, which has a code switch. The address can be set from 1 to 16 according to the 

instructions on the label of the address module. The address can be chosen freely or 

according to the installation plan. However, care must be taken that each luminaire in the 

same group has a different address. NOTE! However, you have to check on your central 

battery unit, what is maximum address number. 

Содержание TWT17 Series

Страница 1: ...TWT17XX ENGLISH PAGE 3 FINNISH PAGE 6 SWEDISH PAGE 10 MECHANICAL DIMENSIONS PAGE 14 ...

Страница 2: ...2 ENGLISH PAGE 3 SUOMI SIVU 7 SVENSKA SIDAN 13 MECHANICAL DIMENSIONS PAGE 19 ...

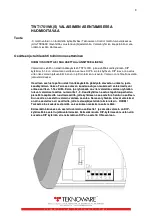
Страница 3: ...eknoware central battery unit with automatic addressable testing It can also be used with the Teknoware Local Controller unit TWT1771W S supply voltage 24 230 V AC DC Note Luminaire shall be connected to 24V 230V AC DC emergency lighting central battery unit light source 3W white LED TWT1751WK S supply voltage 230 V AC DC Note Luminaire shall be connected to 230V AC DC emergency lighting central b...

Страница 4: ...to the log book of the emergency lighting system and they shall be shown to the authorities if requested Removing from usage Batteries and fluorescent lamps are hazardous waste Metal parts should be recycled as steel or aluminium waste Wires connectors and circuit boards are electronics waste Plastic parts should be recycled according to the material markings of them POINTS TO NOTE WHEN INSTALLING...

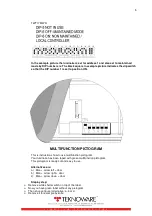
Страница 5: ...ION PICTOGRAM This is instructions how to use multifunction pictogram Your luminaire has been taped with green multifunction pictogram This pictogram is ready cut and easy to use Alternatives are a Man arrow left door b Man arrow right door c Man arrow down door Step by step Remove white shelter witch on top of the label Now you have green label without any pictogram Then choose figure alternative...

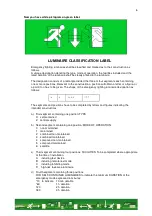
Страница 6: ...ents and positions have to be completed by letters and figures indicating the intended constructions a First segment containing one position TYPE X self contained Z central supply b Second segment containing one position MODE OF OPERATION 0 non maintained 1 maintained 2 combined non maintained 3 combined maintained 4 compound non maintained 5 compound maintained 6 satellite c Third segment contain...

Страница 7: ... EN1838 LVD direktiivi vain verkkojännitteellä toimivissa malleissa TWT1771W S liitäntäjännite 24 230 V AC DC valonlähde Teholed 3W S malli on kaksoiseristetty TWT1751WK S liitäntäjännite 230 V AC DC valonlähde Teholed 3W K S malli Control turvavalokeskukseen ja tai tilavahtijärjestelmään liitettävä jatkuvatoiminen turvavalaisin S malli on kaksoiseristetty TWT1752W liitäntäjännite 230 VAC Normaali...

Страница 8: ...toiminnan varmistamiseksi joka kuukausi testataan poistumisvalaistusjärjestelmän toiminta akkukäytöllä kerran vuodessa täytyy testata poistumisvalaistusjärjestelmän toiminta akkukäytöllä nimelliskeston ajan 1h tai erikseen määritellyn pidennetyn toiminta ajan verran suoritetut testit ja tarkastukset on merkittävä poistumisvalaistusjärjestelmän huoltokirjaan ja se on esitettävä viranomaisille pyyde...

Страница 9: ...en asetus tapahtuu elektroniikkayksikön päädystä olevasta nurkasta josta koodikytkimen näkee Tarrassa olevan koodaus ohjeen mukaisesti valaisimelle voi antaa osoitteen 1 16 väliltä Esim jos ryhmässä on viisi valaisinta voidaan ryhmään tulevat valaisimet asettaa numeroille 1 5 Koodikytkimen asetus tapahtuu parhaiten pienellä tasapäisellä ruuvimeisselillä jolla kytkimeen saa asetettua halutun osoitt...

Страница 10: ...merkintä tai hymyilevä kasvo on yläreunassa Poista tarran päällä oleva vaalea suojapaperi Esiin tulee kauttaaltaan vihreä tarra Valitse haluamasi valkoinen opaskuvio vaihtoehdoista a b tai c Poista ylimääräiset vihreät osiot esim veitseä apuna käyttäen Haluttu poistumistiesuuntakuvio on muodostunut valkoinen kuvio vihreällä pohjalla Valmiiksi valaisimeen liimattu Poista tarran päällä oleva vaalea ...

Страница 11: ...illa toimiva valaisin vai keskusakustojärjestelmään kytkettävä valaisin Ruudukot tarkoittavat seuraavaa a Ensimmäisessä ruudussa olevat merkinnät tarkoittavat TYYPPI Merkitty tehtaalla valmiiksi X Yksikkövalaisin omilla akuilla toimiva valaisin Z Keskusakustojärjestelmään kytkettävä b Toisessa ruudussa olevat merkinnät tarkoittavat Valaisimen toimintatapa 0 ajoittain toimiva turvavalo 1 jatkuvatoi...

Страница 12: ...nnessä ruudussa olevat merkinnät tarkoittavat omilla akuilla varustettujen valaisinten toiminta aikaa minuuteissa 10 min 60 min 120 min Esim Keskusjärjestelmään kytketty jatkuvatoiminen turvavalaisin 180 min Z 1 ...

Страница 13: ...vändning i adressförsedda nödbelysningssystem Tapsa Control TWT1752W anslutningsspänning 230 VAC kontinuerligt fungerande nödbelysning med eget batteri och 1 h driftstid innehåller laddningselektronik och nätövervakning ljuskälla 3W LED Elektrisk och mekanisk installation Belysningen är avsedd för att ytinstalleras och fungera som kontinuerlig säkerhetsbelysning Öppna armaturens kåpa genom att dra...

Страница 14: ...ingssystemet och uppvisas för myndigheterna på begäran Vi också rekommendera att användare kontrolleras funktionen hos de kontinuerliga armaturerna dagligen Modeller med eget batteri Testing av armaturen förverkligs på löstagning av gruppsäkring Batteriets livslängd är cirka 4 år vid normala förhållanden Batteriet skall bytas när armaturen inte lyser under den drifttid på 1 h eller den fastställda...

Страница 15: ... mellan 1 16 enligt kodningsinstruktionen på etiketten Om gruppen t ex innehåller fem armaturer kan armaturerna få nummer från 1 till 5 Inställningen av önskad adress i kodkontakten utförs enklast med en liten spårskruvmejsel Armaturer som tillhör samma grupp skall alltid installeras med olika adresser I annat fall fungerar inte testsystemet korrekt OBS Överse hur mycket är maximum antalet av adre...

Страница 16: ...m redan klistrats fast på belysningen Avlägsna det ljusa skyddspappret som finns på dekalen Då kommer en alltigenom grön dekal fram Välj önskad vit vägledningsbild alternativ a b eller c Avlägsna de överflödiga gröna delarna t ex med hjälp av en kniv Du har nu skapat en bild av den önskade räddningsvägen vit bild av löpare pil och dörr på grön botten Andra typer av bilder är inte tillåtna MÄRKNING...

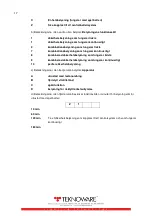
Страница 17: ... kombinerad säkerhetsbelysning som fungerar tidvis 9 kombinerad säkerhetsbelysning som fungerar kontinuerligt 10 perifer säkerhetsbelysning c Beteckningarna i den tredje rutan betyder Apparatur A utrustad med testanordning B fjärrstyrt vilotillstånd C spärrfunktion D belysning för riskfyllt arbetsutrymme d Beteckningarna i den fjärde rutan beskriver funktionstiden i minuter för belysning som är ut...

Страница 18: ...18 ...

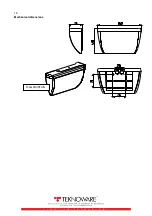
Страница 19: ...19 Mechanical dimensions FLAG MAINTAIN ...

Страница 20: ...tems for special lighting applications like emergency lighting and vehicle interior lighting Over 70 of our total production is exported to over 40 countries Designing and manufacturing of Teknoware products takes place in our factories located in Lahti Finland Teknoware quality is based on ISO 9001 and ISO14001 systems VOT1771WD 05 07 ...

Отзывы: