background image

5

3. Preparation before capture

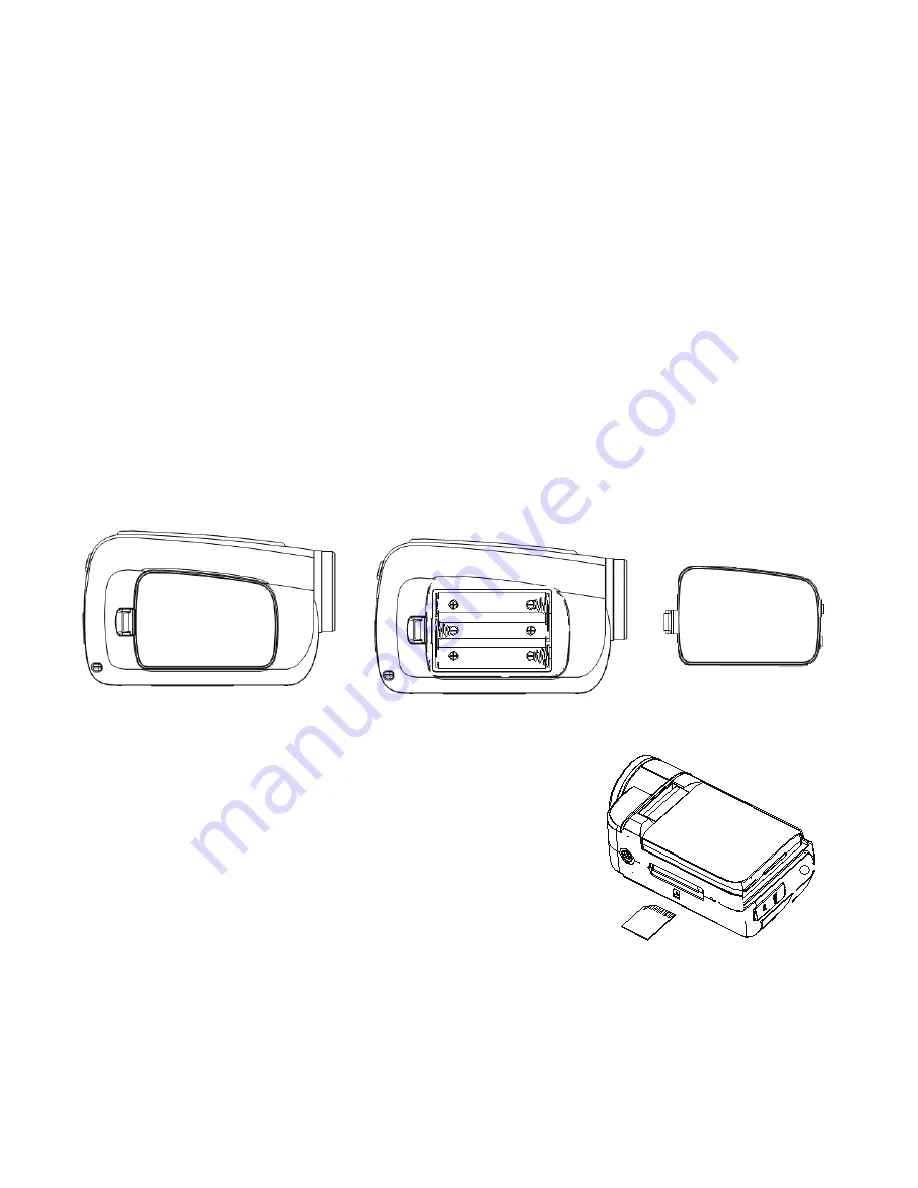
3.1 Battery

1.

Open the video camera battery door.

2. Insert 3 AAA batteries according to the positive (+) and negative (-)

poles indicated on the battery cover.

3. Close the battery door.

3.2 Insert the memory card

Insert the memory card to the card slot carefully.

Check the right direction before inserting the

memory card.

Содержание 811142

Страница 1: ...www teknofun entertainment com Mode d emploi CAMERA VIDEO TEKNOFUN ET BARBAPAPA Ref 811142 811144 811185 811145 811146 811222...

Страница 2: ...yant 5 Effacer 6 Lecture vid o 7 Mode 8 cran LCD TFT 9 Gauche Retardateur 10 Marche Arr t 11 Bouton Bas 12 Menu 13 Prise jack sortie AV 14 Porte USB 15 Droite voyant M A 16 OK 17 Obturateur 18 Haut Vi...

Страница 3: ...2 2 Affichage l cran OSD A R alisation de vid os...

Страница 4: ...3 B Prise de vues C Enregistrement de fichiers audio...

Страница 5: ...e vid os ou de photos 3 Pr paration avant capture 3 1 Piles 1 Ouvrez le volet des piles 2 Mettez 3 piles AAA Pas Inclus en respectant les p les positif et n gatif indiqu s sur le volet 3 Fermez le vol...

Страница 6: ...D appuyez sur le bouton POWER pour mettre sur ON presser encore sur POWER pour mettre la cam ra sur OFF NOTE la cam ra s arr te automatiquement apr s une p riode de nons activit pour pr server les pil...

Страница 7: ...ation et appuyez nouveau sur le bouton DROIT LED ON OFF pour l teindre quand la lumi re est suffisante 6 Prise de photo a Appuyez sur le bouton mode jusqu ce que l ic ne s affiche en haut gauche de l...

Страница 8: ...ayback 8 1 Visionner les photos a Appuyez sur le bouton Playback pour acc der au mode de lecture b Appuyez sur les boutons droite ou gauche pour voir la photo ou la vid o suivante ou pr c dente c Appu...

Страница 9: ...et appuyez sur le bouton gauche pour retourner en arri re e Appuyez sur le bouton UP pour mettre en pause et appuyez nouveau pour reprendre la lecture 8 3 coute des fichiers audio a Allumez la cam ra...

Страница 10: ...bouton ok pour acc der au sous menu One liminer le fichier s lectionn All liminer tous les fichiers sauf ceux qui sont verrouill s c Utiliser les boutons haut et bas pour s lectionner le fichier d Ap...

Страница 11: ...sur l ic ne Mon poste de travail sur le bureau de votre ordinateur c Double cliquez l ic ne d Double cliquer le r pertoire DCIM e Double cliquez le r pertoire 100MEDIA f Copiez tous les fichiers sur...

Страница 12: ...C externe jusqu 32 Go Format fichier JPEG AVI WAV Qualit vid o D1 720x480 30fps D1 VGA 640 x 480 30fps VGA QVGA 320 x 240 30fps QVGA Retardateur 10 sec 2 sec Zoom 4 x zoom num rique quilibre des blanc...

Страница 13: ...I 800MHz ou sup rieur M moire 128 Mo ou sup rieure Espace disque dur Min 500 Mo Alimentation 3 piles alkaline AAA Langues OSD anglais fran ais allemand espagnol italien portugais chinois Plage focale...

Страница 14: ...la notice technique Les couleurs et les d tails peuvent varier par rapport au mod le pr sent sur la bo te ATTENTION A utiliser sous la surveillance rapproch e d un adulte Les piles ne doivent pas tre...

Страница 15: ...r la lentille Ne pas ins rer les fils dans des prises murales Pour garantir le bon fonctionnement v rifier et remplacer les piles si n cessaire Les piles puis es doivent tre retir es du produit Les pi...

Страница 16: ...www teknofun entertainment com USER MANUAL DIGITAL VIDEO CAMERA Ref 811142 811144 811185 811145 811146 811222...

Страница 17: ...lamp 4 Self Timer LED 5 Delete 6 Playback 7 Mode 8 TFT LCD Screen 9 Left Self Timer 10 Power 11 Down button 12 Menu 13 AV Out jack 14 USB jack 15 Right LED on or off 16 OK 17 Shutter 18 Up Display 19...

Страница 18: ...2 2 On screen display A When shooting movies...

Страница 19: ...3 B When shooting still images...

Страница 20: ...4 C When recording audio file D When playing back...

Страница 21: ...ery door 2 Insert 3 AAA batteries according to the positive and negative poles indicated on the battery cover 3 Close the battery door 3 2 Insert the memory card Insert the memory card to the card slo...

Страница 22: ...he power button to enter default video recording mode If the camera is in other recording mode press the mode button till the icon appears on the upper left corner of screen b Press the shutter button...

Страница 23: ...FF button to turn on the compensating lamp and when the light is enough press the RIGHT LED ON OFF button to turn off the compensating lamp 7 Audio recording a Press the mode button till the icon appe...

Страница 24: ...to show the image in full screen 8 2 Play video files a Press the Playback button to enter the playback mode b Press the left or right buttons to select a video file c Press the shutter button to pla...

Страница 25: ...to continue 8 4 Delete files a In playback mode press the menu button to enter the menu interface press the up or down buttons to select delete b Press the ok button to enter the submenu One Delete cu...

Страница 26: ...nnect the camera with a PC by a USB cable and turn the camera on b Double click the icon my computer on the desktop of PC c Double click icon d Double click DCIM file folder e Copy all the files to yo...

Страница 27: ...o 32GB SDHC up to 32GB File format JPEG AVI WAV Video quality D1 720x480 30fps D1 VGA 640 x 480 30fps VGA QVGA 320 x 240 30fps QVGA Self timer 10 sec 2 sec Zoom 4 x digital zoom White Auto Daylight Tu...

Страница 28: ...CPU Pentium III 800MHz or above Memory 128 MB memory or above Disk space Min 500 MB space available OSD language English French German Spanish Italian Portuguese Dutch Focal range f 6 5mm Aperture F...

Страница 29: ...from failure of the camera 2 Using your camera when there is body static electricity may power off your camera or stop PC CAM only restart it and the camera works again ALL RIGHTS RESERVED 2014 TEKNO...

Отзывы: