background image

WARNING

Please use your furniture correctly and safely. Improper use can cause safety hazards,  

or damage to your furniture or household items

Carefully read the following safety information.

Death or serious injury may occur when children climb on furniture. A remote control, toys or other items placed on  

the furniture may encourage a child to climb on the furniture which could cause it to tip-over and result in serious injury 

or death.

NEVER

 allow children to climb on furniture.

NEVER

 place toys, food, remote, etc. on top of furniture.

ALWAYS

 use either the safety hardware as instructed or other wall anchoring device.

Placing audio and/or video equipment onto furniture not specifically designed to support audio and/or video equipment 

may result in death or serious injury due to furniture collapse or tip over.

NEVER

 place a TV on furniture that is not intended to support a TV.

This product is not designed to support a television unless a TV warning label is included and the instructions 

specifically state the size and weight of the television.

Overloading drawers and shelves may result in furniture that can break or sag, or tip-over which may result in injury. 

NEVER

 exceed the weight limits shown in the instructions. 

Place the heavier items on lower shelves as far back from the front as possible.

Load the bottom surfaces first to avoid top-heavy furniture.

Moving furniture that is not designed to be moved or equipped with casters may result in injury or damage to furnishings 

or personal property.

ALWAYS

 unload shelves and drawers, starting with the top surfaces, before moving.

NEVER

 push or pull furniture on carpet. Have a friend help lift properly to move and/or reposition it.

Содержание Hideaway Cotswold 5430446

Страница 1: ...OTE THIS INSTRUCTION BOOKLET CONTAINS IMPORTANT SAFETY INFORMATION PLEASE READ AND KEEP FOR FUTURE REFERENCE Hideaway Cotswold Office Craft Station Model 5430446 Get crafty Teknik www teknikoffice co uk ...

Страница 2: ...1 G RIGHT DOOR 1 H LEFT DOOR 1 I PULL OUT TOP 1 J PULL OUT BACK 1 K FLIP UP TOP 1 L OUTER UPRIGHT 2 M INNER UPRIGHT 2 N SHELF UPRIGHT 1 O SLIDE OUT SHELF 1 P SLIDING SHELF BACK 1 Q ADJUSTABLE SHELF 6 R LEG 1 S FRONT MOLDING 1 T RIGHT MOLDING 1 U LEFT MOLDING 1 V LEG STOP 1 å While not all parts are labeled some of the parts will have a label or an inked letter on the edge to help distinguish simil...

Страница 3: ...abeled some of the parts will have a label or an inked letter on the edge to help distinguish similar parts from each other Use this part identification to help identify similar parts A B C D E F G H J K L I L M M N O P Q Q Q Q Q Q R S T U V Page 3 ...

Страница 4: ... 1 EXTENSION SET SHOWN SEPARATED EXTENSION SLIDE 2 40MC EXTENSION RAIL 2 40MA 35AW CABINET RIGHT 1 35AY DRAWER RIGHT 1 35AZ DRAWER LEFT 1 35AX CABINET LEFT 1 EXTENSION SET SHOWN SEPARATED LOCKING EXTENSION SLIDE 2 Z Y LOCKING EXTENSION RAIL 2 CASTER 2 15C 16C CASTER BRACKET 2 430446 www sauder com service Page 4 This part is not suitable for the UK market ...

Страница 5: ...nit 14M PROPEL NUT 4 1P GROMMET CAP 1 16H HINGE 2 16F MOLDING CONNECTOR 2 4P CORD CLIP 1 1R METAL PIN 24 67H HINGE 4 5I MAGNETIC CATCH 2 96K PULL 2 10P GROMMET 1 6I STRIKE PLATE 2 1N NAIL 42 2R RUBBER SLEEVE 24 FURNITURE TIPPING RESTRAINT KIT 1 97 Page 5 17P SCREW COVER 4 12F TWIST LOCK FASTENER 14 ...

Страница 6: ...CREW 2 17S BLACK 7 8 LARGE HEAD SCREW 4 27S BLACK 1 5 8 PAN HEAD SCREW 6 2S BLACK 1 7 8 FLAT HEAD SCREW 9 57S SILVER 2 FLAT HEAD SCREW 5 18S BROWN 1 FLAT HEAD SCREW 4 66S BLACK 2 PAN HEAD SCREW 4 12S BROWN 1 FLAT HEAD SCREW 4 23S SILVER 5 8 FLAT HEAD SCREW 4 62S BLACK 9 16 EURO SCREW 4 11S BLACK 1 2 FLAT HEAD SCREW 2 3S GOLD 5 16 FLAT HEAD SCREW 16 54S SILVER 9 16 LARGE HEAD SCREW 16 Page 6 ...

Страница 7: ...R with a Phillips screwdriver as tight as possible Dowel end 2 Push a TWIST LOCK FASTENER into the large hole in the part 1 HOW TO USE A TWIST LOCK FASTENER Step 1 å Assemble your unit on a carpeted floor or on the empty carton to avoid scratching your unit or the floor å Push eight SAUDER TWIST LOCK FASTENERS 12F into the large holes in the FIXED SHELF D and BOTTOM E 12F 12F Do not tighten the TW...

Страница 8: ...e END Turn a SCREW into this hole å NOTE The EXTENSION SLIDES will be used later å Fasten the CABINET RIGHT 35AW to the RIGHT END A and the CABINET LEFT 35AX to the LEFT END B Use four GOLD 5 16 FLAT HEAD SCREWS 3S through the first and second holes from the roller end in the RAIL and into the holes of your choice in the ENDS å Now insert the CORD CLIP 4P into the hole in the RIGHT END A The CORD ...

Страница 9: ...OTTOM E to the LEFT END B Tighten four TWIST LOCK FASTENERS Step 3 Do not stand the unit upright without the BACK fastened The unit may collapse Caution B D E Surface with TWIST LOCK FASTENERS Surface with TWIST LOCK FASTENERS Page 9 ...

Страница 10: ...S 12F into the large holes in the SHELF UPRIGHT N å Fasten the SHELF UPRIGHT N to the FIXED SHELF D Use two BLACK 1 7 8 FLAT HEAD SCREWS 2S 12F N D N BLACK 1 7 8 FLAT HEAD SCREW 2 used in this step 2S Surface without TWIST LOCK FASTENERS Page 10 ...

Страница 11: ...å Fasten the RIGHT END A to the FIXED SHELF D and BOTTOM E Tighten four TWIST LOCK FASTENERS Step 5 D E A Open end Open end Page 11 ...

Страница 12: ...p two MOLDING CONNECTORS 16F into the notches in the MOLDINGS S T and U Flat end Flat end Use your hammer to tap the MOLDING CONNECTORS 16F into the notches in the MOLDINGS 16F Unfinished surface S U T 16F Page 12 ...

Страница 13: ...T MOLDING T to the RIGHT END A Use two BLACK 2 PAN HEAD SCREWS 66S å Fasten the LEFT MOLDING U to the LEFT END B Use two BLACK 2 PAN HEAD SCREWS 66S Step 7 T U B A BLACK 2 PAN HEAD SCREW 4 used in this step 66S Page 13 ...

Страница 14: ... C to the UPRIGHT N Tighten two TWIST LOCK FASTENERS å Fasten the TOP C to the FRONT MOLDING S Use two SILVER 2 FLAT HEAD SCREWS 57S å Fasten the TOP C to the RIGHT MOLDING T and LEFT MOLDING U Use six BLACK 1 5 8 PAN HEAD SCREWS 27S SAFETY STRAP 97 SHORT SCREW C C T U N S SILVER 2 FLAT HEAD SCREW 2 used for the FRONT MOLDING 57S BLACK 1 5 8 PAN HEAD SCREW 6 used in this step 27S Page 14 ...

Страница 15: ...four BLACK 9 16 EURO SCREWS 62S å Finish fastening the BACK F to your unit using the NAILS 1N å NOTE Be sure to tap NAILS into the holes that line up over the FIXED SHELF D and SHELF UPRIGHT N Step 9 F Do not stand the unit upright without the BACK fastened The unit may collapse Caution Before fastening the BACK punch out the perforations and push the SAFETY STRAP through this hole B A E NAIL 42 u...

Страница 16: ... A and B å Use a hammer to drive a PROPEL NUT 14M through each BRACKET and into the holes in the ENDS Now turn a LEVELER 18E into each PROPEL NUT å NOTE To raise a corner of the unit turn the LEVELER counter clockwise To lower a corner turn the LEVELER clockwise B A Page 16 17E 14M 18E ...

Страница 17: ...2 Using a Phillips screwdriver or a hand drill press the screw slightly onto the drywall just below the top surface of your unit so the SAFETY STRAP will not be visible 3 Apply pressure turn the screw until a pilot hole is made and the nylon sheath slips through 4 Turn the screw until it is flush against the wall and you feel a firm resistance 5 Continue to turn until the screw starts spinning fre...

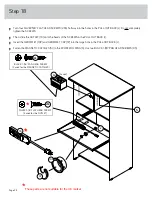
Страница 18: ...S 17S through holes 1 and 4 å Fasten the PULL OUT BACK J to the PULL OUT TOP I Use three SILVER 2 FLAT HEAD SCREWS 57S J I Surface with more holes Z Z SILVER 2 FLAT HEAD SCREW 3 used for the PULL OUT BACK 57S 1 1 2 2 3 3 4 4 Open end Open end 17S BLACK 7 8 LARGE HEAD SCREW 4 used for the SLIDES 17S Page 18 ...

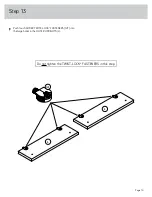
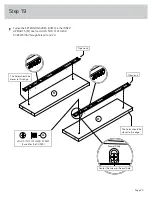
Страница 19: ...å Push four SAUDER TWIST LOCK FASTENERS 12F into the large holes in the OUTER UPRIGHTS L Step 13 L L 12F Do not tighten the TWIST LOCK FASTENERS in this step Page 19 ...

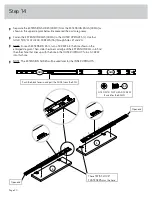
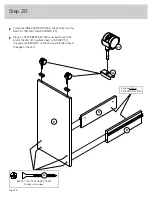
Страница 20: ...ch EXTENSION RAIL turn a SCREW into the hole shown in the enlarged diagram Then slide the inner cartridge of the EXTENSION RAIL in to find the other hole that lines up with the hole in the OUTER UPRIGHT Turn a SCREW into this hole å NOTE The EXTENSION SLIDES will be used later for the INNER UPRIGHTS Push the black lever in and pull the SLIDE from the RAIL 40MA 40MC Open end GOLD 5 16 FLAT HEAD SCR...

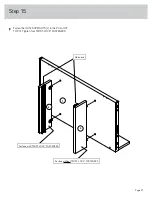
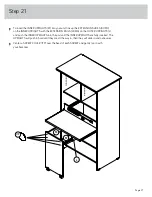
Страница 21: ...å Fasten the OUTER UPRIGHTS L to the PULL OUT TOP I Tighten four TWIST LOCK FASTENERS Step 15 L L I Surface with TWIST LOCK FASTENERS Surface without TWIST LOCK FASTENERS Open end Page 21 ...

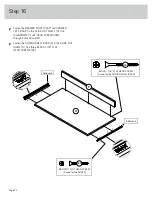
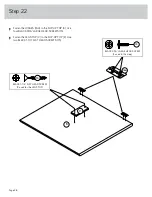
Страница 22: ...AT HEAD SCREWS 18S through holes 2 and 4 å Fasten the SLIDING SHELF BACK P to the SLIDE OUT SHELF O Use three BLACK 1 7 8 FLAT HEAD SCREWS 2S O P Roller end Roller end 3 2 1 4 3 2 1 4 BROWN 1 FLAT HEAD SCREW 4 used for the SLIDES 18S Page 22 BLACK 1 7 8 FLAT HEAD SCREW 3 used for the SLIDING SHELF BACK 2S ...

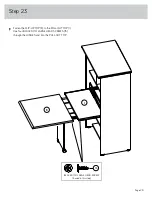
Страница 23: ... fully inserted The drawer will push in hard until it is all the way in then it will slide in and out easier å To insert the SLIDE OUT SHELF O into your unit tip the front of the drawer down and drop the glides on the drawer behind the glides on the unit Lift the front of the drawer up and slide it into the unit Step 17 O I Y Z Place the glide on the SLIDE behind the glide on the RAIL Page 23 ...

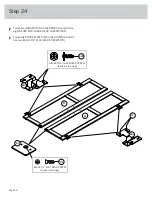
Страница 24: ...the PULL OUT BACK J å Insert the GROMMET 10P and GROMMET CAP 1P into the large hole in the PULL OUT BACK J å Fasten the MAGNETIC CATCHES 5I to the FRONT MOLDING S Use two BLACK 1 1 8 PAN HEAD SCREWS 9S J 1D SILVER 5 8 FLAT HEAD SCREW 4 used for the OUTLET 23S 1P 10P 9S BLACK 1 1 8 PAN HEAD SCREW 2 used for the MAGNETIC CATCHES 5I 2 used Page 24 S These parts are not suitable for the UK market ...

Страница 25: ...16 FLAT HEAD SCREWS 3S through holes 1 and 4 Step 19 M M Open end Open end GOLD 5 16 FLAT HEAD SCREW 4 used for the SLIDES 3S Drawer Slide Center the screw in the oval hole 1 1 2 2 3 3 4 4 The holes should be closer to this edge The holes should be closer to this edge Page 25 ...

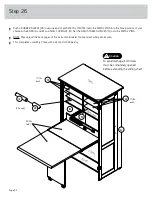
Страница 26: ...REWS 2S å Place a CASTER BRACKET 16C over each hole in the end of the LEG R Carefully insert a CASTER 15C through each BRACKET on the LEG and into the holes in the edge of the LEG BLACK 1 7 8 FLAT HEAD SCREW 4 used in this step 2S 15C 16C Surface without EXTENSION SLIDES M R M Page 26 ...

Страница 27: ...40MA on the OUTER UPRIGHTS L and push the INNER UPRIGHTS into the unit until the INNER UPRIGHTS are fully inserted The UPRIGHTS will push in hard until they are all the way in then they will slide in and out easier å Center a SCREW COVER 17P over the head of each SCREW and gently tap in with your hammer Step 21 M M L 17P Page 27 ...

Страница 28: ...P K Use four BLACK 9 16 LARGE HEAD SCREWS 1S å Fasten the LEG STOP V to the FLIP UP TOP K Use two BLACK 1 1 4 FLAT HEAD SCREWS 7S K V 16H BLACK 9 16 LARGE HEAD SCREW 4 used in this step 1S BLACK 1 1 4 FLAT HEAD SCREW 2 used for the LEG STOP 7S Page 28 ...

Страница 29: ...Fasten the FLIP UP TOP K to the PULL OUT TOP I Use four BLACK 9 16 LARGE HEAD SCREWS 1S through the HINGES and into the PULL OUT TOP Step 23 K I BLACK 9 16 LARGE HEAD SCREW 4 used in this step 1S Page 29 ...

Страница 30: ... eight SILVER 9 16 LARGE HEAD SCREWS 54S å Fasten the STRIKE PLATES 6I to the DOORS G and H Use two BLACK 1 2 FLAT HEAD SCREWS 11S G H 67H 67H 1S 6I BLACK 1 2 FLAT HEAD SCREW 2 used in this step 11S SILVER 9 16 LARGE HEAD SCREW 8 used in this step 54S Page 30 ...

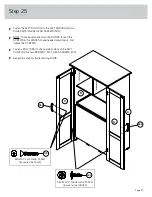
Страница 31: ...EWS in the HINGES make needed adjustments and tighten the SCREWS å Fasten a PULL 96K to the outside surface of the LEFT DOOR H Use two BROWN 1 FLAT HEAD SCREWS 12S å Repeat this step for the remaining DOOR Step 25 G H B A 96K 96K SILVER 9 16 LARGE HEAD SCREW 8 used for the HINGES 54S BROWN 1 FLAT HEAD SCREW 4 used for the PULLS 12S Page 31 ...

Страница 32: ...t the ADJUSTABLE SHELVES Q onto the METAL PINS å NOTE Please read the back pages of the instruction booklet for important safety information å This completes assembly Clean with a damp cloth Wipe dry To avoid damage both doors must be completely opened before extending the sliding shelf Caution 24 used 1R 2R 15 lbs 35 lbs total 50 lbs 25 lbs 10 lbs each Q Q 10 lbs each Page 32 B A N ...

Страница 33: ...ult in death or serious injury due to furniture collapse or tip over NEVER place a TV on furniture that is not intended to support a TV This product is not designed to support a television unless a TV warning label is included and the instructions specifically state the size and weight of the television Overloading drawers and shelves may result in furniture that can break or sag or tip over which...

Отзывы: