www.teknikoffice.co.uk
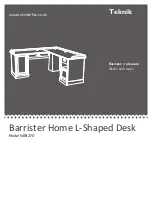
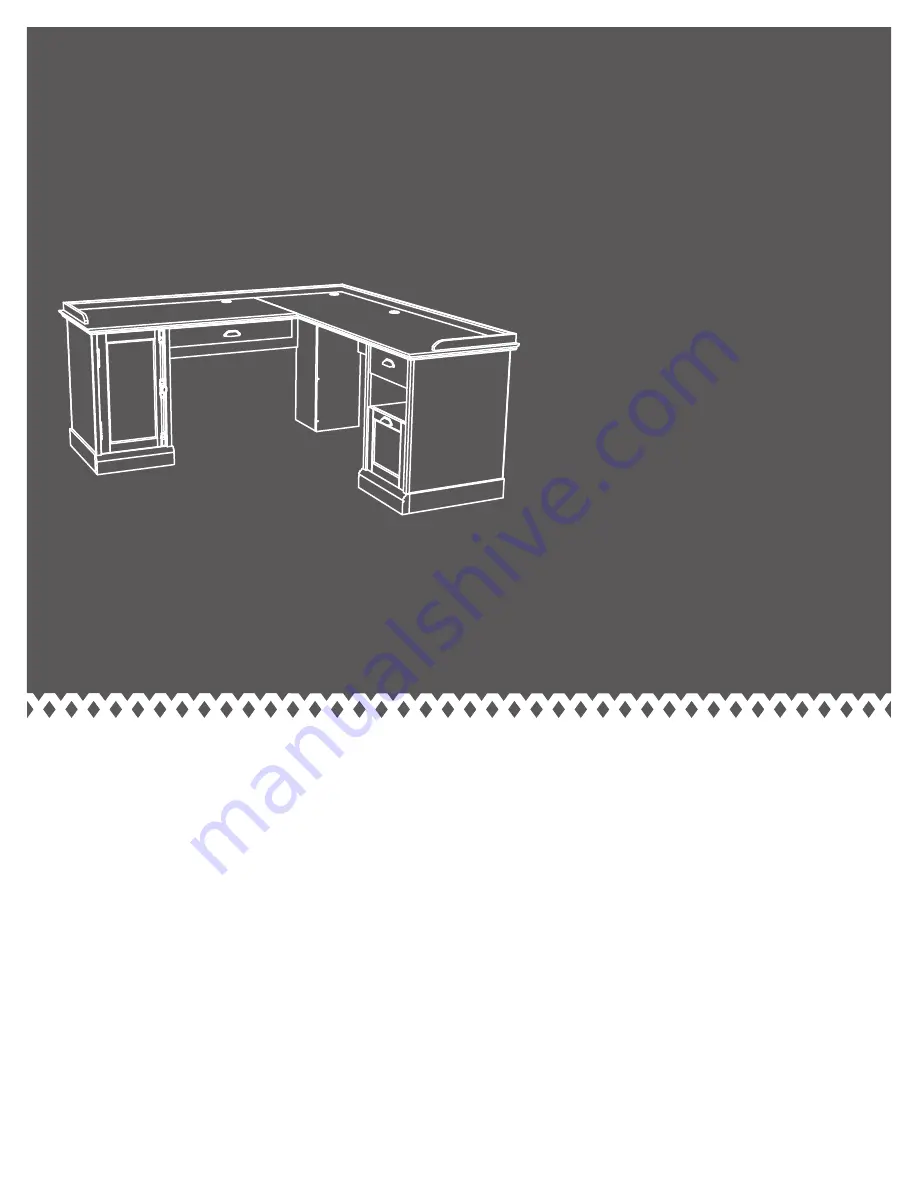
Barrister Home L-Shaped Desk
Model
5
418270
Business
or
pleasure
.
Works both ways.
Teknik
Страница 1: ...www teknikoffice co uk Barrister Home L Shaped Desk Model 5418270 Business or pleasure Works both ways Teknik ...
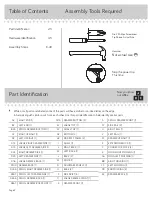
Страница 2: ...ENCIL DRAWER BOX FRONT 1 D716 DRAWER BOTTOM 2 E2 LARGE TOP 1 F2 SMALL TOP 1 G2 BOTTOM 2 H2 MODESTY PANEL 2 I SHELF 1 J RIGHT BACK 1 K2 LEFT BACK 1 L BACK 2 M DOOR 1 N ADJUSTABLE SHELF 1 O BASE 2 P SIDE SKIRT 4 Q LARGE DRAWER FRONT 1 R DRAWER FRONT 1 S PENCIL DRAWER FRONT 1 T2 SIDE RAIL 2 U RIGHT RAIL 1 V LEFT RAIL 1 W DRAWER UPRIGHT 1 X EXTENSION BLOCK 1 Y CONNECTOR PLATE 2 Z LONG RIGHT MOLDING 1 ...
Страница 3: ...Part Identification Page 3 A2 B2 C2 D2 E2 F2 G2 H2 I J K2 L M N O P Q R S T2 U V W X Y Z AA BB CC DD EE G2 H2 L O P P P Y DD DD DD T2 B26 D14 D15 D24 D25 D78 D109 D266 D267 D466 D467 D716 D716 ...
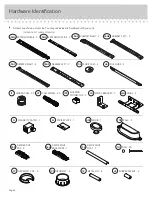
Страница 4: ... 2 GROMMET CAP 3 1P METAL PIN 4 1R MOLDING CONNECTOR 2 19F 10A SLIDE CAM 4 MAGNETIC CATCH 1 3I GROMMET 3 10P NAIL 30 1N HIDDEN CAM 23 1F CAM DOWEL 23 2F KNOB 1 69K PULL 3 70K 33M DECORATIVE END 2 34M DECORATIVE BACKPLATE 1 RUBBER SLEEVE 4 2R 73M DECORATIVE POST 2 42H HINGE 2 Page 4 EXTENSION SET SHOWN SEPARATED EXTENSION RAIL 2 35MA EXTENSION SLIDE 2 35MC METAL BRACKET 7 4G STRIKE PLATE 1 6I ...
Страница 5: ...EAD SCREW 24 10S 15S SILVER 5 8 MACHINE SCREW 2 BLACK 7 8 LARGE HEAD SCREW 2 17S GRAY 1 3 8 MACHINE SCREW 2 39S BLACK 7 8 MACHINE SCREW 2 37S 3S GOLD 5 16 FLAT HEAD SCREW 24 BLACK 1 2 FLAT HEAD SCREW 1 11S BLACK 1 PAN HEAD SCREW 8 60S SILVER 1 1 2 MACHINE SCREW 1 95S Page 5 30S BLACK 1 9 16 FLAT HEAD SCREW 14 BLACK 1 1 2 PAN HEAD SCREW 12 49S BLACK 1 15 16 FLAT HEAD SCREW 21 113S ...
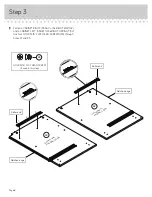
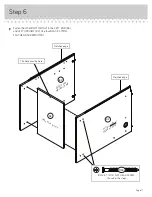
Страница 6: ...S H2 SHELF I and BACKS K2 and J Then insert the metal end of a CAM DOWEL 2F into each HIDDEN CAM å NOTE You will only insert two HIDDEN CAMS and CAM DOWELS into one of the MODESTY PANELS H2 Page 6 Do not tighten the HIDDEN CAMS in this step Insert the metal end of the CAM DOWEL into the HIDDEN CAM Arrow 23 used Arrow 1F 2F Do not insert a HIDDEN CAM and CAM DOWEL into this hole A2 B2 C2 D2 H2 I J ...
Страница 7: ... and RIGHT UPRIGHT C2 Use four GOLD 5 16 FLAT HEAD SCREWS 3S å NOTE For each EXTENSION RAIL turn a SCREW into the hole shown in the enlarged diagram Then slide the inner cartridge of the EXTENSION RAIL in to find the other hole that lines up with the hole in the END UPRIGHT Turn a SCREW into this hole å NOTE The EXTENSION SLIDES 40MC will be used later for the DRAWERS Open end GOLD 5 16 FLAT HEAD S...
Страница 8: ...a CABINET LEFT 35GB to the RIGHT UPRIGHT C2 Use four GOLD 5 16 FLAT HEAD SCREWS 3S through holes 1 and 3 1 2 3 1 2 3 GOLD 5 16 FLAT HEAD SCREW 4 used in this step 3S Roller end Roller end A2 C2 Surface with HIDDEN CAMS Surface with HIDDEN CAMS Notched edge Notched edge ...
Страница 9: ...DDEN CAMS must be completely tightened HIDDEN CAMS that are not completely tightened may loosen and parts may separate To completely tighten Arrow Maximum 210 degrees A2 C2 Surface with HIDDEN CAMS Surface without HIDDEN CAMS Notched edge Notched edge I Surface with HIDDEN CAMS Finished edge Do not stand the unit upright without the BACK fastened The unit may collapse Caution ...
Страница 10: ...OTTOM G2 to the RIGHT END A2 and RIGHT UPRIGHT C2 Use four BLACK 1 15 16 FLAT HEAD SCREWS 113S Step 5 Page 10 A2 C2 G2 Unfinished surface This hole must be here BLACK 1 15 16 FLAT HEAD SCREW 4 used in this step 113S ...
Страница 11: ...T UPRIGHT D2 Use four BLACK 1 15 16 FLAT HEAD SCREWS 113S Step 6 Page 11 G2 This hole must be here Surface with HIDDEN CAMS Surface without HIDDEN CAMS Notched edge Notched edge B2 D2 BLACK 1 15 16 FLAT HEAD SCREW 4 used in this step 113S Unfinished surface ...
Страница 12: ...TS P to the ENDS A2 and B2 and UPRIGHTS C2 and D2 Use eight BLACK 1 PAN HEAD SCREWS 60S Step 7 Page 12 A2 C2 B2 D2 P P P P Long finished edge Long finished edge Long finished edge BLACK 1 PAN HEAD SCREW 8 used in this step 60S ...
Страница 13: ...TS are even with the edges of the ENDS UPRIGHTS and BOTTOMS å Fasten the BASES O to the ENDS A2 and B2 UPRIGHTS C2 and D2 and BOTTOMS G2 Use six BLACK 9 16 LARGE HEAD SCREWS 1S through the METAL BRACKETS on the ENDS UPRIGHTS and BOTTOMS and into the BASES BLACK 9 16 LARGE HEAD SCREW 12 used in this step 1S 4G A2 C2 B2 D2 G2 G2 4G 4G 6 used O O Curved edge Curved edge ...
Страница 14: ...Slide the END MOLDINGS DD onto the notched edges of the ENDS A2 and B2 and UPRIGHTS C2 and D2 å U S Patent No 5 499 886 Notched edge Slide the END MOLDINGS DD onto the notched edges Notched edge A2 C2 B2 D2 DD DD DD DD ...
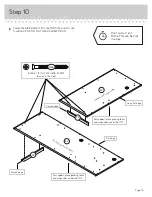
Страница 15: ... Don t worry It isn t Rome This can be built in a day Surface with more holes Surface with more holes Curved edge Curved edge Flat edge Long flat edge For support place packing foam and magazines under the TOP For support place packing foam and magazines under the TOP BLACK 1 15 16 FLAT HEAD SCREW 4 used in this step 113S ...
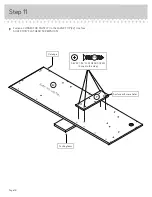
Страница 16: ...TOR PLATE Y to the LARGE TOP E2 Use four SILVER 1 1 8 FLAT HEAD SCREWS 10S Step 11 Page 16 E2 Surface with more holes Y Packing foam Flat edge SILVER 1 1 8 FLAT HEAD SCREW 4 used in this step 10S Surface with more holes ...
Страница 17: ... Page 17 å Tap two MOLDING CONNECTORS 19F into the notches in the MOLDINGS Z AA BB and CC Flat end 19F Flat end 19F Use your hammer to tap the MOLDING CONNECTORS 19F into the notches in the MOLDINGS Z BB AA CC ...
Страница 18: ...D SCREWS 10S å Fasten the MOLDINGS Z AA BB and CC to the TOPS E2 and F2 Use twelve SILVER 1 1 8 FLAT HEAD SCREWS 10S BB Z AA CC Packing foam Surface with more holes Surface with more holes Flat edge Long curved edge Y Surface with more holes SILVER 1 1 8 FLAT HEAD SCREW 15 used in this step 10S 10S Packing foam ...
Страница 19: ...p 14 Page 19 å Fasten the RIGHT END A2 and RIGHT UPRIGHT C2 to the LARGE TOP E2 and RIGHT MOLDING BB Tighten four HIDDEN CAMS E2 Arrow Minimum 190 degrees Maximum 210 degrees BB C2 A2 DD DD Z Packing foam ...
Страница 20: ... Fasten the MODESTY PANEL H2 to the LARGE TOP E2 Tighten two HIDDEN CAMS å NOTE Be sure the MODESTY PANEL with two HIDDEN CAMS is fastened to the LARGE TOP E2 å Fasten the MODESTY PANEL H2 to the RIGHT UPRIGHT C2 Use two BLACK 1 15 16 FLAT HEAD SCREWS 113S Packing foam Page 20 BLACK 1 15 16 FLAT HEAD SCREW 2 used in this step 113S ...
Страница 21: ... the option of assembling the pencil drawer to the right or left side of your unit Follow the next step for this option å IMPORTANT Go to Step 18 for this option PENCIL DRAWER ON RIGHT PENCIL DRAWER ON LEFT Page 21 Step 16 ...
Страница 22: ...en the CABINET LEFT 35GB to the DRAWER UPRIGHT W as shown in the lower right Use two GOLD 5 16 FLAT HEAD SCREWS 3S through holes 1 and 3 å Then fasten the DRAWER UPRIGHT W to the CONNECTOR PLATE Y Tighten two HIDDEN CAMS å Next fasten the DRAWER UPRIGHT W to the MODESTY PANEL H2 Use a METAL BRACKET 4G and two BLACK 9 16 LARGE HEAD SCREWS 1S PENCIL DRAWER ON RIGHT SILVER 1 1 8 FLAT HEAD SCREW 2 use...
Страница 23: ...CK J to the LEFT BACK K2 Use three BLACK 1 15 16 FLAT HEAD SCREWS 113S Step 18 Page 23 J K2 Surface without HIDDEN CAMS Surface without HIDDEN CAMS Edge with CAM DOWELS BLACK 1 15 16 FLAT HEAD SCREW 3 used in this step 113S ...
Страница 24: ... the BACKS J and K2 to the LARGE TOP E2 Tighten four HIDDEN CAMS å Fasten the RIGHT BACK J to the MODESTY PANEL H2 Use two BLACK 1 15 16 FLAT HEAD SCREWS 113S Packing foam Packing foam BLACK 1 15 16 FLAT HEAD SCREW 2 used in this step 113S PENCIL DRAWER ON RIGHT PENCIL DRAWER ON LEFT J K2 Surface with HIDDEN CAMS Surface with HIDDEN CAMS ...
Страница 25: ...LL TOP F2 Tighten two HIDDEN CAMS å Then fasten the MODESTY PANEL H2 to the LEFT UPRIGHT D2 Use two BLACK 1 15 16 FLAT HEAD SCREWS 113S Step 20 Page 25 Arrow Minimum 190 degrees Maximum 210 degrees Packing foam F2 H2 D2 Surface with HIDDEN CAMS Notch B2 CC DD DD AA BLACK 1 15 16 FLAT HEAD SCREW 2 used in this step 113S MODESTY PANEL with three HIDDEN CAMS ...
Страница 26: ...EXTENSION BLOCK X to the RIGHT UPRIGHT D2 Use two SILVER 1 1 8 FLAT HEAD SCREWS 10S through the larger holes in the EXTENSION BLOCK å Now fasten a CABINET LEFT 35GB to the EXTENSION BLOCK X Use two GOLD 5 16 FLAT HEAD SCREWS 3S through holes 1 and 3 å Fasten the CABINET RIGHT 35GA to the DRAWER UPRIGHT W as shown in the lower left Use two GOLD 5 16 FLAT HEAD SCREWS 3S through holes 1 and 3 å Then ...
Страница 27: ...LS into the holes that line up over the SHELF I å NOTE Perforations have been provided for access through the BACK Carefully cut out the holes needed Do not stand the unit upright without the BACK fastened The unit may collapse Caution NAIL 30 used in this step 1N D2 A2 G2 G2 L L B2 C2 Edge without holes Finished surface Finished surface Edge without holes These holes must line up over the SHELF I...
Страница 28: ...1 1 2 PAN HEAD SCREWS 49S å Fasten the MODESTY PANEL H2 to the LARGE TOP E2 Tighten one HIDDEN CAM å Fasten the RAILS U and V to the TOPS E2 and F2 Use ten BLACK 1 1 2 PAN HEAD SCREWS 49S E2 F2 U V SILVER 1 1 8 FLAT HEAD SCREW 3 used in this step 10S K2 H2 Page 28 Don t forget to fasten the MODESTY PANEL H2 to the LEFT BACK K2 with two BLACK 1 1 2 PAN HEAD SCREWS 49S 49S BLACK 1 1 2 PAN HEAD SCREW...
Страница 29: ... 9 16 LARGE HEAD SCREWS 1S å Fasten a STRIKE PLATE 6I to the DOOR M Use a BLACK 1 2 FLAT HEAD SCREW 11S Step 24 Page 29 BLACK 9 16 LARGE HEAD SCREW 4 used for the HINGES 1S M 42H BLACK 1 2 FLAT HEAD SCREW 1 used for the STRIKE PLATE 11S 6I Indented holes ...
Страница 30: ...E POSTS 73M into the DECORATIVE ENDS å Fasten the DECORATIVE BACKPLATE 34M and DECORATIVE KNOB 69K to the DOOR M Use a SILVER 1 1 2 MACHINE SCREW 95S å Push the MAGNETIC CATCH 3I into the hole in the LONG LEFT MOLDING AA B2 69K 33M 34M 33M 73M 73M BLACK 9 16 LARGE HEAD SCREW 4 used for the HINGES 1S AA 3I SILVER 1 1 2 MACHINE SCREW 1 used in this step 95S SILVER 5 8 MACHINE SCREW 2 used in this st...
Страница 31: ...R SIDES D266 and D267 Use two BLACK 1 9 16 FLAT HEAD SCREWS 30S å Turn the pencil drawer over and fasten the DRAWER BRACE EE to the PENCIL DRAWER BACK D466 and PENCIL DRAWER BOX FRONT D467 Use two BLACK 1 9 16 FLAT HEAD SCREWS 30S 1 2 3 4 Be sure the DRAWER BOTTOM inserts into the DRAWER BACK groove Groove D466 D267 Finished surface D266 B26 D267 D266 D467 30S 30S D466 D267 D266 D467 D466 30S 30S ...
Страница 32: ...ONT å Fasten the PULL 70K to the PENCIL DRAWER FRONT S Use two GRAY 1 3 8 MACHINE SCREWS 39S through the exact holes shown in the PENCIL DRAWER BOX FRONT D467 through the PENCIL DRAWER FRONT and into the PULL BLACK 7 8 LARGE HEAD SCREW 2 used in this step 17S 70K GRAY 1 3 8 MACHINE SCREW 2 used for the PULL 39S PENCIL DRAWER ON RIGHT PENCIL DRAWER ON LEFT D467 S BLACK 7 8 LARGE HEAD SCREW 2 used i...
Страница 33: ...o the PENCIL DRAWER RIGHT SIDE D266 and a DRAWER LEFT 35GD to the PENCIL DRAWER LEFT SIDE D267 Use four GOLD 5 16 FLAT HEAD SCREWS 3S through holes 1 and 3 1 2 3 D267 D266 GOLD 5 16 FLAT HEAD SCREW 4 used in this step 3S Roller end Roller end 1 2 3 ...
Страница 34: ...RGE DRAWER FRONT Q å Slide the LARGE DRAWER BOTTOM D716 into the grooves in the LARGE DRAWER SIDES D14 and D15 and LARGE DRAWER FRONT Q The tabs should insert freely into the slots Gently tilt the DRAWER SIDES side to side until the tabs slip into the slots Groove Be sure the DRAWER BOTTOM inserts into the DRAWER FRONT groove D14 D15 D716 D78 Q Unfinished surface With the palm of your hand tap the ...
Страница 35: ... DRAWER SIDES D14 and D15 Use four GOLD 5 16 FLAT HEAD SCREWS 3S through holes 1 and 3 å NOTE The screw head in the CAM must be visible through the slotted hole in the SLIDE Open end Open end Screw head turn CAM to line up holes in the SLIDES with holes in DRAWER SIDES 1 2 3 10A 10A GOLD 5 16 FLAT HEAD SCREW 4 used in this step 3S 1 2 3 ...
Страница 36: ...3S through holes 1 and 3 å NOTE The screw head in the CAM must be visible through the slotted hole in the SLIDE å Fasten a PULL 70K to the DRAWER FRONT R Use two BLACK 7 8 MACHINE SCREWS 37S 1 2 3 1 2 3 Roller end Roller end 70K R D24 D25 Screw head turn CAM to line up holes in the SLIDES with holes in DRAWER SIDES 10A 10A BLACK 7 8 MACHINE SCREW 2 used for the PULL 37S GOLD 5 16 FLAT HEAD SCREW 4...
Страница 37: ... 70K to the LARGE DRAWER FRONT Q Use two GOLD 1 MACHINE SCREWS 50S å Push the FILE GLIDES 4B onto the LARGE DRAWER SIDES D14 and D15 D14 D15 4B 4B Q 70K Almost time to celebrate With a nap GOLD 1 MACHINE SCREW 2 used in this step 50S ...
Страница 38: ...Step 33 Page 38 å Insert a GROMMET 10P and GROMMET CAP 1P into the large holes in the TOPS E2 and F2 E2 F2 10P 1P ...
Страница 39: ...e rollers on the unit Lift the front of the drawer up and slide it into the unit Repeat this step to insert the pencil drawer å To insert the large drawer into your unit line up the EXTENSION SLIDES on the drawer with the EXTENSION RAILS on the unit and push the drawer into the unit until the drawer is fully inserted The drawer will push in hard until it is all the way in then it will slide in and...
Страница 40: ...e DRAWER FRONTS line up better when closed Tighten the SCREW when finished with adjustments å NOTE Please read the back pages of the instruction booklet for important safety information å This completes assembly Clean with your favorite furniture polish or a damp cloth Wipe dry Cam The higher the screw in the oblong hole the higher your drawer front will be The lower the screw the lower the drawer ...
Страница 41: ...y moving furniture that is not designed and equipped with casters Furniture can tip over or break if improperly moved Physical injury Furniture can be very heavy Breakage of tops particularly with double pedestal furniture drawers at both ends Unload shelves and drawers from top to bottom before moving the unit Do not push furniture especially on a carpeted floor Have a friend help you lift the ite...