background image

 å

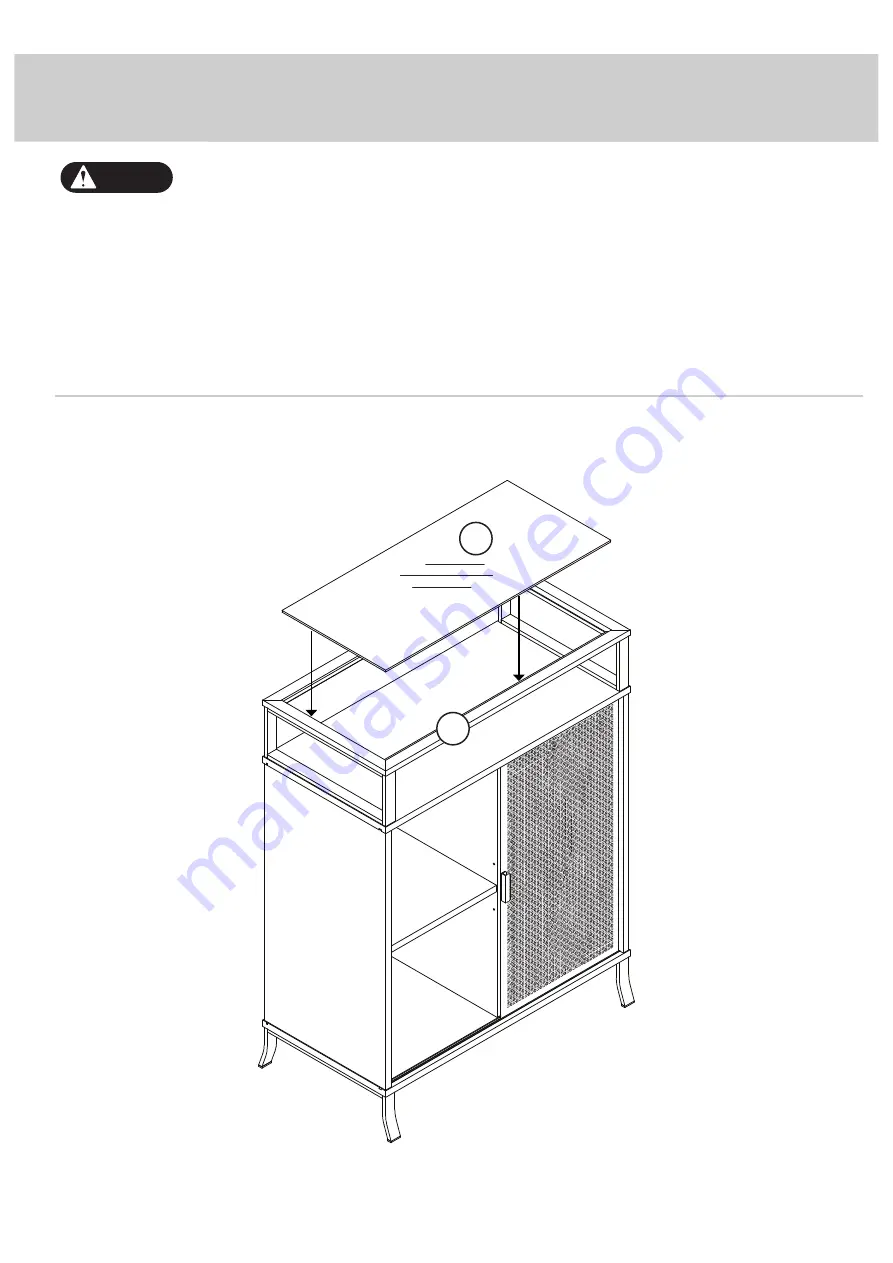
Carefully set the GLASS TOP (E) onto the
GLASS FRAME (K).

Step 13

Tempered safety glass is used. It is stronger than normal glass, and it will not break into long, sharp, knife-like 
shards. However, safety glass 

can break

. When safety glass breaks, it instantly fractures into small, bead-like 

pieces. These small pieces may have sharp edges.
For your safety, follow these precautions when you assemble your product:

• Wear safety glasses or other eye protection.
• Do not try to drill into or cut safety glass. It will instantly break into small pieces.
• Do not force the glass into position.
• If the glass breaks, be careful when you pick up the pieces. They may have sharp edges.


Caution

Page 18

E

K

Содержание 5425655

Страница 1: ...S INSTRUCTION BOOKLET CONTAINS IMPORTANT SAFETY INFORMATION PLEASE READ AND KEEP FOR FUTURE REFERENCE Accent Storage Cabinet City Center Collection Model 5425655 For things n such Teknik www teknikoffice co uk ...

Страница 2: ...Part Identification Hardware Identification Assembly Steps Safety Hammer Not actual size No 2 Phillips Screwdriver Tip Shown Actual Size Table of Contents Assembly Tools Required 3 4 5 19 20 Page 2 ...

Страница 3: ...help distinguish similar parts from each other Use this part identification to help identify similar parts Now you know our ABCs A LEFT END 1 B RIGHT END 1 C UPRIGHT 1 D ADJUSTABLE SHELF 2 E GLASS TOP 1 F BOTTOM 1 G LEG 2 H FOOT 1 J FRAME 2 K GLASS FRAME 1 L DOOR 1 M BACK 2 N SHELF 1 Page 3 A B C D E F G H J K L M N J D M G ...

Страница 4: ... may receive extra hardware with your unit Page 4 CAM SCREW 6 1 HIDDEN CAM 6 2 WOOD DOWEL 6 3 1 3 8 FLAT HEAD SCREW 6 7 8 13 16 HEX HEAD SCREW 12 APPLIQUE CARD 1 4 L WRENCH 1 5 BACK CONNECTOR 6 6 1 2 PAN HEAD SCREW 4 9 5 8 FLAT HEAD SCREW 6 10 SHELF PIN 8 11 ...

Страница 5: ... Turn the CAM SCREW or gently tap the CAM DOWEL until the shoulder is against the surface of the part 1 Hidden Cam Hidden Cam Arrow Push a HIDDEN CAM into the part The arrow in the HIDDEN CAM must point toward the hole in the edge of the board Hole 2 3 1 2 Insert the CAM SCREW or CAM DOWEL into the HIDDEN CAM Tighten the HIDDEN CAM Page 5 ...

Страница 6: ...n a carpeted floor or on the empty carton to avoid scratching your unit or the floor å Push six HIDDEN CAMS 2 into the ENDS A and B and UPRIGHT C Page 6 2 Arrow A C Just think The sooner you do this the sooner you do something else B ...

Страница 7: ...RIGHT C å Fasten the BOTTOM F to the ENDS A and B and UPRIGHT C Use six 1 3 8 FLAT HEAD SCREWS 7 å NOTE You should start each SCREW a few turns before completely tightening any of them å NOTE Be sure the WOOD DOWELS in the ENDS and UPRIGHT insert into the BOTTOM Step 2 3 B C A F 1 3 8 FLAT HEAD SCREW 6 used in this step 7 Smaller groove ...

Страница 8: ...å Fasten the LEGS G to the BOTTOM F Tighten four 13 16 HEX HEAD SCREWS 8 using the L WRENCH 5 Step 3 F G G 5 13 16 HEX HEAD SCREW 4 used in this step 8 Page 8 ...

Страница 9: ...Step 4 å Fasten the FOOT H to the BOTTOM F exactly as shown Use four 1 2 PAN HEAD SCREWS 9 F H 1 2 PAN HEAD SCREW 4 used in this step 9 Page 9 ...

Страница 10: ...å Carefully stand your unit upright å Insert the BACKS M into the grooves in the ENDS A and B and BOTTOM F Step 5 Page 10 Don t worry It isn t Rome This can be built in a day F M M B A ...

Страница 11: ...Step 6 Page 11 å Fasten the FRAMES J to the GLASS FRAME K Tighten four 13 16 HEX HEAD SCREWS 8 using the L WRENCH 5 5 K J J 13 16 HEX HEAD SCREW 4 used in this step 8 ...

Страница 12: ...Step 7 å Turn six CAM SCREWS 1 into the SHELF N N 1 Page 12 ...

Страница 13: ...å Fasten the SHELF N to the FRAMES J Tighten four 13 16 HEX HEAD SCREWS 8 using the L WRENCH 5 Step 8 5 13 16 HEX HEAD SCREW 4 used in this step 8 J N J Page 13 ...

Страница 14: ...Step 9 Page 14 å Insert the SHELF PINS 11 into the hole locations of your choice in the ENDS A and B and UPRIGHT C Set the ADJUSTABLE SHELVES D onto the SHELF PINS A B C D D 11 11 8 used ...

Страница 15: ...Step 10 å Insert the DOOR L into the track in the BOTTOM F L F Page 15 ...

Страница 16: ...the ENDS A and B and UPRIGHT C Tighten six HIDDEN CAMS å NOTE Be sure the WOOD DOWELS in the ENDS and UPRIGHT insert into the SHELF å NOTE Be sure the BACKS insert into the smaller groove in the SHELF and the DOOR inserts into the track in the SHELF Step 11 Page 16 3 B C A Smaller groove N ...

Страница 17: ... and SHELF N as shown You may need to gently tap them in with your hammer å Fasten the BACK CONNECTORS 6 to the BOTTOM F and SHELF N Use six 5 8 FLAT HEAD SCREWS 10 If you re doing this to help a friend don t leave without a bite M M 6 6 Lip F N Lip 5 8 FLAT HEAD SCREW 6 used in this step 10 ...

Страница 18: ...s it instantly fractures into small bead like pieces These small pieces may have sharp edges For your safety follow these precautions when you assemble your product Wear safety glasses or other eye protection Do not try to drill into or cut safety glass It will instantly break into small pieces Do not force the glass into position If the glass breaks be careful when you pick up the pieces They may...

Страница 19: ... onto each visible HIDDEN CAM å NOTE Please read the back pages of the instruction booklet for important safety information å This completes assembly Clean with a damp cloth Wipe dry To cover HIDDEN CAMS 4 3 5 l b s 2 5 l b s Adjustable shelf 25 lbs each 3 5 l b s t o t a l ...

Страница 20: ...tip over Overloaded shelves can break Never exceed the weight limits shown in the instructions Work from bottom to top when loading shelves Place the heavier items on the lower shelves Placing TVs on furniture items that are not designed to support a television is hazardous Risk of injury or death TVs can be very heavy Plus the weight and location of the picture tube tends to make TVs unbalanced a...

Отзывы: