


2
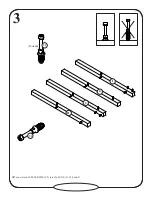
Push thirty-one HIDDEN CAMS (U2) into the ENDS (A), UPRIGHTS (B and C), SHELVES (E), BACKS (F), DRAWER
UPRIGHTS (O), and SHELF MOLDINGS (P). Then insert the metal end of fifteen CAM DOWELS (W2) into the HIDDEN CAMS.
(15 used)
Arrow
Do not tighten the HIDDEN CAMS in this step.
Arrow
Arrow
Arrow
B
C
O
O
U2
W2
(31 used)
E
F
F
E
P
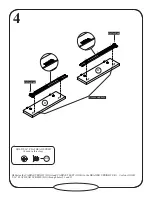
Do not insert CAM
DOWELS into these parts.
Do not insert CAM DOWELS
into these HIDDEN CAMS.
A
U2
U2