background image

 å

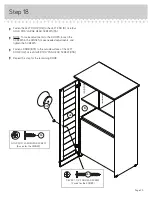
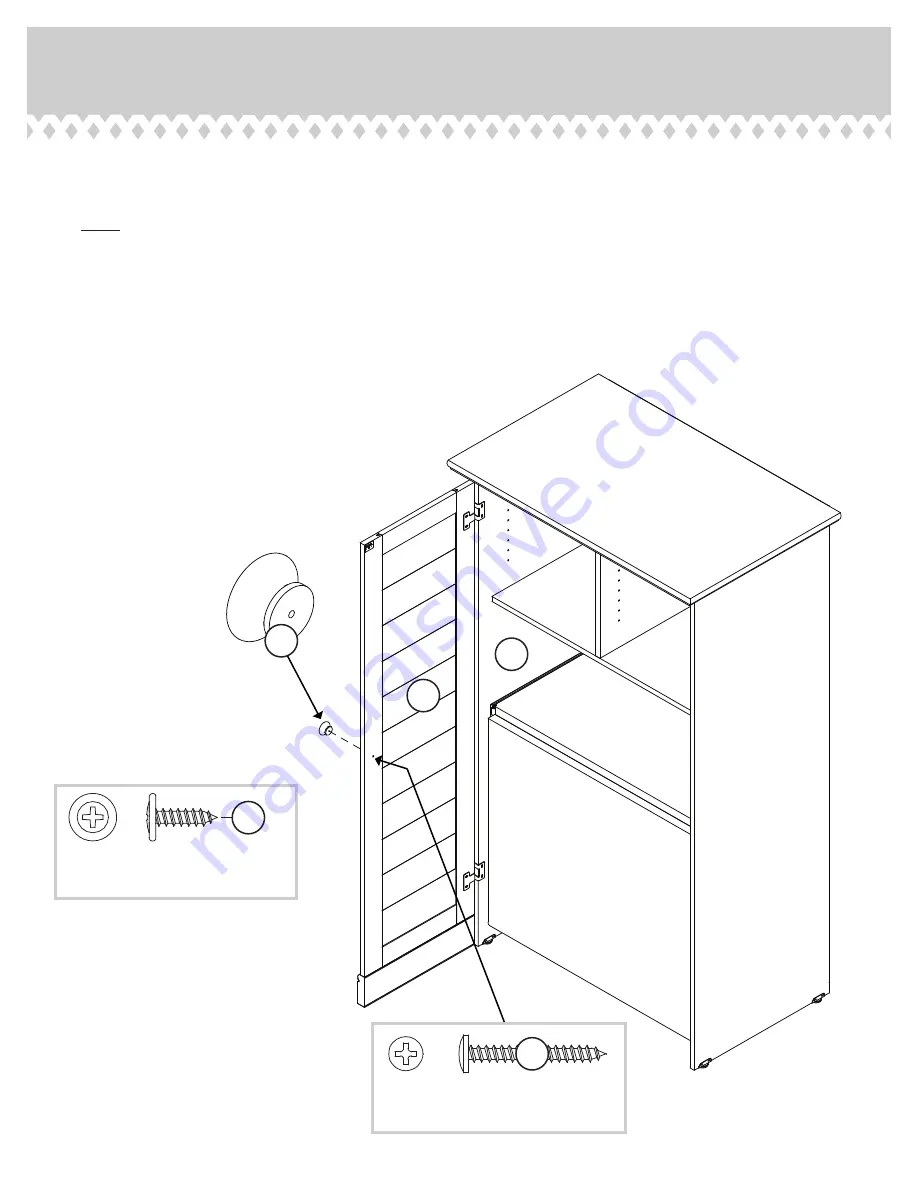
Fasten the LEFT DOOR (H2) to the LEFT END (B). Use four
GOLD 9/16" LARGE HEAD SCREWS (5S).

 å

NOTE: To make adjustments to the DOORS, loosen the
SCREWS in the HINGES, make needed adjustments, and 
tighten the SCREWS.

 å

Fasten a KNOB (87K) to the outside surface of the LEFT
DOOR (H2). Use a SILVER 1-1/4" PAN HEAD SCREW (45S).

 å

Repeat this step for the remaining DOOR.

Step 18

Page 23

GOLD 9/16" LARGE HEAD SCREW

(8 used for the HINGES)

5S

87K

SILVER 1-1/4" PAN HEAD SCREW

(2 used for the KNOBS)

45S

H2

B

Содержание 5158097

Страница 1: ...www teknikoffice co uk Get crafty Hideaway Office Craft Station Model 5158097 Teknik ...

Страница 2: ... 3 4 5 6 24 A RIGHT END 1 B LEFT END 1 C TOP 1 D FIXED SHELF 1 E BOTTOM 1 F BACK 1 G2 RIGHT DOOR 1 H2 LEFT DOOR 1 I PULL OUT TOP 1 J3 PULL OUT BACK 1 K FLIP UP TOP 1 L OUTER UPRIGHT 2 M INNER UPRIGHT 2 N SHELF UPRIGHT 1 O SLIDING SHELF 1 P SLIDING SHELF BACK 1 Q ADJUSTABLE SHELF 6 R LEG 1 S FRONT MOLDING 1 T RIGHT MOLDING 1 U LEFT MOLDING 1 V LEG STOP 1 Page 2 Now you know our ABCs Part Identificat...

Страница 3: ...arts will have a label or an inked letter on the edge to help distinguish similar parts from each other Use this part identification to help identify similar parts Part Identification Page 3 A B C D E F G2 H2 I J3 K L L M M N O P Q Q Q Q Q Q R S T U V ...

Страница 4: ...4 FLIP UP TOP HINGE 2 16H MOLDING CONNECTOR 2 16F HINGE 4 30H EXTENSION SET SHOWN SEPARATED LOCKING EXTENSION SLIDE 2 Z Y LOCKING EXTENSION RAIL 2 CASTER 2 15C 35AW CABINET RIGHT 1 35AY DRAWER RIGHT 1 35AZ DRAWER LEFT 1 35AX CABINET LEFT 1 16C CASTER BRACKET 2 Page 4 OUTLET 1 1D EXTENSION SET SHOWN SEPARATED EXTENSION SLIDE 2 40MC EXTENSION RAIL 2 40MA 17E LEVELER BRACKET 4 NAIL 46 1N STRIKE PLATE...

Страница 5: ...AD SCREW 6 7S GOLD 9 16 LARGE HEAD SCREW 16 5S BLACK 1 5 8 PAN HEAD SCREW 6 27S BLACK 1 7 8 FLAT HEAD SCREW 9 2S SILVER 2 FLAT HEAD SCREW 5 57S BROWN 1 FLAT HEAD SCREW 4 18S CORD CLIP 1 4P BLACK 2 PAN HEAD SCREW 4 66S GOLD 5 16 FLAT HEAD SCREW 16 3S SCREW COVER 4 16P METAL PIN 24 1R BLACK 1 2 FLAT HEAD SCREW 2 11S GROMMET 1 10P RUBBER SLEEVE 24 2R Page 5 SILVER 5 8 FLAT HEAD SCREW 4 23S ...

Страница 6: ...tching your unit or the floor å To begin assembly push a SAUDER TWIST LOCK FASTENER 11F into the large holes in the FIXED SHELF D and BOTTOM E å Repeat this step for the OUTER UPRIGHTS L and SHELF UPRIGHT N Page 6 14 used 11F Do not tighten the TWIST LOCK FASTENERS in this step 11F D E ...

Страница 7: ...the MOLDINGS S T and U Step 2 Page 7 Flat end Flat end S T U Use your hammer to tap the MOLDING CONNECTORS 16F into the notches in the MOLDINGS Unfinished surface Unfinished surface 16F 16F Just think The sooner you do this the sooner you do something else ...

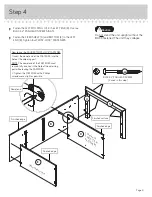
Страница 8: ... other hole that lines up with the hole in the END Turn a SCREW into this hole å Fasten the CABINET RIGHT 35AW to the RIGHT END A and the CABINET LEFT 35AX to the LEFT END B Use four GOLD 5 16 FLAT HEAD SCREWS 3S through the first and second holes from the roller end in the RAIL and into the holes of your choice in the ENDS å Now insert the CORD CLIP 4P into the hole in the RIGHT END A The CORD CLI...

Страница 9: ...e of the adjoining part NOTE The dowel end of the FASTENER must remain fully inserted in the hole of the adjoining part while locking the FASTENER 2 Tighten the FASTENER with a Phillips screwdriver as tight as possible Finished edge Finished edge Finished edge Unfinished surface Surface with TWIST LOCK FASTENERS Finished surface B D E S U Dowel end BLACK 2 PAN HEAD SCREW 2 used in this step 66S Do ...

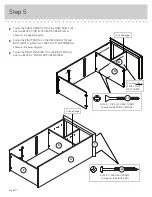
Страница 10: ...D and BOTTOM E Tighten four TWIST LOCK FASTENERS as shown in the lower diagram å Fasten the RIGHT MOLDING T to the RIGHT END A Use two BLACK 2 PAN HEAD SCREWS 66S Step 5 Page 10 D D N BLACK 1 7 8 FLAT HEAD SCREW 2 used for the SHELF UPRIGHT 2S Finished edge Finished edge A BLACK 2 PAN HEAD SCREW 2 used for the RIGHT END 66S T E Surface without TWIST LOCK FASTENERS ...

Страница 11: ... NOTE Do not overtighten the SCREWS into the TOP å Fasten the RIGHT and LEFT MOLDINGS U and T to the TOP C Use six BLACK 1 5 8 PAN HEAD SCREWS 27S å NOTE Do not overtighten the SCREWS into the TOP Step 6 Page 11 N C T U Unfinished edge S BLACK 1 5 8 PAN HEAD SCREW 6 used for the RIGHT and LEFT MOLDINGS 27S SILVER 2 FLAT HEAD SCREW 2 used for the FRONT MOLDING 57S Surface with holes ...

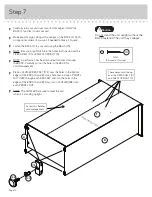
Страница 12: ...h the BACK Carefully cut out the hole in the BACK for cord management å Place a LEVELER BRACKET 17E over the holes in the bottom edges of the ENDS A and B Use a hammer to drive a PROPEL NUT 14M through each BRACKET and into the holes in the edges of the ENDS A and B Now turn a LEVELER 18E into each PROPEL NUT å NOTE The LEVELERS are used to level the unit when it is standing upright Do not stand t...

Страница 13: ...WS 3S å NOTE For each EXTENSION RAIL turn a SCREW into the hole shown in the enlarged diagram Then slide the inner cartridge of the EXTENSION RAIL in to find the other hole that lines up with the hole in the UPRIGHTS Turn a SCREW into this hole Open end Open end Edge with TWIST LOCK FASTENERS L L GOLD 5 16 FLAT HEAD SCREW 4 used in this step 3S Push the black lever in and pull the SLIDE from the RA...

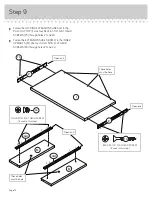
Страница 14: ...ON SLIDES 40MC to the INNER UPRIGHTS M Use four GOLD 5 16 FLAT HEAD SCREWS 3S through holes 1 and 4 Step 9 Page 14 I BLACK 1 1 4 FLAT HEAD SCREW 4 used in this step 7S These holes must be here 1 2 3 4 1 2 3 4 M M Z Z Open end Open end 1 2 3 4 1 2 3 4 Open end These holes must be here 7S GOLD 5 16 FLAT HEAD SCREW 4 used in this step 3S 40MC 40MC ...

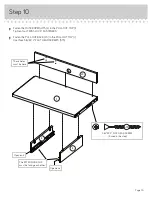
Страница 15: ...T LOCK FASTENERS å Fasten the PULL OUT BACK J3 to the PULL OUT TOP I Use three SILVER 2 FLAT HEAD SCREWS 57S Step 10 Page 15 I J3 L L SILVER 2 FLAT HEAD SCREW 3 used in this step 57S The EXTENSION RAILS must be facing each other Open end Open end These holes must be here ...

Страница 16: ...nd of the LEG R Carefully insert a CASTER 15C through each BRACKET on the LEG and into the holes in the edge of the LEG Step 11 Page 16 BLACK 1 7 8 FLAT HEAD SCREW 4 used in this step 2S 15C 16C M M Surface without EXTENSION SLIDES The CASTER should overhang this bottom surface more R Don t worry It isn t Rome This can be built in a day ...

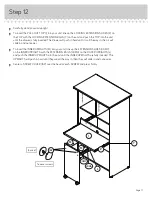
Страница 17: ...e way in then it will slide in and out easier å To insert the INNER UPRIGHTS M into your unit line up the EXTENSION SLIDES 40MC on the INNER UPRIGHTS with the EXTENSION RAILS 40MA on the OUTER UPRIGHTS L and push the INNER UPRIGHTS into the unit until the INNER UPRIGHTS are fully inserted The UPRIGHTS will push in hard until they are all the way in then they will slide in and out easier å Center a...

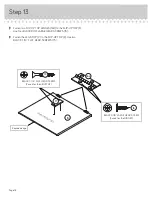
Страница 18: ... UP TOP HINGES 16H to the FLIP UP TOP K Use four BLACK 9 16 LARGE HEAD SCREWS 1S å Fasten the LEG STOP V to the FLIP UP TOP K Use two BLACK 1 1 4 FLAT HEAD SCREWS 7S Step 13 Page 18 K V 16H Unfinished surface Rounded edge BLACK 9 16 LARGE HEAD SCREW 4 used for the HINGES 1S ...

Страница 19: ...the PULL OUT TOP I Use four BLACK 9 16 LARGE HEAD SCREWS 1S å Fasten the MAGNETIC CATCH 1I to the FRONT MOLDING S Use two BLACK 9 16 LARGE HEAD SCREWS 1S Step 14 Page 19 I K BLACK 9 16 LARGE HEAD SCREW 6 used in this step 1S 1I 1S S Finished surface Rounded edge ...

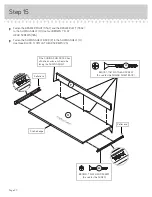
Страница 20: ...e SLIDING SHELF BACK P to the SLIDING SHELF O Use three BLACK 1 7 8 FLAT HEAD SCREWS 2S BROWN 1 FLAT HEAD SCREW 4 used for the SLIDES 18S Roller end Roller end O P BLACK 1 7 8 FLAT HEAD SCREW 3 used for the SLIDING SHELF BACK 2S If the SLIDING SHELF BACK has a finished surface it should be facing the SLIDING SHELF Finished edge Finished surface ...

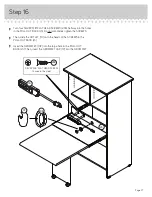
Страница 21: ...pletely tighten the SCREWS å Then slide the OUTLET 1D onto the heads of the SCREWS in the PULL OUT BACK J3 å Insert the GROMMET 10P into the large hole in the PULL OUT BACK J3 Then insert the GROMMET CAP 1P into the GROMMET Step 16 Page 21 10P 1P J3 1D SILVER 5 8 FLAT HEAD SCREW 4 used in this step 23S ...

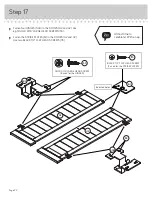
Страница 22: ... å Fasten the STRIKE PLATES 6I to the DOORS G2 and H2 Use two BLACK 1 2 FLAT HEAD SCREWS 11S Step 17 Page 22 GOLD 9 16 LARGE HEAD SCREW 8 used for the HINGES 5S 5S 30H 30H G2 H2 BLACK 1 2 FLAT HEAD SCREW 2 used for the STRIKE PLATES 11S Almost time to celebrate With a nap Indented holes 6I ...

Страница 23: ...REWS in the HINGES make needed adjustments and tighten the SCREWS å Fasten a KNOB 87K to the outside surface of the LEFT DOOR H2 Use a SILVER 1 1 4 PAN HEAD SCREW 45S å Repeat this step for the remaining DOOR Step 18 Page 23 GOLD 9 16 LARGE HEAD SCREW 8 used for the HINGES 5S 87K SILVER 1 1 4 PAN HEAD SCREW 2 used for the KNOBS 45S H2 B ...

Страница 24: ... in the ENDS A and B and UPRIGHT N Set the ADJUSTABLE SHELVES Q onto the METAL PINS å NOTE Please read the back pages of the instruction booklet for important safety information å This completes assembly Clean with a damp cloth Wipe dry 24 used 15 lbs 25 lbs total 30 lbs 3 lbs each Q Q 1R 2R 25 lbs 40 lbs 20 lbs A B N 3 lbs each ...

Страница 25: ...sult in death or serious injury due to furniture collapse or tip over NEVER place a TV on furniture that is not intended to support a TV This product is not designed to support a television unless a TV warning label is included and the instructions specifically state the size and weight of the television Overloading drawers and shelves may result in furniture that can break or sag or tip over which...

Отзывы: