background image

PL

60

zaprogramowanej  płyty  grzejnej 

będzie  naprzemiennie  wyświetlał 

wybrany poziom mocy oraz symbol       

.

Po  upływie  określonego  czasu 

gotowania,  zaprogramowana 

strefa  grzewcza  wyłączy  się,  a 

zegar  wyemituje  serię  sygnałów 

dźwiękowych,  trwających  przez 

kilka  sekund. Aby  wyłączyć  sygnał 

dźwiękowy, dotknij dowolny czujnik.

Wskaźnik  programatora  czasowego 

(12)  wyświetli  migające 

00

  obok 

punktu  dziesiętnego  (4)  wybranej 

strefy. Jeśli wyłączona strefa grzewcza 

jest  gorąca,  jej  wskaźnik  zasilania 

(3) będzie naprzemiennie wyświetlał 

symbol H i   „-“.

.  Jeśli  chcesz  jednocześnie 

zaprogramować inną strefę grzejną, 

należy powtórzyć kroki od 1 do 3.

Jeśli  jedna  lub  więcej  stref  są  już 

z a p r o g r a m o w a n e ,   w s k a ź n i k 

programatora czasowego (12) pokaże 

domyślnie najkrótszy czas pozostały 

do   końca, pokazując „t” na odnośnej 

strefie.  Reszta  zaprogramowanych 

stref  będzie  pokazywać  na  swoich 

wskaźnikach  migający  punkt 

przeciętny.  Gdy  zostanie  naciśnięty 

„suwak” innej zaprogramowanej strefy, 

zegar pokaże przez kilka sekund czas 

pozostały dla tej strefy, a jej wskaźnik 

pokaże na przemian poziom mocy i „t”.

Zmiana zaprogramowanego czasu.

Aby  zmienić  zaprogramowany 

czas,  należy  nacisnąć  „suwak”  (2) 

zaprogramowanej strefy. Będzie wtedy 

można odczytać i zmodyfikować czas.

Zaprogramowany czas można zmienić 

przy  pomocy  czujników    (10)  i 

  (11).

Wyłączanie zegara 

:  Jeśli  chcesz  zatrzymać  zegar 

przed  upływem  zaprogramowanego 

czasu , można to zrobić w dowolnym 

momencie  poprzez  zmianę  jego 

wartości na „--”.

Wybierz żądaną płytę. 

2

  Ustaw wartość zegara na „00” za 

pomocą  czujnika    (10).  Zegar 

zostanie  wyłączony.  Można  to 

również zrobić szybciej naciskając 

jednocześnie „czujniki  (10), i 


(11).

Funkcja zarządzania 

energią (w zależności od 

modelu)

Niektóre  modele  są  wyposażone 

w  funkcję  ograniczania  mocy 

(zarządzanie  energią).  Funkcja 

ta  pozwala  na  zmianę  całkowitej 

mocy  generowanej  przez  kuchenkę 

na  inne  wartości,  wskazane  przez 

użytkownika. Aby  to  zrobić,  należy 

wejść  do  menu  ograniczania  mocy, 

dostępnego  przez  pierwszą  minutę 

po podłączeniu płyty grzejnej do sieci 

elektrycznej.


1

  Naciśnij klawisz dotykowy    (11) 

na  trzy  sekundy.  Na  wskaźniku 

programatora  czasowego  (12) 

pojawią się litery PL.

2

  Naciśnij klawisz dotykowy blokady 

 (6). Pojawią się poszczególne 

wartości  mocy,  do  których  płyta 

może zostać ograniczona i można 

je  będzie  zmienić  za  pomocą 

czujników    (11) i   (10). 

3

  Po  wybraniu  wartości,  ponownie 

naciśnij klawisz dotykowy blokady

  (6).  Płyta  grzejna  będzie 

ograniczona do wybranej wartości 

mocy.

Jeśli  chcesz  ponownie  zmienić  tę 

wartość,  należy  odłączyć  płytę  od 

zasilania  i  podłączyć  ją  ponownie 

po  kilku  sekundach.  W  ten  sposób 

znów będzie można wejść do menu 

ograniczania mocy.

Za każdym razem, gdy poziom mocy 

strefy  grzejnej  zostanie  zmieniony, 

ogranicznik  mocy  obliczy  całkowitą 

moc generowaną prze kuchenkę. Jeśli 

zostanie osiągnięty łączny limit mocy, 

sterowanie dotykowe nie pozwoli Ci 

na zwiększenie poziomu mocy danej 

płyty  grzejnej.  Kuchenka  wyemituje 

sygnał  dźwiękowy  i  wskaźnik  mocy 

(3) zacznie migać na poziomie, który 

nie może zostać przekroczony. Jeśli 

chcesz przekroczyć tę wartość, należy 

obniżyć  moc  innych  płyt.  Czasami 

obniżenie  mocy  innej  płyty  o  jeden 

poziom  będzie  niewystarczające, 

ponieważ  zależy  to  od  ustawionej 

mocy grzejnej każdej płyty. Możliwe 

jest, że w celu podniesienia poziomu 

dużej  płyty  grzejnej,  poziom  mocy 

kilku mniejszych będzie musiał zostać 

zmniejszony.

W przypadku korzystania z szybkiego 

włączania przy maksymalnej mocy i 

wspomniana wartość jest wyższa od 

wartości ustalonej przez ogranicznik, 

płyta grzewcza zostanie ustawiona na 

maksymalnym  możliwym  poziomie. 

Kuchenka  wyemituje  sygnał 

dźwiękowy  i  wspomniana  wartość 

mocy mignie dwukrotnie na wskaźniku 

(3).

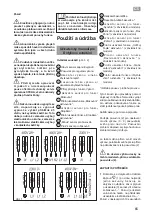
Funkcje specjalne: 

iCooking (w zależności 

od modelu)

Sterowanie  dotykowe  posiada 

specjalne  funkcje,  które  pomagają 

użytkownikowi  gotować  przy  użyciu 
czujnika iCooking   (16). Funkcje te 

są dostępne zależności od modelu.

Aby aktywować specjalną funkcję w 

danej strefie:

1

  Po  pierwsze,  powinna  ona 

zostać wybrana; następnie, punkt 

dziesiętny (4) zostanie aktywowany 

na wskaźniku mocy (3).

2

  Dotknij  teraz  czujnika  iCooking 

  (16).  Po  każdorazowym 

naciśnięciu,  pojawią  się  funkcje 

iCooking,  dostępne  dla  każdej 

strefy.  Włączenie  tych  funkcji 

zostanie  zasygnalizowane 

odpowiednimi  diodami (17),  (18), 

(19) i (20). 

Jeśli chcesz w dowolnym momencie 

anulować włączoną specjalną funkcję, 

należy dotknąć „suwaka” (2) odnośnej 

strefy, aby ją wybrać. Punkt dziesiętny 

(4) wskaźnika mocy (3) zaświeci się. 

Następnie dotknij ponownie „suwaka” 

(2), aby ustawić nowy poziom mocy lub 

aby wyłączyć strefę; można też wybrać 

inny  specjalną  funkcję,  dotykając 
ponownie czujnika iCooking    (16).

Содержание 112520018

Страница 1: ...L KULLANMA VE MUHAFAZA N KURULUM TAL MATLARI VE TAVS YELER SERAM K ISITMA PLAKALARI DOKUNMAT K KONTROL INSTRUKCJA OBS UGI MONTA U ORAZ WSKAZ WKI DOTYCZ CE PIEL GNACJI CERAMICZNYCH P YT KUCHENNYCH TOUC...

Страница 2: ...HAFAZA N KURULUM TAL MATLARI VE TAVS YELER SERAM K ISITMA PLAKALARI DOKUNMAT K KONTROL 48 INSTRUKCJA OBS UGI MONTA U ORAZ WSKAZ WKI DOTYCZ CE PIEL GNACJI CERAMICZNYCH P YT KUCHENNYCH TOUCH CONTROL 56...

Страница 3: ...3 Presentaci n Apresenta o Presentation Pr sentation Pr sentation Wprowadzenie Proveden Predstavenie Prezentare Presentasjon Presentazione Presentatie...

Страница 4: ...standen Unidades en mm Unidades em mm Units in mm Einheiten in mm Unit s en mm mm cinsiden birimler Wymiary w mm Jednotky v mm Jednotky v mm Unit i n mm Unit in mm Eenheden in mm Instalaci n Instala o...

Страница 5: ...r Wymiary w mm Jednotky v mm Jednotky v mm Unit i n mm Unit in mm Eenheden in mm Instalaci n Instala o Installation Montage Installation Kurulum Monta Instalace In tal cia Instalare Installazione Inst...

Страница 6: ...o s s i n supervisi n Los ni os no deben jugar con el aparato Precauci n Es peligroso cocinar con grasas o aceites sin estar presente ya que pueden pro ducir fuego NUNCA trate de extinguir un fuego co...

Страница 7: ...no ser as la encimera puede tener fallos de funcionamiento Sobretensiones anormalmen te altas pueden provocar la aver a del sistema de control como ocurre con cualquier tipo de aparato el c trico Se a...

Страница 8: ...de 10 segundos en caso contrario el control t ctil se apagar autom ticamente Cuando el Control T ctil est activado puede ser desconectado en cualquier momento tocando el sensor de encendido apagado ge...

Страница 9: ...roceso de cocci n En caso de que la funci n temporizador se encuentre activo tambi n permanecer en pausa Activaci n de la funci n Stop Go Toque durante un segundo el sensor Stop Go 8 Se enciende el pi...

Страница 10: ...l primer minuto tras conectar la cocina a la red es posible acceder al men de limitaci n de potencia 1 Toque el sensor 11 durante tres segundos Aparecer n las letras PL en el indicador del reloj tempo...

Страница 11: ...nte nunca emplear agua ya templada o caliente Elincumplimientodeestascondiciones distorsiona el adecuado control de la ebullici n ADVERTENCIA noutilizaresta funci n para un cocinado distinto al de her...

Страница 12: ...minutos se ajusta al nivel 9 seg n modelo 0 1 2 3 4 5 6 7 8 9 P 8 8 5 4 4 3 2 2 1 0 Cuando se ha producido la descone xi n de seguridad aparece un 0 si la temperatura en la superficie del vidrio no es...

Страница 13: ...ras El aparato ha sido ensayado de acuerdo a la norma EN 60350 2 y el valor obtenido en Wh Kg est disponible en la placa de caracteristicas del aparato Si algo no funciona Antes de llamar al Servicio...

Страница 14: ...ato ou um cobertor N o armazene objectos nas reas de cozedura da placa Eviteposs veis riscos de inc ndio O gerador de indu o cumpre as normas europeias vigentes Noentanto recomendamos que as pessoas c...

Страница 15: ...ont m informa es t cnicas importantes Utiliza o e manuten o Instru es do controlo t ctil ELEMENTOS DEL PAINEL DE CONTROLE figura 2 1 Sensor de ligar desligar general 2 Cursor slider para sele o de pot...

Страница 16: ...to desligado um H aparece no seu indicador de pot ncia 3 se a superf cie de vidro da zona de cozimento relacionado quente e h um risco de queimaduras Quando a temperatura cai o indicador 3 desliga se...

Страница 17: ...cia antes de passar o seu tempo de trabalho pode ser feito por meio de tocar cursor slider modificar o seu n vel de energia ou repetindo a etapa 3 Fun o temporizador rel gio de contagem regressiva Est...

Страница 18: ...vel que n o pode ser ultrapassado Se voc deseja exceder esse valor voc deve diminuir o poder dos outros bicos s vezes n o ser suficiente para reduzir outra por um nico n vel pois isso depende do pode...

Страница 19: ...ue a cozedura est sob controlo do sistema Quando o sistema detetar que a fervura estar prestes a come ar soar um primeiro bipe Aproveite esta oportunidade para preparar alimentos a ferver ou cozinhar...

Страница 20: ...elas e recipientes espessos com fundos totalmente planos N o recomend vel utilizar recipientes cujo di metro seja menor do que a zona para cozinhar N o deslize os recipientes sobre o vidro pois podem...

Страница 21: ...ecem O recipiente n o adequado n o tem fundo ferromagn tico ou demasiado pequeno Verifique se o fundo do recipiente atra do por um man ou utilize um fundo maior Ouvese um zumbido no in cio da cozedura...

Страница 22: ...sible fire hazards The induction generator complies with current EU l e g i s l a t i o n W e howeverrecommend that anyone fitted with a device such as a pacemaker should refer to their physician or i...

Страница 23: ...et together with the instructions manual throughout the product s service life These contain important technical information Use and Maintenance User instructions of the Touch Control HANDLING ELEMENT...

Страница 24: ...onnected or otherwise a will light up if the hob is still connected TURNING ALL PLATES OFF All plates can be simultaneously disconnected by using the general on off sensor 1 All plate indicators 3 wil...

Страница 25: ...ly program each plate for durations ranging from 1 to 90 minutes Setting a timer on a plate Once the power level is set on the desired zone and while the decimal dot of the zone keeps on the zone will...

Страница 26: ...ooking functions available in each zone one by one These functions will show the activation with the corresponding leds 17 18 19 and 20 If you want to cancel a special active function at any time you...

Страница 27: ...nd to activate the timer function for both zones To activate this function press the sensor 15 By doing so the decimal points 4 of the linked plates will light up and the value 0 will be shown on thei...

Страница 28: ...cleaner for ceramic hot plates Plastic objects sugar or food containing a lot of sugar that have melted onto the surface must be removed immediately using a scraper Metallic sheens are caused by dragg...

Страница 29: ...nduction zones have a fan to keep the electronics cool This only operates when the electronic circuits get hot It stops again when the circuits cool whether the hob is turned on or not The symbol will...

Страница 30: ...Ger t spielen V o r s i c h t berhitzte Fette und le k nnen sich selbst entz nden E i n e n B r a n d NIEMALSmitWasser l schen Schalten Sie in diesem Fall das Ger t aus und ersticken Sie die Flammen m...

Страница 31: ...chalten und vor dem Herauszie hen des Steckers ca 25 Sekunden zuwarten DieseZeitisterforderlich damit sich der elektrische Schaltkreis entladen kann und verhindert dass Elektrizit t ber die Steckerkon...

Страница 32: ...9 zu w hlen Solange die Platte ausgew hlt bleibt also mit der Dezimalpunkt 4 leuchtet kann die Leistungsstufe ver ndert werden AUSSCHALTEN EINER PLATTE Mit der Schieberegler Taste 2 kann die Leistung...

Страница 33: ...en entsprechenden Schieberegler 2 bis die Energieanzeige 3 9 anzeigt und dr cken Sie nun mit Ihrem Finger f r eine Sekunde weiter oder ber hren Sie P direkt und dr cken dort f r eine Sekunde 2 Die Ene...

Страница 34: ...swert beschr nkt Wenn Sie den Wert erneut ndern m chten m ssenSiedenHerdvonder Stromzufuhr trennen und dann nach einen Sekunden wieder anschlie en Nun k nnen Sie erneut auf das Men zur Leistungsbegren...

Страница 35: ...g dieser B e d i n g u n g e n w i r d d i e ordnungsgem e Kontrolle des Kochvorgangs beeintr chtigen WARNUNG Verwenden Sie diese Funktion nicht f r einen anderen Kochzweck als kochendes Wasser Niemal...

Страница 36: ...en der Leistungen und Funktionen der zugewiesenen Zonen gel scht Sicherheitsabschaltung Wenn sich eine oder mehrere Kochzo nen nicht korrekt ausschalten schaltet sich das Ger t nach Ablauf einer bes t...

Страница 37: ...all entsorgt werden darf Nach Gebrauchsende ist das Kochfeld dementsprechend dem zust ndigen Recyclingpunkt f r elektrische und elektronische Ger te zu bergeben Bitte denken Sie daran dass Sie mit der...

Страница 38: ...oder der Glaskeramik War ten Sie bis die Elektronik abgek hlt ist oder entfernen Sie das Gef damit die Glaskeramik abk hlt Auf der Anzeige einer der Kochzo nen erscheint C85 Das verwendete Gef ist ni...

Страница 39: ...uisi ner base de grais se ou d huile sans tre pr sent dans la mesure o celles ci peuvent s enflam m e r N e s s a y e z JAMAIS d teindre un feu avec de l eau Le cas ch ant d connecter l appa reil et c...

Страница 40: ...celui ci est install dans le m me meuble Attention Le branchement lectrique devra tre effectu avec une prise de terre idoine respectant les normes en vigueur dans le cas contraire la plaque peut ne p...

Страница 41: ...nuez respectivement la valeur Par ailleurs vous pouvez directement s lectionner un niveau de puissance en posant votre doigt sur le point souhait de la barre de d filement 2 Pour s lectionner une plaq...

Страница 42: ...ctile 6 Si vous utilisez la touche tactile Marche Arr t 1 pour arr ter l appareil lorsque la fonction de verrouillage est activ e vous ne pourrez pas le remettre en marche sans le d verrouiller D sact...

Страница 43: ...1 3 Si une ou plusieurs zones sont d j programm es l indicateur de minuterie 12 affiche par d faut le temps restant le plus court et le plus proche de la fin et un t sur la zone concern e Le temps re...

Страница 44: ...isson et appuyez sur le capteur iCooking 16 jusqu ce que la LED 17 de l ic ne s allume Une fois cette fonction activ e le symbole s affiche sur le voyant d alimentation 3 Vous pouvez annuler la foncti...

Страница 45: ...d cimal 4 des zones de cuisson reli es s allume et la valeur 0 s affiche au niveau de leurs voyants d alimentation 3 Le voyant de la minuterie 12 affiche trois segments indiquant les zones activ es S...

Страница 46: ...raclette lames Lesirisationscolor essontprovoqu es par des fonds de r cipients comportant des traces s ches de graisse ou par la pr sence de graisses entre le verre et le r cipient lors de la cuisson...

Страница 47: ...umides et ou vous avez les mains humides Vos mains comme la surface du contr le tactile doivent toujours tre s ches et propres Le blocage est activ D sactivez le blocage Vous entendez un bruit de vent...

Страница 48: ...uat ile uyumludur Bununla birlikte kalp pili gibi bir cihaz ile donat lm herhangi birinin h e k i m e dan mas n ya da phe durumunda e n d k s i y o n alanlar n kullanmak tan imtina etmesini tavsiye ed...

Страница 49: ...ve Git fonksiyonu al t rma sens r 9 Durdur ve Git fonksiyonu al yor pilot 10 Zamanlay c i in Eksi sens r 11 Zamanlay c i in Art sens r 12 Zamanlay c g stergesi 13 Zamanlay c ondal k noktas 14 Senkro f...

Страница 50: ...urulacakt r B lge al t r ld nda tencere tespit edilmemi se ya da tencere uygun de ilse g g stergesinde 3 tencere yok anlam na gelen bir sembol g r nt lenecektir E er b lge al yorken zerindeki tencere...

Страница 51: ...ak 1 ila 99 dakika aras nda bir pi irme s resi belirleyin lk de er 60 tan ba layacakt r ikincisi ise 01 den ba layacakt r 10 ve 11 sens rlerine bas l tutuldu unda de er 00 a geri d necektir Kalan s re...

Страница 52: ...en LED ler ile g sterilecektir E er aktif edilmi bir zel fonksiyonu herhangi bir zamanda iptal etmek isterseniz se im yapmak i in ilgili b lmenin kayar imle sens r ne 2 dokunun G g stergesinin 3 ondal...

Страница 53: ...ekranda Flex Zone olarak belirtilen birlikte al mak zere etkin duruma getirilmesi m mk nd r ayr ca her iki b lge i in bir g seviyesi se ilebilir ve zamanlay c fonksiyonu aktif edilebilir B u f o n k s...

Страница 54: ...ve tepsiler tavalar ya da pi irme esnas nda cam ile tencere aras n ya laman n gerek mesi neden olur Bunlar sulu bir nikel kaz t c kullanarak veya seramik s tma plakalar i in zel bir temizleyici kulla...

Страница 55: ...as nda bir fan sesi duyulur Elektronik aksam so uk tutmak i in end ksiyon b lgelerinin bir fan vard r Bu sadece elektronik devreler s nd nda a l r D e v r e l e r serinledi inde ocak zgaras a k ya da...

Страница 56: ...ytkownika nie powinny by wykonywane przez dzieci bez nadzoru doros ych D z i e c i n i e mog bawi s i urz dzeniem O s t r z e e n i e Pozostawienie p yty podczas gotowania p r z y u y c i u t uszczu...

Страница 57: ...iek innego urz dzenia elektronicznego Nie zaleca si u ywania kuchni indukcyjnej w czasie dzia ania funkcji czyszczenia pirolitycznego w przypadku piekarnik w pirolitycznych ze wzgl du na wysok tempera...

Страница 58: ...owany funkcja blokady w czona Przycisk dotykowy 1 ma zawsze pierwsze stwo w wy czaniu sterowania dotykowego W CZANIE P YT Po uaktywnieniu sterowania dotykowego czujnikiem 1 ka da p yta mo e by w czona...

Страница 59: ...si i gotowanie zostanie wznowione z tymi samymi ustawieniami mocy i programatora czasowego kt re zosta y ustawione przed przerw Funkcja mocy Funkcja ta dostarcza dodatkow moc p ycie powy ej warto ci...

Страница 60: ...i poszczeg lne warto ci mocy do kt rych p yta mo e zosta ograniczona i mo na je b dzie zmieni za pomoc czujnik w 11 i 10 3 Po wybraniu warto ci ponownie naci nij klawisz dotykowy blokady 6 P yta grzej...

Страница 61: ...AGA nieu ywa tejfunkcji w innym celu ni gotowanie wody Nigdy nie u ywa oleju gdy mo e to doprowadzi do przegrzania i doprowadzi do po aru W czanie funkcji Aby w czy t funkcj nale y wybra p yt i nacisn...

Страница 62: ...kolwiek problemu zwi zanego z obs ug kuchni lub inn anomali nie uj tymi w niniejszej instrukcji nale y wy czy urz dzenie i zawiadomi serwis techniczny TEKA Sugestie i zalecenia U ywa naczy o grubym i...

Страница 63: ...tabliczce znamionowej urz dzenia W razie problem w z dzia aniem urz dzenia Przed skontaktowaniem si z Serwisem technicznym nale y wykona nast puj ce czynno ci kontrolne Kuchnia si nie uruchamia Upewn...

Страница 64: ...stimul tory doporu ujeme aby se poradily se sv m l ka em v p pad pochybnost k induk n m z n m v bec nevstupovaly Na povrch varn desky by se nem ly pokl dat kovov p edm ty jako jsou no e vidli ky l ce...

Страница 65: ...a 11 Plus senzor pro asova 12 Ukazatel asom i e 13 Desetinn te ka asova e 14 Aktiva n senzor pro funkci Synchro v z vislosti na modelu 15 Aktiva n senzor pro funkci Flex Z na v z vislosti na modelu 16...

Страница 66: ...p pad kdy je z na zapnut a nen detekov na p nev nebo p nev nen vhodn Pokud se p nev odebere ze z ny kdy je spu t na deska automatick zastav z sobov n energi a zobraz symbol nen p nev Kdy se p nev op t...

Страница 67: ...Pokud podr te senzory 10 11 stisknut hodnota se obnov na 00 Kdy z stane doba krat ne jedna minuta hodiny za nou odpo t vat as v sekund ch 3 Kdy ukazatel asova e 12 p estane blikat za ne automaticky o...

Страница 68: ...dotykem senzoru iCooking 16 FUNKCE KEEP WARM v z vislosti na modelu Tato funkce automaticky nastav vhodnou rove v konu pro udr en va en ho j dla hork m Pro aktivaci zvolte varnou desku a stiskn te iCo...

Страница 69: ...sekund k proveden dal operace jinak funkce bude automaticky zak z na viz Obr 3 Po zvolen po adovan Flex Zone m etep i adit rove v konudotykem n kter ho z kurzor posuvn k 2 jedn z propojen ch z n V kon...

Страница 70: ...en ozna uje e s n m nelze zach zet jako s norm ln m domovn m odpadem Tento v robek je nutn odevzdat k recyklaci do sb rn ho dvora pro elektrick a elektronick p stroje T m e ho zlikvidujete dn m zp sob...

Страница 71: ...ovu ji zapn te a zkuste pou t jinou n dobu P stroj se vypne a na ukazatel ch 3 se zobraz zpr va C90 Dotykov ovl d n detekuje zakryt n kter ho senzoru a neumo uje zapnut varn desky Odstra te p padn p e...

Страница 72: ...n mu n e b e z p e e n s t v u po iaru i n d u k n gener tor sp a p o i a d a v k y aktu lnej legislat vy E Odpor ame v ak aby sa ka d osoba pou vaj ca zariadenie ako kar d i o s t i m u l t o r pora...

Страница 73: ...lotn ukazovate funkcie Stop Go aktivovan 10 M nus senzor pre asova 11 Plus senzor pre asova 12 Ukazovate asomera a 13 Desatinn bodka asova a 14 Aktiva n senzor pre funkciu Synchro v z vislosti od mode...

Страница 74: ...n Ukazovate rovne v konu 3 zobraz symbol pre ozn menie e nie je panvica v pr pade ke je z na zapnut a nie je detekovan panvica alebo panvica nie je vhodn Ak sa panvica odoberie zo z ny ke je spusten d...

Страница 75: ...l blikaj ci striedavo s jeho s asnou rov ou v konu 2 Bezprostredne potom nastavte dobu varenia medzi 1 a 99 min tou s pou it m senzorov 10 alebo 11 V pr pade prvej sa hodnota za ne od 60 v pr pade dru...

Страница 76: ...rev bersadotknite sn ma a kurzora posuvn ka 2 pr slu nej z ny Rozsvieti sa desatinn iarka 4 Indik tora nap jania 3 Potom sa znova dotknite kurzora posuvn ka 2 pre nastavenie novej rovne v konu alebo v...

Страница 77: ...e z ny Pre aktiv ciu tejto funkcie stla te senzor 15 N sledne sa rozsvieti desatinn bodka 4 prepojen ch dosiek a na ukazovate och v konu 3 sa zobraz hodnota 0 Na Indik tore asova a 12 sa zobrazia tri...

Страница 78: ...d sledku mastnoty medziskloman doboupo asvarenia Mo no ich odstr ni niklovou krabkou pomocou vody alebo peci lnym isti om na keramick var n platne Plastov predmety cukor alebo jedlo obsahuj ce ve a c...

Страница 79: ...en varenia Induk n z ny s vybaven ventil to rom ktor chlad elektroniku Pracuje len ke s elektrick obvody hor ce Bez oh adu na to i je varn plat a zapnut alebo nie sa po vychladnut obvodov znovu zasta...

Страница 80: ...oastr este periculos deoarece se poate produce un incendiu N u ncerca i NICIODAT s stinge i focul cu ap n acest caz scoate i aparatul din priz i acoperi i fl c rile cu un capac o farfurie sau o p tur...

Страница 81: ...esar pentru desc rcarea total a circuitului electronic evit nduse astfel posibilitatea unei desc rc ri electrice prin contactele tec rului P stra i Certificatul de Garan ie sau dup caz fi a cu specifi...

Страница 82: ...de putere poate fi modificat DEZACTIVAREA UNEI PLITE Utiliz nd tasta barei de glisare a cursorului 2 mic ora i puterea la 0 Plita se va opri Atunci c nd o plit este oprit simbolul H va fi afi at pe in...

Страница 83: ...semnal sonor La activarea func iei Putere a unei plite este posibil ca performan a altor plite s fie afectat reduc nd puterea acestora la un nivel mai mic Acest lucru va fi afi at pe indicatorul core...

Страница 84: ...cient s reduce i un singur nivel de putere al unei alte plite Se ine cont de puterea fiec rei plite i nivelul la care aceasta este reglat Este posibil ca pentru a cre te nivelul unei plite mari nivelu...

Страница 85: ...cteaz c este pe punctul de a ncepe fierberea se aude un prim semnal sonor Profita i de aceast oportunitate pentru a preg ti alimentele pentru fierere sau coacerere dup cum dori i Dup 30 de secunde se...

Страница 86: ...osirea unor recipiente al c ror diametru este mai mic dec t cel al zonei de nc lzire Nu glisa i recipientele pe sticl deoarece se poate zg ria De i sticla poate s suporte impac tul unor recipiente mar...

Страница 87: ...de un magnet sau folosi i un reci pient mai mare Se aude un b z it la nceputul g titului n zonele de induc ie La recipientele care nu sunt groase sau care sunt formate din mai multe piese b z itul est...

Страница 88: ...eri coloso lasciare incustodite sul piano di cottura pentole contenenti grassi od oli dal momento che potrebbero prendere fuoco NON tentare mai di spegnere un incendio con l ac qua In caso di incendio...

Страница 89: ...ere sog getto a malfunzionamenti Sovratensioni troppo alte possono provocare il guasto del sistema di controllo quello che accade con qualsiasi tipo di appa recchio elettrico Si consiglia di utilizzar...

Страница 90: ...il controllo touch si spegne automaticamente Quando il controllo touch attivato possibile disconnetterlo in qualsiasi momento premendo il tasto touch 1 anche se stato bloccato funzione blocco attivat...

Страница 91: ...sta funzione mette il processo di cottura in pausa Anche il timer sar messo in pausa se attivato Attivazione della funzione Stop Toccare il sensore di arresto 8 per un secondo Il pilota 9 si accende e...

Страница 92: ...ne di Power Management a seconda del modello Alcuni modelli sono dotati di una funzione di limitazione di potenza Power Management Questa funzione permette di impostare a differenti valori selezionati...

Страница 93: ...ull indicatore di potenza 3 possibile annullare la funzione in qualsiasi momento spegnendo la piastra modificando il livello di potenza o scegliendo una funzione speciale diversa FUNZIONE iQUICKBOILIN...

Страница 94: ...bile ottenere che due zone di cottura identificate dall etichetta Synchro funzionino insieme sia per selezionare un livello di potenza che per attivare la funzione timer per entrambe le zone Per attiv...

Страница 95: ...n pu essere smaltito come un normale rifiuto urbano Deve essere conferito presso un punto di raccolta di apparecchiature elettriche ed elettroniche per essere riciclato Accertarsi che questo pro dotto...

Страница 96: ...uovere il reci piente per far raffreddare il vetro Sull indicatore di una delle piastre appare C85 Il recipiente utilizzato non adeguato Spegnere la cucina riaccenderla e provare con un altro recipien...

Страница 97: ...ig bent is gevaarlijk wegens hetrisicovoorbrand Probeer NOOIT een brand met water te blus sen in dit geval moet u het apparaat uitschakelen en de vlammen afdekken met een deksel bord of dekentje Laat...

Страница 98: ...achten voor het uittrekken van de stekker Deze tijd is nodig voor het volledig ontladen van het elektronische circuit en zo de mogelijkheid van een elektrische ontlading via de stekkercontacten te voo...

Страница 99: ...mindicator en het decimale punt 4 licht op gedurende 10 seconden 2 Gebruik de cursor schuifregelaar 2 om een nieuw bereidingsniveau te selecteren tussen 0 en 9 Zolang de plaat geselecteerd is met ande...

Страница 100: ...raak onmiddellijk P aan en houd uw vinger gedurende n seconde ingedrukt 2 De stroomniveau indicator 3 geeft het symbool P weer en de plaat begint het extra vermogen te leveren De Stroomfunctie heeft e...

Страница 101: ...jzigd zal de stroombeperker het totale vermogen berekenen dat wordt gegenereerd door de kookplaat Als u de totale stroomlimiet hebt bereikt zal de aanraakgevoelige bediening u niet toelaten het stroom...

Страница 102: ...e stroomindicator 3 en op de timer indicator 12 een bewegend segment verschijnt om aan te geven dat de bereiding wordt gestuurd door het systeem Wanneer het system detecteert dat het op het punt staat...

Страница 103: ...em of niet in deze handleiding vermelde storing moet u het apparaat uits chakelen en de technische dienst van TEKA waarschuwen Suggesties en aanbevelingen Gebruik potten en pannen met een dikke en vol...

Страница 104: ...nctioneert niet Controleer of de netwerkkabel op het passende stopcontact aangesloten is De inductievelden warmen niet op Onjuiste pot of pan zonder ferromag netische bodem of te klein Controleer of d...

Страница 105: ......

Страница 106: ......

Страница 107: ......

Страница 108: ...70 local A 201 CC El polo Surco ul 3 go Maja 8 A2 Estrada da Mota Apdo 533 Sevastopol str no 24 5th floor of 15 Neverovskogo 9 Office 417 121170 Moscow Russia Clemenceau Avenue 83 01 33 34 UE Square C...

Отзывы: