background image

3-18

Chapter 3 - Real-Time Guidance

Data Setup

SmartPad II

Software Version 4.02

Data Examples

The following is a series of data storing examples using the menu items described in the Data menu section.

Example 1: All Data Menu Items Set to OFF

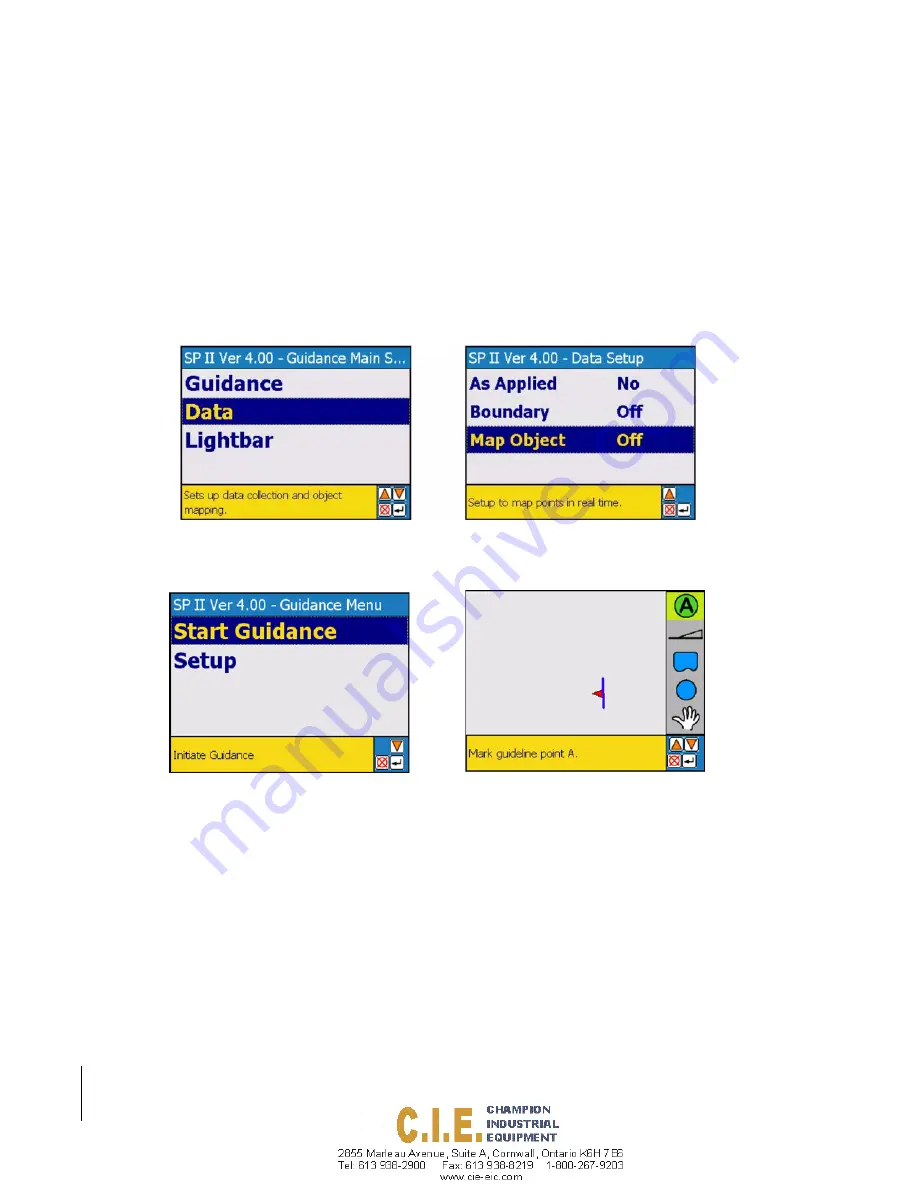
This example describes how to start guidance with no As Applied data, or boundary file information and no mapping 
objects on the go, Figure 3-19. Therefore when the Start Guidance menu item is selected the software will go directly 
in to the real-time guidance process.

Figure 3-20 (left side) shows the Start Guidance menu item. When the Start Guidance menu item is pressed the 
SmartPad II software will go directly into the real-time navigation page, Figure 3-20 (right side).

Figure 3-19: All Data Items Set to Off

Figure 3-20: Staring Guidance

Содержание SmartPad II

Страница 1: ...SWATH XL GUIDELINE SMARTPAD II USER GUIDE Software Version 4 02 98 05067 R0 MID TECH...

Страница 2: ...noted all other brand or product names are trademarks or registered trademarks of their respective companies or organizations Limitation of Liability MIDWEST TECHNOLOGIES INC PROVIDES THIS MATERIAL AS...

Страница 3: ...d Requirements 9 Lightbar 9 Interface Cable 9 SmartPad II 9 GPS Receiver Compatibility 9 Optional CompactFlash Storage Card 9 CompactFlash Card Instructions 10 Inserting the CompactFlash Card 10 Stori...

Страница 4: ...cklight 18 System Setup 19 Unit 20 Language 21 GPS Receiver 22 DGPS Type 23 SmartPad II Tools 24 Receiver Status 25 GPS Logger 26 Lightbar Test 27 Delete Files 28 Set Date and Time 29 Clock 30 Chapter...

Страница 5: ...Real Time Guidance Process 38 Starting Real Time Guidance 38 The Real Time View Page 38 SmartPad II View Page Buttons 40 Real Time View Options 41 Solid View 41 Spray Boom View 41 Zoom Pan Mode 42 No...

Страница 6: ...ge 9 Display Message 10 Antenna Setup 11 Offset Direction 13 Offset Distance 14 Data Setup 15 Point Grid File 17 Boundary 18 Background 19 Sample Number 20 Sample Name 21 About Nav 2 Point Real Time N...

Страница 7: ...set Direction 9 Offset Distance 10 About Mapper Real Time Mapping 11 The Real Time View Page 13 Real Time View Buttons 14 Real Time View Options 15 North Up View 15 COG View 15 Creating a Field Bounda...

Страница 8: ...1 8 Table of Contents SmartPad II Software Version 4 02...

Страница 9: ...Midwest Technologies Inc Vehicle Guidance and Mapping Software Chapter 1 Introduction Simple straight forward guidance and mapping Software Version 4 02...

Страница 10: ...several passes around the field headlands and receive curved guidance information via the Lightbar once the multiple headland passes are completed the operator has the option to switch to Parallel Cur...

Страница 11: ...figure the SmartPad II and soft ware Chapter 3 Real Time Operation describes SmartPad II real time guidance and mapping Chapter 4 Waypoint Navigation describes SmartPad II real time Nav2Point Chapter...

Страница 12: ...real time brings up the object s info E Dif ready Added a GPS Logger application under Tools to log raw GGA output from a receiver Nav 2 Point View GMF files as background Show BND files as background...

Страница 13: ...bility to change the backlight and lightbar brightness On The Go Please review Figure 1 1 to see which buttons control the screen and backlight Figure 1 1 UP ARROW DOWN ARROW ENTER RIGHT ARROW LEFT AR...

Страница 14: ...operation You should review the appropriate operators manual for installation instructions We recommend connecting all hardware components prior to perma nently installing each component in the vehicl...

Страница 15: ...The Lightbar should be located with in the operators field of view while under normal driving conditions The Lightbar can be mounted on the vehicle cab dash or ceiling Interior installation is recomme...

Страница 16: ...sily reach view and operate the system See Figure 1 4 for instruction on how to connect the Lightbar and SmartPad II to the interface cable Make sure the interface cables are not under any excess stra...

Страница 17: ...46 5 mm Weight 23 Oz 652 g OS Windows CE Net 4 2 GPS Receiver Compatibility The SmartPad II product does not include a GPS receiver SmartPad II is compatible with any differentially corrected sub mete...

Страница 18: ...o is facing out Slide the card along the guide slots until it makes contact with the SmartPad II expan sion socket The card will slide freely until it reaches the pins on the SmartPad II s expansion s...

Страница 19: ...to the SmartPad II In order for the SmartPad II software to recognize the CompactFlash card the card must be inserted into the SmartPad II prior to turning the unit on All data written to the Compact...

Страница 20: ...hat use the RCD file will be stored in a GMF file The last guideline used prior to exiting out of the SmartPad II software will be saved If RCD data is not stored to the CompactFlash card no guideline...

Страница 21: ...ture SmartPad II does not utilized the Client Farm and Field directory structure MID TECH software applications that utilize a BND file are SmartPad II Fieldware Field Mapping Fieldware Parallel Swath...

Страница 22: ...1 14 Chapter 1 Introduction Chapter 1 Notes SmartPad II Software Version 4 02 Chapter 1 Notes...

Страница 23: ...Midwest Technologies Inc Vehicle Guidance and Mapping Software Chapter 2 Software Overview An introduction on how to use SmartPad II software Software Version 4 02...

Страница 24: ...settings such as Date and Time Zone Units SmartPad II settings and possibly Language to configure the SmartPad II software suite the way you prefer it See First Time Setup Process on page 2 7 for more...

Страница 25: ...g the rest of this section is highly rec ommended SmartPad II Keys There are six keys located on the SmartPad II front panel The entire SmartPad II suite of software can be operated using this key set...

Страница 26: ...item highlight the item using the keys To enter a highlighted menu item use the key To return to the previous menu page press the key In Figure 2 2 the current menu page is the Setup Menu to move bac...

Страница 27: ...n example of an Alpha Numeric dialog box This type of dialog box is used when the user is required to enter a particular value such as a distance or a name The complete value is made up of individual...

Страница 28: ...ftware Overview Fieldware for Smartpad II Software Version 4 02 Figure 2 3 Pick Dialog Box Example Figure 2 4 Alpha Numeric Dialog Box Example Current setting displayed Description of the displayed se...

Страница 29: ...current date and time are set correctly see Set Date and Time on page 2 29 for more details Power Unit On Connect the SmartPad II to the SmartPad II Interface Cable see Figure 2 5 and apply 12 VDC pow...

Страница 30: ...SmartPad II Figure 2 6 This is the top Menu page and from here you can launch an application Guidance Nav2Pt or Mapper access system level setup parameters and run diagnostic tools and utilities See F...

Страница 31: ...t and Mapper To launch an application highlight the desired application name using the up and down arrow keys on the smartpad keypad and then press enter The main application menu will appear Figure 2...

Страница 32: ...uncher Setup Menu Figure 2 19 contains all setup parameters that are common to both Guidance Nav2Pt and Mapper Currently there are four setup menu items found in the Main Setup System SmartPad GPS Rec...

Страница 33: ...press This takes you to the Setup menu page see Figure 2 11 right side Within the Setup Menu the select the Communications menu item using the arrow keys Press to enter the Communications menu page On...

Страница 34: ...e desired setting using the arrow keys once the desired setting is selected press to return back to the Communications setup menu see Figure 2 12 Figure 2 12 The Port Baud Rate Menu Item Setting Descr...

Страница 35: ...Bits menu item and press The Port Data Bits dialog box will appear Select the desired setting using the arrow keys once the desired setting is selected press to return back to the Communications setu...

Страница 36: ...dware for Smartpad II Software Version 4 02 Port Stop Bits The Stop Bits menu item sets the GPS port Stop Bits on the SmartPad II There are no options for this menu item and therefore cannot be change...

Страница 37: ...dialog box will appear Select the desired setting using the arrow keys once the desired setting is selected press to return back to the Communications setup menu see Figure 2 15 Figure 2 15 The Port P...

Страница 38: ...default to menu settings when the unit is powered off To access the SmartPad II menu page highlight the Setup menu item in the Main menu page and press This takes you to the Setup menu page see Figure...

Страница 39: ...able settings are 1 through 10 where 10 is the brightest setting To change the Display Brightness setting highlight the Brightness menu item and press The Display Brightness dialog box will appear Sel...

Страница 40: ...highlight the Backlight menu item and press The Display Backlight dialog box will appear Select the desired setting using the arrow keys once the desired setting is selected press to return back to t...

Страница 41: ...Setup menu item in the Main menu page and press This takes you to the Setup menu page see Figure 2 19 right side Within the Setup Menu select the System menu item using the arrow keys Press to enter...

Страница 42: ...ghlight the Unit menu item and press The System Unit dialog box will appear Select the desired unit setting using the arrow keys once the desired unit is selected press to return back to the System se...

Страница 43: ...ware suite are stored in the Support folder on the PCM CIA Card To change the System Language highlight the Language menu item and press The System Language dialog box will appear Select the desired l...

Страница 44: ...and press This takes you to the Setup menu page see Figure 2 22 Left side With in the Setup Menu select the GPS Receiver menu item using the arrow keys Press to enter the GPS Receiver menu page Once...

Страница 45: ...acklight menu item and press The Display Backlight dialog box will appear Select the desired setting using the arrow keys once the desired setting is selected press to return back to the GPS Receiver...

Страница 46: ...hen trouble shooting a GPS receiver or lightbar You can also set the system clock To access the Tools menu page highlight the Tools menu item in the Main Launcher menu page and press This takes you to...

Страница 47: ...w displays easy to understand text information about the operating status of your GPS receiver The Serial Data Sample windows displays the current raw position string coming from the GPS receiver The...

Страница 48: ...ech s GPSsim program to simulate a live GPS input The most common use of this feature is to simulate GPS to a SmartPad II system without moving To use this tool select the Data Logger menu and create...

Страница 49: ...he text display are not working properly To run the lightbar test program highlight the Lightbar Test menu item using the keys Once highlighted press This will automatically start the lightbar test pr...

Страница 50: ...CompactFlash data card The data card must be inserted in the SmartPad II prior to boot up powering on To delete files select the Delete Files menu and then select the desired file to be delete and pr...

Страница 51: ...th a date and time stamp The auto file name feature will also use the current date to create the file name therefore it is important that the SmartPad II date and time are correct To change the curren...

Страница 52: ...lock by displaying the time in the text display window on the lightbar The time displayed will be based on the system time To display time on your lightbar highlight the Clock menu item using the keys...

Страница 53: ...Fieldware for Smartpad II Software Version 4 02 Chapter 2 Software Overview 2 31 Chapter 2 Notes Chapter 2 Notes...

Страница 54: ...2 32 Chapter 2 Software Overview Chapter 2 Notes Fieldware for Smartpad II Software Version 4 02...

Страница 55: ...Midwest Technologies Inc Vehicle Guidance and Mapping Software Chapter 3 Real Time Guidance Mapping product application in real time using guidance Software Version 4 02...

Страница 56: ...during guidance cre ate additional initial A B guidelines in any orientation This allows the operator to employ parallel and curved swath ing in as many suitable directions as required within a single...

Страница 57: ...t see Figure 3 2 and Table 3 1 To access the Guidance menu page highlight the Setup menu item in the Main menu page and press This takes you to the Setup menu page see Figure 3 1 Within the Setup Menu...

Страница 58: ...Default Value Change at 1st Time Start Up Swath Width 0 0 Required Look Ahead 2 0 s Optional Direction to Swath None Recommended Distance to Swath 0 0 ft Recommended Status Detect Off Optional GPS Typ...

Страница 59: ...th slightly smaller than the actual width will reduce skips Setting the swath width slightly larger than the actual swath width will reduce overlap To change the Swath Width value highlight the Swath...

Страница 60: ...based on the vehicle operators driving ability and preference This value is only used with the guidance pattern Parallel It is not used in Headland curved guidance or the Circle Pivot pattern A Look...

Страница 61: ...antenna will be used to accurately create an As Applied map The Direction to Swath parameter defines the direction from the GPS antenna to the delivery location see Figure 3 6 The GPS antenna should...

Страница 62: ...ect to the GPS antenna will be used to accurately create an As Applied map The Distance to Swath parameter defines the distance from the GPS antenna to the delivery location The GPS antenna should alw...

Страница 63: ...ecting the status detect wires to vehicle boom control switch To change the Status Detect setting highlight the Status Detect menu item and press The Status Detect dialog box will appear Select 1 Sect...

Страница 64: ...3 10 Chapter 3 Real Time Guidance Guidance Setup SmartPad II Software Version 4 02 Figure 3 11 Single Section Status Detect Setting...

Страница 65: ...em and press The GPS Type dialog box will appear Select GPS or DGPS Then press to return back to the Guidance setup menu Figure 3 12 The GPS Type Menu Item Setting Description DGPS Selecting DGPS mode...

Страница 66: ...nning in this mode To change the Data Rate setting highlight the GPS Data Rate menu item and press The Data Rate dialog box will appear Select 1Hz or 5Hz Then press to return back to the Guidance setu...

Страница 67: ...d press in the main menu and the real time guidance process will begin If you elect to do any of the three menu items then you will be prompted for a file name or other related information once the St...

Страница 68: ...tup SmartPad II Software Version 4 02 Figure 3 15 Data Setup Flow Diagram Setting Name Default Value Change at 1st Time Start Up As Applied Off Optional Boundary Off Optional Map Objects Off Optional...

Страница 69: ...during the real time guidance process As Applied data is written in real time to the CompactFlash card You will be prompted for an As Applied data file name when starting the real time guidance proces...

Страница 70: ...ting is selected press to return back to the Data setup menu see Figure 3 17 Figure 3 17 The Boundary Menu Item Setting Description Show Displays an existing field boundary in the guidance map page Yo...

Страница 71: ...escription Point Map points in real time and enter a point name each time a point is mapped You will be prompted for a file name existing or new at the beginning of guidance Named Point Enter the poin...

Страница 72: ...th no As Applied data or boundary file information and no mapping objects on the go Figure 3 19 Therefore when the Start Guidance menu item is selected the software will go directly in to the real tim...

Страница 73: ...enu press to return to the Main Menu Once in the Main menu and the Start Guidance menu item is pressed using the SmartPad II software will not go directly to the real time page first you will be prese...

Страница 74: ...cribes how to create or show an existing boundary file With SmartPad II you can map out a field boundary while spraying or spreading the field headlands If a file containing the field boundary already...

Страница 75: ...Version 4 02 Chapter 3 Real Time Guidance 3 21 Data Setup Figure 3 24 The Boundary Menu Item Figure 3 25 Field Boundary Menu Item and Dialog Box Figure 3 26 Selecting an Existing Boundary File to Sho...

Страница 76: ...ject in the Data menu In this example a Named Point was selected in the Data menu as shown in Figure 3 27 Once the type of mapping object has been selected in the data menu move to the Main menu page...

Страница 77: ...more description on the Named Point mapping object Once the Map File and Object name have been selected highlight the GO menu item and press to start the real time guidance process This example also d...

Страница 78: ...arallel Message 1 Parallel Message 2 Parallel Message 3 Curved Message LED Brightness Alarm and Hazard Range see Figure 3 32 To access the Lightbar menu page highlight the Setup menu item in the Main...

Страница 79: ...t Time Start up Lightbar ON Optional Drive Sensitivity 1 5 ft Optional Display Mode Swath Optional Parallel Message 1 X Track Error Optional Parallel Message 2 Applied Area Optional Parallel Message 3...

Страница 80: ...box will appear Select the desired setting using the arrow keys once the setting is selected press to return back to the Lightbar setup menu see Figure 3 33 Figure 4 33 Setup Lightbar Use Lightbar Se...

Страница 81: ...ar Display Mode Swath with a X track error of 2 3 ft When determining what value to enter into the menu field you must consider the accuracy of the GPS DGPS system you are using Different DGPS sources...

Страница 82: ...the desired setting using the arrow keys once the desired setting is selected press to return back to the Lightbar setup menu see Figure 3 36 Figure 3 36 The Display Mode Menu Item Setting Descriptio...

Страница 83: ...ance 3 29 Lightbar Setup Figure 3 37 Swath Display Mode Figure 3 38 Vehicle Display Mode Center LED stack equals current guideline Moving LED represents the vehicle position Moving LED represents the...

Страница 84: ...l MSG 1 dialog box will appear Select the desired message using the arrow keys once the desired message is selected press to return back to the Lightbar setup menu see Figure 3 39 Figure 3 39 The Para...

Страница 85: ...2 dialog box will appear Select the desired message using the arrow keys once the desired message is selected press to return back to the Lightbar setup menu see Figure 3 40 Figure 3 40 The Parallel...

Страница 86: ...l MSG 3 dialog box will appear Select the desired message using the arrow keys once the desired message is selected press to return back to the Lightbar setup menu see Figure 3 41 Figure 3 41 The Para...

Страница 87: ...ighlight the Curved MSG menu item and press The Curved MSG dialog box will appear Select the desired message using the arrow keys once the desired message is selected press to return back to the Light...

Страница 88: ...re are 10 settings 1 10 Setting 1 is the dimmest and setting 10 is the brightest To change the LED Brightness level highlight the LED Brightness menu item and press The LED Brightness dialog box will...

Страница 89: ...menu item allows you to detect when the vehicle has entered a previously sprayed area If the Alarm menu item is set to Applied Area or All any area you spread or spray including headlands will be con...

Страница 90: ...3 36 Chapter 3 Real Time Guidance Lightbar Setup SmartPad II Software Version 4 02 Figure 3 45 Previously Applied Area Detection Figure 3 46 Hazard Detection Example...

Страница 91: ...100 ft 30 m is the minimum setting for this menu item This menu item should be used in conjunction with the Alarm menu item found on page 3 35 To change the Hazard Range setting highlight the Hazard...

Страница 92: ...boundary Because the user did not want to collect map or view any data the SmartPad II software immediately moves to the Real Time View page once the key was pressed This start up sequence will vary...

Страница 93: ...is either highlighted or pressed information such as total area applied will be displayed If you have a field boundary displayed in the map window the area of the field boundary in Acres or Hectares...

Страница 94: ...3 40 Chapter 3 Real Time Guidance About the Real Time Guidance Process SmartPad II Software Version 4 02 SmartPad II View Page Buttons Figure 3 50 View Page Buttons...

Страница 95: ...ally be activated with the master switch See Figure 3 51 to for an illustration of the Solid View with the option of switch to Spray Boom View Select the Tool but ton as shown in the left image of Fig...

Страница 96: ...ed areas To activate the Zoom Pan Mode the operator must be zoomed to a point that the some of the view area is missing on the screen Locate the hand button down the right side of the real time screen...

Страница 97: ...e vehicle position is 1 3 up and centered in the width of the view portion of the real time page and the ground map moves beneath the vehicle The direction of the vehicle is always to the top of the v...

Страница 98: ...different guidance modes Figure 3 56 Each mode can be selected in the real time screen and the operator has the option of switching from one mode to the next On The Go The real time screen will show t...

Страница 99: ...d in Chapter 2 is complete and the Guidance Setup Pattern option selected is Parallel Mark Point A To mark the initial point A begin driving along the first swath path typically this would be along a...

Страница 100: ...ton bar and press The B point will be displayed in the view page This establishes the initial swath baseline Figure 3 60 shows the initial baseline with the A and B points Once the baseline is establi...

Страница 101: ...ned on when the vehicle is applying product The initial guideline does not have to be established prior to turning on the Applied Swath Exiting Real Time Guidance You can exit the real time guidance p...

Страница 102: ...il on how to establish a reference guideline To mark the initial point A begin driving along the first swath path Figure 3 63 It is recommended that the reference guideline be established along the lo...

Страница 103: ...in Lightbar setup Lightbar Setup on page 3 24 When the reference guideline is established the operator can begin driving Curve AB guidance The CenterLine soft ware detects which guideline is closest t...

Страница 104: ...allel to the first cir cuit Applying Multiple Headland Circuits Figure 3 66 shows the SmartPad II View Page when the Curved guidance mode is selected Notice in this figure that the user is in Curved g...

Страница 105: ...up plies guidance information right side of figure For more details on how to interpret curved guidance information on the lightbar see Lightbar Curved Guidance Graphics on page 3 61 Figure 3 69 and F...

Страница 106: ...52 Chapter 3 Real Time Guidance The Curved Guidance Mode SmartPad II Software Version 4 02 Figure 3 69 Driving Second Headland Circuit Figure 3 70 Continuing with Curved Guidance Around Second Circui...

Страница 107: ...71 If the A and B points were marked during the curved guidance process the SmartPad II software will automatically guide the vehicle along the closest parallel line as soon as the operator switches...

Страница 108: ...3 73 shows the completed field notice there are several areas of the field where the operator turned spray off to avoid double application on previously applied areas Figure 3 72 Product Application u...

Страница 109: ...s and moves in either direction left or right to the next guideline the software will automatically create the next circular guideline Marking Point A In this example the operator wants to apply produ...

Страница 110: ...ds the Mark B button becomes active and the operator can mark point B anytime after Circle Guideline Guidance Once the operator has marked point B the circle guideline will appear in the SmartPad disp...

Страница 111: ...lands Next the operator will line up to drive the first swath to the inside of the headlands Circle Pivot mode works very similar to Parallel mode the software will automatically draw and guide the ve...

Страница 112: ...e path in the text display top section of lightbar and cross track error information is conveyed via the cross track LEDs For more information on the curved vehicle path see section Lightbar Curved Gu...

Страница 113: ...e Version 4 02 Chapter 3 Real Time Guidance 3 59 The Circle Pivot Guidance Mode Figure 3 81 Product Application in Progress using Circle Pivot Option Figure 3 82 Completed Application using Circle Piv...

Страница 114: ...u can use the Fieldware Map Manager tool to view your application as applied maps Figure 3 83 shows the as applied map of the center pivot application used in this example To view your as applied maps...

Страница 115: ...is based on the vehicle speed The lightbar in Figure 3 84 informs the user to drive straight and there are no turns approaching In Figure 3 85 the light bar indicates the vehicle is approaching a tur...

Страница 116: ...ously Applied Area Figure 3 86 and Figure 3 87 show how previously applied area detection works As the vehicle enters a previously applied area the lightbar displays the message APPLIED and the Red st...

Страница 117: ...lap example The vehicle can overlap up to 25 of the Swath Width with out being notified Once the edge of the vehicle swath overlaps 25 or more into a neighboring swath the lightbar will display the AP...

Страница 118: ...setup to create a field boundary a Map Boundary button is added to the button bar in the view page see Figure 3 89 To start mapping the field boundary first align the edge of the vehicle swath with t...

Страница 119: ...If the is pressed now SmartPad II will stop mapping the field boundary Figure 3 92 shows the vehicle just about to complete driving the field perimeter The initial guideline has been estab lished and...

Страница 120: ...3 66 Chapter 3 Real Time Guidance Creating a Field Boundary SmartPad II Software Version 4 02 Figure 3 92 Completing the Field Boundary...

Страница 121: ...the vehicle location When SmartPad II is setup to map a point a point button will be added to the view page button bar see Figure 3 93 left side To map a point drive to the location of the object or...

Страница 122: ...setup to map a Named Point a point button will be added to the view page button bar see Figure 3 95 To map a Named Point drive to the location of the object or feature you want to map this location sh...

Страница 123: ...igure 3 96 left side To map a hazard drive to the location of the object or feature you want to map this location should coincide with the location of your GPS antenna Next highlight the Hazard button...

Страница 124: ...detection will not work with point objects When SmartPad II is setup to map a Named Haz ard a Hazard button will be added to the view page button bar see Figure 3 98 To map a Named Hazard drive to th...

Страница 125: ...re see Chapter 2 Light bar Alarm and Hazard Range for more information on how to setup hazard detection Hazard detection works similar to applied area detection Part of the setup process is selecting...

Страница 126: ...3 72 Chapter 3 Real Time Guidance Hazard Detection SmartPad II Software Version 4 02 Figure 3 100 Hazard Detection Red Warning Figure 3 101 Hazard Detection...

Страница 127: ...ble information that could be displayed Figure 3 102 The SmartPad II Lightbar Lightbar State Description Mark A Displayed when establishing the guidance point A of the initial guideline Mark B Display...

Страница 128: ...le to the left indicates the vehicle s course on the ground is due South 180 degrees Area Applied A user defined lightbar message indicating the current amount of area applied in Acres System unit set...

Страница 129: ...y The arrow symbol on the right indicates the field boundary is on the right side of the vehicle See Creating a Field Boundary on page 3 64 System Warning The message is displayed when there is loss o...

Страница 130: ...3 76 Chapter 3 Real Time Guidance Chapter 3 Notes SmartPad II Software Version 4 02 Chapter 3 Notes...

Страница 131: ...Midwest Technologies Inc Sample Waypoint Navigation Software Chapter 4 Waypoint Navigation Real time navigation to sample points using a Lightbar Software Version 4 02...

Страница 132: ...r and location name The primary use of the Nav 2 Point pro gram will be for soil sampling Sample points and grids created in the Fieldware Tools Form a Sampling Pattern pro gram can be imported into t...

Страница 133: ...SmartPad II Software Version 4 02 Chapter 4 Waypoint Navigation 4 3 About the Nav 2 Point Application Figure 4 2 Nav 2 Point Flow Diagram...

Страница 134: ...Up the Nav 2 Point Application The second menu item in the SmartPad II Nav 2 Point Main Menu page is Setup Setup contains several sub menu fields that allow you to customize the SmartPad II Nav 2 Poi...

Страница 135: ...arm Range and Display Message To access the Lightbar menu page highlight the Setup menu item in the Nav 2 Point Main menu page and press This takes you to the Setup menu page see Figure 4 4 Within the...

Страница 136: ...x will appear Select the desired setting using the arrow keys once the setting is selected press to return back to the Lightbar setup menu see Figure 4 5 Figure 4 5 Setup Lightbar Use Lightbar Setting...

Страница 137: ...on the lightbar 1 is dim 10 is brightest To change the Offset Distance setting highlight the Offset Distance menu item and press The Offset Distance dialog box will appear Enter the desired distance u...

Страница 138: ...5 setting is the loudest You can also turn the alarm off by selecting the OFF setting To change the Alarm setting highlight the Offset Distance menu item and press The Alarm dialog box will appear Sel...

Страница 139: ...a notification of when you are on the point or at least close enough to the point to consider it visited To change the Alarm Range setting highlight the Alarm Range menu item and press The Alarm Range...

Страница 140: ...Display Message menu item and press The Display Mes sage dialog box will appear Select the desired message using the arrow keys once the desired message is selected press to return back to the Lightba...

Страница 141: ...to one side RIGHT 15 5 ft of the vehicle and maps the field boundary while driving along side the fence line a distance equal to the Offset Distance Once the boundary is mapped you should change the...

Страница 142: ...na Setup SmartPad II Software Version 4 02 Figure 4 11 Antenna Setup Flow Diagram Setting Name Default Value Change at 1st Time start Up Offset Direction Off Optional Offset Distance 0 0 Optional Tabl...

Страница 143: ...desired setting using the arrow keys once the desired setting is selected press to return back to the Antenna setup menu see Figure 4 12 Figure 4 12 Offset Direction to the Right Setting Description O...

Страница 144: ...na position To change the Offset Distance setting highlight the Offset Distance menu item and press The Offset Distance dialog box will appear Enter the desired distance using the arrow keys once the...

Страница 145: ...ill be prompted for a file name or other related information once the Start Nav 2 Point process is implemented There are some examples of how this process will work at the end of this section To acces...

Страница 146: ...on 4 02 Figure 4 15 Nav 2 Point Data Setup Flow Diagram Setting Name Default Value Change at 1st Time start Up Point Grid File Show Optional Boundary Off Optional Background Off Optional Sample On Opt...

Страница 147: ...hat is created using the Fieldware Tools Form Grid To change the Point Grid File setting highlight the Point Grid File menu item and press The Point Grid dialog box will appear Select the desired sett...

Страница 148: ...file naming will occur after you have pressed the Start Nav 2 Point menu item To change the Boundary File setting highlight the Boundary menu item and press The Field Boundary dialog box will appear S...

Страница 149: ...iles ending in gmf can be used as the background file To change the Background File setting highlight the Background menu item and press The Background dialog box will appear Select the desired settin...

Страница 150: ...menu item has been pressed If this menu item is set to Off then no sample number will be added to any new sample points To change the Sample Number setting highlight the Sample Number menu item and p...

Страница 151: ...the Off menu item is selected then no sample name will be added to any new sample points To change the Sample Name setting highlight the Sample Name menu item and press The Sample Name dialog box wil...

Страница 152: ...t real time process depends on how you have configured Nav 2 Point via the Setup process Using Figure 4 22 as an example the operator has setup Nav2Pt to have a new Point Grid file and also to create...

Страница 153: ...I Software Version 4 02 Chapter 4 Waypoint Navigation 4 23 About Nav 2 Point Real Time Navigation Figure 4 22 File Selection Before Starting Real Time Mapping Figure 4 23 Pressing Go to Start Real Tim...

Страница 154: ...ndary in the setup process a Map Field Boundary button will be included in the button bar To navigate up and down in the button bar use the keys located on the Smartpad To select or activate a highlig...

Страница 155: ...SmartPad II Software Version 4 02 Chapter 4 Waypoint Navigation 4 25 About Nav 2 Point Real Time Navigation Nav2Point Real time View Buttons Figure 4 24 Nav2Point Real Time View Buttons...

Страница 156: ...ime view page North Up View In the North Up view option North is always towards the top of the display see Figure 4 25 COG View In the COG view the vehicle position anchor point is 1 3 up and centered...

Страница 157: ...7 The operator has also decided not to show any existing points or grid data this is accomplished by set ting the Point Grid File menu item to Off This setting could be set to New or Show and the oper...

Страница 158: ...he real time process Figure 4 30 shows the real time view page The left side shows the user preparing to start the boundary mapping process The Map boundary icon is highlighted and the keys is pressed...

Страница 159: ...SmartPad II Software Version 4 02 Chapter 4 Waypoint Navigation 4 29 Nav 2 Point Real Time Scenarios Figure 4 31 Real time Icons used in the Boundary Mapping Example...

Страница 160: ...increment the sample number and be prompted for a sample name The operator will also offset the antenna over the soil probe located at the back of his pickup truck See Figure 4 33 for the Antenna Off...

Страница 161: ...ewly added sample point Figure 4 37 Detecting Nearness to a Sample Point A required feature in the Nav 2 Point application will be to detect when the operator is close to an existing sample point When...

Страница 162: ...ting points therefore the Start Navigation button is not placed in the button bar Figure 4 36 Once the operator added the first sample point the Start Navigation button is placed in the button bar Fig...

Страница 163: ...probe located on the back of the pick up truck see Figure 4 40 Once the setup process is completed and the operator has selected Start Nav 2 Point they will be presented with the Start Nav 2 Point pa...

Страница 164: ...ersion 4 02 Once in the real time view page the operator can either drop a sample point or select an existing point to navigate to Figure 4 41 Selecting the Point Grid File to Display Figure 4 42 Sele...

Страница 165: ...rator will select the Stop Navigation button when they are finished navigating to the selected point Figure 4 45 right side If the operator has elected to use the lightbar as a navigation aid Setup Li...

Страница 166: ...4 36 Chapter 4 Waypoint Navigation Nav 2 Point Real Time Scenarios SmartPad II Software Version 4 02 Figure 4 46 Buttons Used in Navigating to Points Example...

Страница 167: ...The Sample Point with in the Alarm range should also have its point number displayed next to the point in the view page The informa tion bar located at the bottom the of the view page will also altern...

Страница 168: ...g to with in the Alarm range of the sample point highlighting the Delete Sample Point button and pressing This will remove the Sample Point from the view and the data file Once the point is deleted th...

Страница 169: ...SmartPad II Software Version 4 02 Chapter 4 Waypoint Navigation 4 39 Nav 2 Point Real Time Scenarios Figure 4 50 Deleting a Sample Point...

Страница 170: ...d be displayed Figure 4 51 The SmartPad II Lightbar Lightbar State Description Course on Ground COG A user defined lightbar message indicating the vehicles heading in degrees 0 to 359 The example to t...

Страница 171: ...side of the vehicle System Warning The message is displayed when there is loss of GPS differential corrections Guidance calculations are stopped until differential corrections resume System Warning T...

Страница 172: ...4 42 Chapter 4 Waypoint Navigation Chapter 4 Notes SmartPad II Software Version 4 02 Chapter 4 Notes...

Страница 173: ...Fieldware for Smartpad II Software Version 4 02 Chapter 5 Field Mapping 5 1 Chapter 5 Field Mapping Real time mapping of points lines and polygons Software Version 4 02...

Страница 174: ...es weed patches Insect infesta tion wet areas Tile lines tile risers poles rocks wholes etc The items mapped will be stored as a gmf file on the data card that can be used as a background file during...

Страница 175: ...pper Application Setting Up the Mapper Application The second menu item in the Mapper Main Menu page is Setup Setup contains two sub menu fields that allow you to customize the Mapper software and har...

Страница 176: ...a location set in antenna setup All points lines and polygons will be stored in the Map file once Start Mapper has been selected To access the Data menu page highlight the Setup menu item in the Mappe...

Страница 177: ...II Software Version 4 02 Chapter 5 Field Mapping 5 5 DataSetup Figure 5 5 Mapper Data Setup Flow Diagram Setting Name Default Value Change at 1st Time start Up Boundary Off Optional Table 5 1 Data Men...

Страница 178: ...undary All file naming will occur after you have pressed the Start Mapper menu item To change the Boundary File setting highlight the Boundary menu item and press The Field Boundary dialog box will ap...

Страница 179: ...maps the field bound ary while driving along side the fence line a distance equal to the Offset Distance Once the boundary is mapped you should change the Antenna offset to match the location of the...

Страница 180: ...ieldware for Smartpad II Software Version 4 02 Figure 5 8 Antenna Setup Flow Diagram Setting Name Default Value Change at 1st Time start Up Offset Direction Off Optional Offset Distance 0 0 Optional T...

Страница 181: ...the desired setting using the arrow keys once the desired setting is selected press to return back to the Antenna setup menu see Figure 5 9 Figure 5 9 Offset Direction to the Right Setting Description...

Страница 182: ...ntenna position To change the Offset Distance setting highlight the Offset Distance menu item and press The Offset Distance dialog box will appear Enter the desired distance using the arrow keys once...

Страница 183: ...only appear if the boundary option was turned on in Data setup see Figure 5 4 Using Figure 5 12 as an example the operator has setup Mapper to Create a Boundary file and the Map file will automatical...

Страница 184: ...er 5 Field Mapping About Mapper Real Time Mapping Fieldware for Smartpad II Software Version 4 02 Figure 5 12 File Selection Before Starting Real Time Mapping Figure 5 13 Pressing Go to Start Real Tim...

Страница 185: ...in the setup process a Map Field Boundary button will be included in the button bar To navigate up and down in the button bar use the keys located on the Smartpad To select or activate a highlighted...

Страница 186: ...5 14 Chapter 5 Field Mapping About Mapper Real Time Mapping Fieldware for Smartpad II Software Version 4 02 Real Time View Buttons Figure 5 14 Real Time View Buttons...

Страница 187: ...located in the button bar in the real time view page See the left image in Fig ure 5 15 North Up View In the North Up view option North is always towards the top of the display COG View In the COG vi...

Страница 188: ...button is added to the button bar in the view page see Figure 5 17 To start mapping the field boundary first align the antenna or preset antenna location with the edge of the field boundary In the fol...

Страница 189: ...map object Point allows you to mark a point at the vehicle location A point button will be on to the view page button bar see Figure 5 19 left side To map a point drive to the location of the object...

Страница 190: ...eldware for Smartpad II Software Version 4 02 Figure 5 20 shows a mapped point with the tag showing the point name ROCK The tag is displayed when the Infor mation button in the button bar is highlight...

Страница 191: ...w page button bar see Figure 5 21 left side To map a hazard drive to the location of the object or feature you want to map this location should coincide with the location of your GPS antenna Next high...

Страница 192: ...mapping modes Figure 5 23 Each mode can be selected in the real time screen and the operator has the option of switching from one mode to the next On The Go The real time screen will show all the mapp...

Страница 193: ...f this is and interior or exterior polygon Figure 5 25 If interior is selected this area will be subtracted from the total area of the field Once the polygon type has been selected a name must be esta...

Страница 194: ...ygon Figure 5 27 If interior is selected this area will be subtracted from the total area of the field Once the polygon type has been selected a name must be established Figure 5 27 After a name is en...

Страница 195: ...ntenna location To map a polyline stream select the polyline stream button once selected a name must be established Figure 5 29 After a name is entered begin driving the path to be located Notice when...

Страница 196: ...ne mark select the polyline mark button once selected a name must be established Figure 5 31 After a name is entered begin driving the path to be located Notice when the polyline mark button is select...

Страница 197: ...Fieldware for Smartpad II Software Version 4 02 Chapter 5 Field Mapping 5 25 Chapter 5 Notes Chapter 5 Notes...

Страница 198: ...5 26 Chapter 5 Field Mapping Chapter 5 Notes Fieldware for Smartpad II Software Version 4 02...

Отзывы: