
Pag.4/4
Istruzione / User’s Manual / Manuel d’utilisation
IST-2138.KM01.01/B
TECNOCONTROL S.r.l. Via Miglioli 97 SEGRATE ( MI ) Tel: 02/26 92 28 90 Fax: 02/21 33 734
verifica senza toccare i trimmer e nel caso i
valori non siano quelli richiesti contattare il
nostro laboratorio.
Per la regolazione del trimmer è neces-
sario utilizzare un cacciavite a taglio di
dimensione adeguata
Aprire
il coperchio della custodia.
“
Regolazione dell’ALLARME 1
”. Per
verificare e/o tarare lo strumento va uti-
lizzata la bombola con la stessa miscela
Gas/aria al 10%LIE con cui è stato tara-
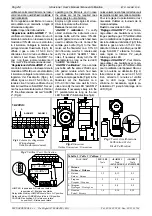
to il rivelatore. Collegare la bombola al
portagomma del Flussimetro (Fig.3), far
affluire il gas a circa 0,15÷0,3 l/min,
attendere circa 3 minuti e verificare che
si illumini il Led Rosso “ALARM1”. Se
così non fosse ruotare lentamente il
Trimmer P2 fino all’accensione del Led.
“
Regolazione dell’ALLARME 2
”. utiliz-
zando la bombola con la stessa miscela
Gas/aria al 20%LIE per cui è stato tarato
il rivelatore, collegare la bombola al por-
tagomma del Flussimetro (Fig.4), far
affluire il gas a circa 0,15÷0,3 l/min, at-
tendere circa 3 minuti e verificare che si
illumini il Led Rosso “ALARM2”. Se così
non fosse ruotare lentamente il Trimmer
P1 fino all’accensione del Led “ALARM
2”. (Fig.4).
operating on the trimmers, and in case
the values are not the required ones
please apply to our Laboratory.
Employ a right sized single slot screw-
driver to operate on the trimmer.
Remove
the sensor's cover.
“
ALARM 1 calibration
”. To verify
or/and calibrate the instrument use a
sample bottle with the same 10%LEL
specific gas/air mixture which had been
used to calibrate the unit. Connect the
sample gas bottle (Fig.3) to the flow-
meter, set the flowmeter on a 0,15÷0,3
l/min flow rate, wait for 3 minutes and
verify the red LED “ALARM 1” illumi-
nates. If necessary slowly turn the P2
potentiometer as long as the red LED
“ALARM1” illuminates.
“
ALARM 2 calibration
”. Use a sample
gas bottle with the same 20%LEL spe-
cific gas/air mixture which had been
used to calibrate the instrument. Con-
nect the sample gas bottle (Fig.4) to the
flowmeter, set the flowmeter on a
0,15÷0,3 l/min flow rate, wait for 3 min-
utes and verify the red LED “ALARM 2”
illuminates. If necessary slowly turn the
P1 potentiometer as long as the red
LED “ALARM2” illuminates (See fig.4).
où les valeurs ne sont pas correctes, veuil-
lez prendre contact avec notre Laboratoire.
Pour le réglage du potentiomètre il est
nécessaire d’utiliser un tournevis de di-
mension adaptée.
Ouvrir
le couvercle du boîtier.
“Réglage d’ALARM 1”.
Pour l'étalon-
nage utiliser une bouteille avec le mé-
lange spécifique gaz 10%LIE/air utilisé
pour la calibration de l’appareil. Raccor-
der la bouteille au débimètre (Fig 3) faire
débiter le gaz à environ 0,15-0,3 l/min,
attendre 3 minutes et vérifier que la LED
rouge “ALARM 1” s’illumine. Si nécés-
saire, régler le trimmer P2 jusqu’à
l’allumage de la LED.
“Réglage d’ALARM 2”.
Pour l'étalon-
nage utiliser une bouteille avec le mé-
lange spécifique gaz 20%LIE/air utilisé
pour la calibration de l’appareil. Raccor-
der la bouteille au débimètre (Fig 4)
faire débiter le gaz à environ 0,15-0,3
l/min, attendre 3 minutes et vérifier
que la LED rouge “ALARM 2”
s’illumine. Si nécéssaire, régler le po-
tentiomètre P1 jusqu’à l’allumage de la
LED (Fig.4).
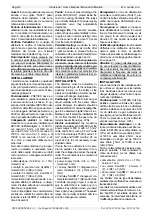
Fig.1
Schema di collegamento
Wiring diagram
Schéma de raccordement
+
-
C
NC NA
C
NC NA
12-24Vdc
-
+
ALARM 2
ALARM 1
7
8
3
2
1
6
5
4
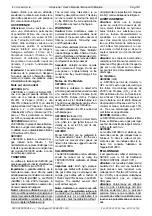
Fig. 2
Dimensioni
Outline Dimensions / Dimensions
Fig.3
Tester di calibrazione
Calibration Tester
Kit de Calibration
0,3L/min
EExd
D
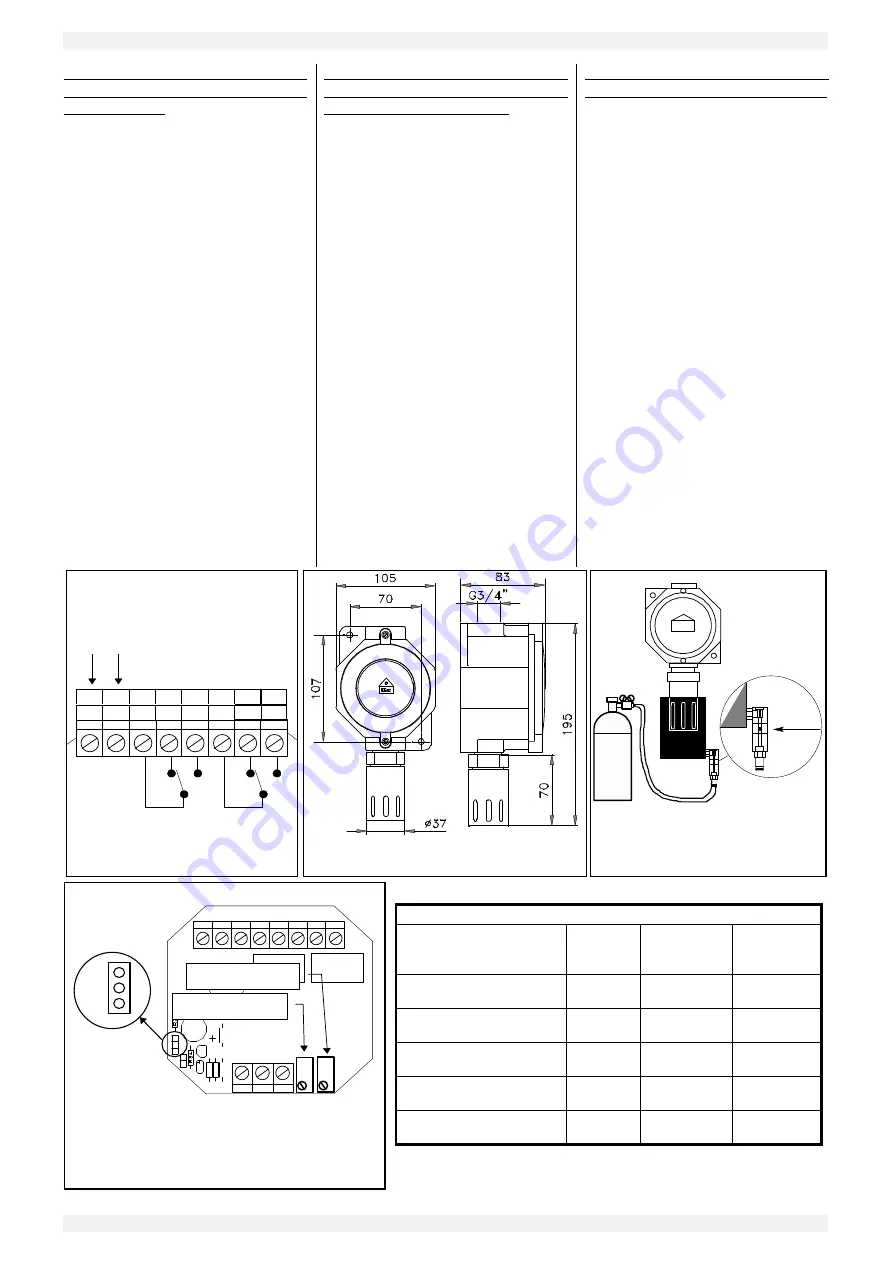
Tabella 1 /
Table 1
/
Tableau 1
GAS / GAZ
LIE / LEL
%v/v
ALARM 1
%v/v
=10%LIE/LEL
ALARM 2
%v/v
=20%LIE/LEL
1.
Metano
Methane / Méthane
5
0,5
1
2. Butano
Butane / Butane
1,5
0,15
0,3
3. Propano
Propane / Propane
2
0,2
0,4
4. Idrogeno
Hydrogen / Hydrogène
4
0,4
0,8
5. Benzina
Petrol /
Essence
1,4
0,14
0,28
Fig.4
Verifica
/
Test
/
Vérification
1 2 3 4 5 6 7 8
P2
“ALARM 1
”
B
A
C
JUMPER in posizione A-C relè con ritardo
in posizione C-B relè senza ritardo
Relay without delay: JUMPER should be in A-C position.
Relay with delay: JUMPER should be in C-B position.
CAVALIER en position A-C relais avec retard
en position C-B relais sans retard
P1
“ALARM 2
”


