


60
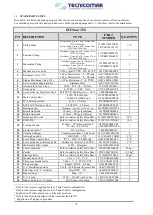
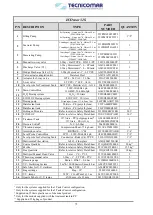
Model
Valve Regulation
(%)
Timer
*
(sec.)
ECOFLOC
indicative consumption
(liters/month)
ECOLOC solution 20%
Indicative consumption
†
(liters/month)
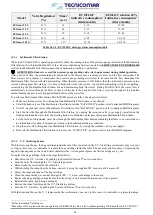
ECOmar 20 S
21 %
26
2÷10
10÷40
ECOmar 32 S
21 %
40
3÷12
13÷62
ECOmar 45 S
21 %
50
4÷18
18÷84
ECOmar 70 S
27 %
60
6÷28
30÷132
ECOmar 145 S
27 %
137
12÷54
60÷270
Table 14.1.2 – ECOFLOC dosing system consumption table
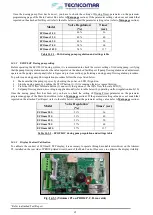
14.1.3
Multimedia Filter Station
While the ECOmar S STP is operating periodically check the reading value of the pressure gauge, installed on the Multimedia
Filter Station; if it is higher than the 30% of the value recorded during first start-up (refer to
FIRST START UP PROCEDURE
section) the Multimedia Filter Station needs that a backwash procedure is performed.
ATTENTION: Ensure to record the pressure gauge reading value (start-up pressure) during initial operation.
After a period of time, the accumulated dirt and debris in the filter causes a resistance to flow, and the flow diminishes. The
filter pressure drop (and as a consequence the pressure gauge readings) will start to increase and the flow throughout the
Multimedia Filter Station will start diminishing. When the inlet pressure is 30% higher than the initial inlet pressure value,
recorded during plant first start-up, it is time to backwash (clean) the system. A periodic backwashing will prevent packing,
reclassifying the Multimedia Filter Station bed and maintaining high flow rates. During BACKWASH, the water flow is
automatically reversed through the filter so that it is directed to the bottom of the filter vessel, up through all the installed
media, flushing the previously trapped dirt and debris out the waste line.
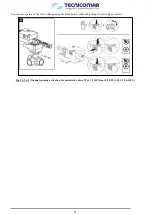
To perform a Multimedia Filter Station BACKWASH procedure follow the steps listed below:
•
Make sure that any water flow throughout the Multimedia Filter Station is not allowed.
•
Set all the head valves of the Multimedia Filter Station into the “
BACKWASH
” position (refer to attached P&ID diagram);
•
Set all 3-way manual valves of Multimedia Filter Station into “
BACKWASH
” position (refer to attached P&ID diagram);
•
Start the flow the through the Multimedia Filter Station, by opening the isolation valve (your supply) installed on the
fresh not-chlorinated water inlet; thus letting fresh not-chlorinated water pass throughout Multimedia Filter Station;
•
Let the fresh not-chlorinated water flow through the Multimedia Filter Station (checking that there is no water leaks or
air infiltrations) for about 5 minutes, according to the backwash discharge conditions;
•
Stop the water flow throughout the Multimedia Filter Station, by closing the isolation valve (your supply);
•
Reset all the Multimedia Filter Station valves into the
“OPERATION”
position (refer to attached P&ID diagram).
14.1.4
U.V. Sterilizing System
With the time and the use, the bag cartridge inside the safe filter, installed on the U.V. Sterilizing system inlet, may wear out
or clog; in this cases, it is advisable to replace the bag cartridge inside the filter. The necessity and frequency of replacing the
bag cartridge depends on the treated water characteristics. As line guide replace the filter cartridge every year.
To replace the bag cartridge, follow the steps listed below:
•
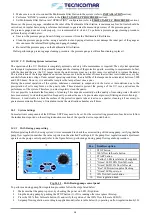
Shut down the U.V. sterilizer, by pushing the System On Button
on its control box;
•
Stop the water flow through the U.V. Sterilizing System;
•
Drain totally the water inside the safe filter;
•
While holding the sump from the bottom, unscrew it using the supplied SW wrench, until it comes off.
•
Empty the sump and take out the bag cartridge;
•
Clean the sump inside. Use neutral detergents (Ph. = 7) to prevent damage to the sump;
•
Replace the bag cartridge and make sure that the O-ring is well set and lubricated (use silicon grease);
•
Reinstall the sump, tightening it manually;
•
Restore the water flow through the U.V. Sterilizing System;
•
Start the U.V. sterilizer, by pushing the System-On Button
on its control box.
With the time and the use, the U.V. lamps inside the sterilizer may wear out, in this cases, it is advisable to replace the lamps.
*
Refer to attached Test Report
†
Max value refer to plant continuous operation (24h/24h). Min value refer to plant operating 160 h/month (only ECOFLOC).
Содержание ECOmar 145 S
Страница 45: ...45 12 1 1 Macerating Discharge pumps performance curves Fig 12 1 1 1 C30 50Hz performances ECOmar 20 32 S ...
Страница 46: ...46 Fig 12 1 1 2 C30 60Hz performances ECOmar 20 32 S ...
Страница 47: ...47 Fig 12 1 1 3 S42 50Hz performances ECOmar 45 70 145 S ...
Страница 48: ...48 Fig 12 1 1 4 S42 60Hz performances ECOmar 45 70 145 S ...
Страница 79: ...79 ...