background image

English   

- 17 -

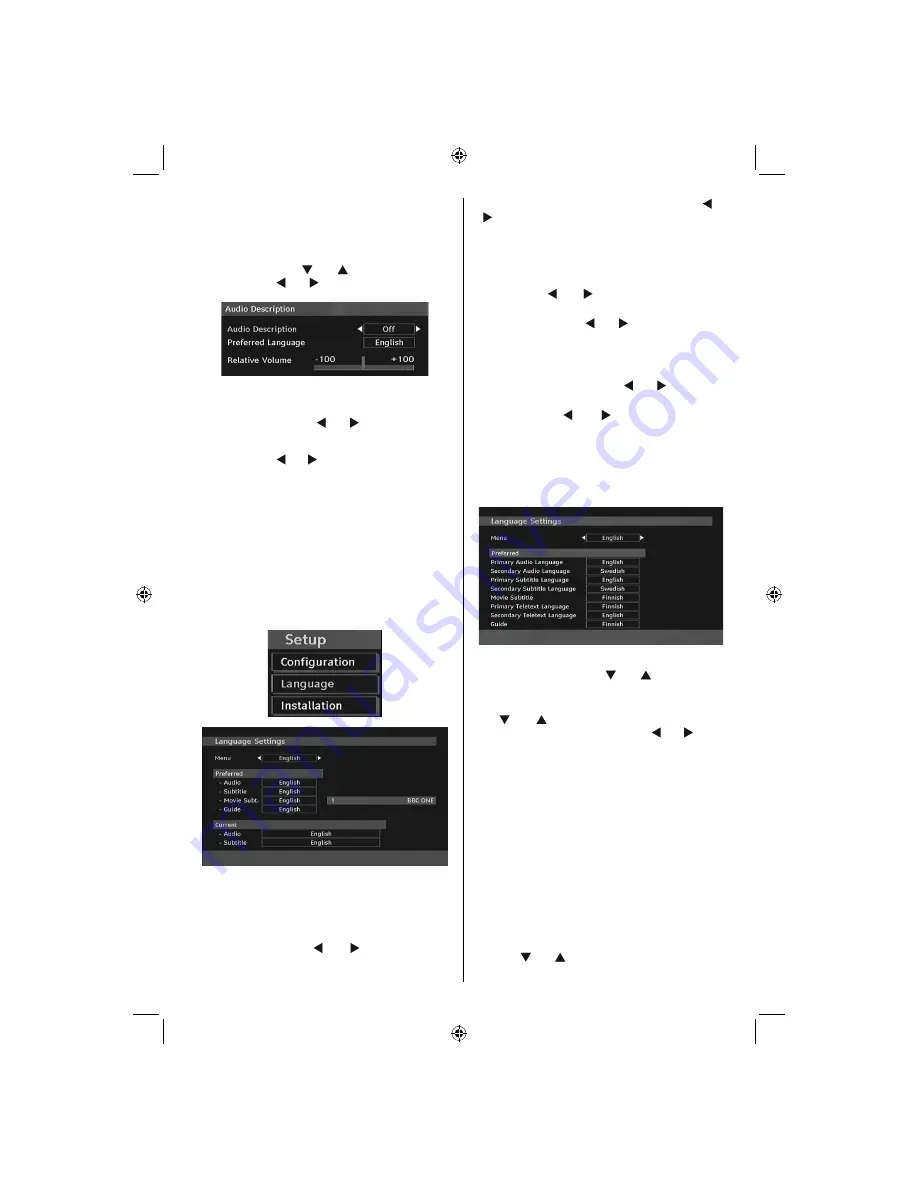
description narrator talks through the presentation, 
describing what is happening on the screen during the 
natural pauses in the audio (and sometimes during 
dialogue, if deemed necessary). You can use this 
feature, only if the broadcaster supports that additional 
narration track. Use “ ” or “ ” buttons to select an 
item. Then use “ ” or “ ” buttons to set.

Audio Description (Optional)

This function enables or disables the audio description 
feature by pressing the “ ” or “ ” buttons.

Preferred Language (Optional)

By pressing the “ ” or “ ” buttons the preferred audio 
description language is being changed.
This setting can be used, only if it is available.

Relative Volume (Optional)

Using this option, the Audio Description volume level 
can be increased or decreased relatively, according 
to the general volume.

Language 

 In this menu the user can adjust the preferred 
language. Language is changed by pressing “

OK

” 

button. 


Menu

 : shows the language of the system 

 Preferred 

 These settings will be used if available. Otherwise the 
current settings will be used. 
 •  

Audio

 : by pressing “ ” or “ ” keys change the 

audio language.

•  

Subtitle

 : alter the subtitle language with “ ” or 

“ ” keys. The chosen language will be seen in 
subtitles.

Movie Subtitle (optional)

• In order to display subtitles properly, use this setting 

to select a movie subtitle language.

• By pressing “ ” or “ ” button, select the desired 

language option.

•  

Guide

 : By pressing  “ ” or “ ” buttons change the 

guide language. 

 Current 

 •  

Audio

 :  if audio language is supported change the 

audio language by pressing “ ” or “ ” buttons 

•  

Subtitle

 : if subtitle is backed up, alter the subtitle 

language with “ ” or “ ” buttons. The chosen 
language will be seen in subtitles. 

Note

: If the Country option is set to Denmark, Sweden, 

Norway or Finland, the Language Settings menu will function 
as described below:

Language Settings

In the con

fi

 guration menu, highlight the Language 

Settings item by pressing “ ” or “ ” buttons. Press 

OK

” and Language Settings submenu will be 

displayed on the screen:
Use “ ” or “ ” buttons to highlight the menu item 
that will be adjusted and then press “ ” or “ ” button 
to set.

Notes

:

• System Language determines the on-screen menu 

language.

• Audio Language is used for selecting the soundtrack 

of a channels.

• Primary settings are the 

fi

rst priority when multiple 

choices are available on a broadcast. Secondary 
settings are the alternatives when the 

fi

rst options 

are not available.

 Installation 

 The Installation menu is mainly intended to help you 
for creating a Channel Table in the most ef

fi

 cient way. 

Select Installation from the Con

fi

 guration menu by 

pressing “ ” or “ ” buttons. 
 This menu includes the following items:  

01_MB46_[GB]_1205UK_IDTV_NICKEL15_19843W_10069993_50176012.indd   17

01_MB46_[GB]_1205UK_IDTV_NICKEL15_19843W_10069993_50176012.indd   17

05.11.2010   10:26:59

05.11.2010   10:26:59

Содержание VL19TV1001

Страница 1: ...VL19TV1001 OPERATING INSTRUCTIONS MODE D EMPLOI COLOUR TELEVISION WITH REMOTE CONTROL TELEVISEUR COULEUR A TELECOMMANDE ...

Страница 2: ...www vestel france fr ...

Страница 3: ...rmation for Users in European Union Countries 4 Disconnecting the Device 4 Headphone Volume 4 Installation 4 LCD Screen 4 Warning 4 Connection to a Television Distribution System Cable TV etc from Tuner 4 Overview of the Remote Control 5 LCD TV and Operating Buttons 6 Viewing the Connections Back Connectors 6 Viewing the Connections Side Connectors 7 Power Connection 7 Aerial Connection 7 Connecti...

Страница 4: ...dows 98 Windows 7 ME 2000 XP Vista Windows 7 Game Mode Introduction Thank you for choosing this product This manual will guide you for the proper operation of your TV Before operating the TV please read this manual thoroughly Please do keep this manual in a safe place for future references This device is intended to receive and display TV programs The different connection options make an additiona...

Страница 5: ... mercury please follow the local laws or regulations for disposal to you Notice especially the chapter SAFETY PRECAUTIONS Carefully keep the handbook as future reference When selling the device or giving it away absolutely give these direction for use Preparation For ventilation leave a free space of at least 10 cm all around the set To prevent any fault and unsafe situations please do not place a...

Страница 6: ...mains connection or through other apparatus with a connection to protective earthing and to a television distribution system using coaxial cable may in some circumstances create a fire hazard Connection to a cable distribution system has therefore to be provided through a device providing electrical isolation below a certain frequency range galvanic isolator see EN 60728 11 The Standby On button d...

Страница 7: ... DTV mode Sound menu Page up Channel list in DTV 18 mode Menu on off 19 OK Select analogue TV mode Channel list 20 in DTV mode Cursor Left 21 AV Source 22 Info 23 Volume up down 24 Mute 25 Picture mode selection 26 Time Subpage in TXT mode Subtitle on off 27 Teletext on off 28 Mix in TXT mode 29 Expand in TXT mode Image size 30 available for EU countries available for UK country option EXIT GUIDE ...

Страница 8: ...able between the PC INPUT on the TV and the component video outputs of your device SPDIF Coaxial Out 3 outputs digital audio signals of the currently watched source Dolby D Audio is bypassed while in media browser mode only RF Input connects to an antenna or a cable system 4 Note that if you use a media recorder you should connect the aerial cable through the device to the television with an appro...

Страница 9: ...ed device s audio outputs and the TV s audio inputs Note If you connect a device to the TV via the VIDEO or PC YPbPr cable you should also connect your device with an audio cable to the AUDIO INPUTS of the TV to enable audio Headphone jack is used for connecting an external headphone to the system 5 Connect to the HEADPHONE jack to use headphones Power Connection IMPORTANT The TV set is designed t...

Страница 10: ... video files stored in a USB stick It is possible that certain types of USB devices e g MP3 Players may not be compatible with this TV You may back up your files before making any connections to the TV set in order to avoid any possible data loss Note that manufacturer will not be responsible for any file damage or data loss The TV supports only FAT32 disk formatting NTFS format is not supported I...

Страница 11: ...onal Component audio inputs DVD Player Note These methods of connection perform the same function but in different levels of quality It is not necessary to connect by all three methods Using Side AV Connectors You can connect a range of optional equipment to your LCD TV Possible connections are shown below Note that cables shown in the illustration are not supplied For connecting a camcorder conne...

Страница 12: ...ctive Input Selection Once you have connected external systems to your TV you can switch to different input sources Press button on your remote control for directly changing sources or Select Source option from the main menu by using or button Use then or button to highlight an input and press button to select Note With the or buttons you can set Off or On When Off is selected this source does not...

Страница 13: ...essage will be displayed on the screen To select the Yes or No option highlight the item by using or buttons and press the OK button The IDTV will automatically tune to the UHF or VHF for EU countries transmission channels searching for digital terrestrial TV broadcasts and displaying the names of channels found This process will take about a few minutes After Automatic Search is completed the fol...

Страница 14: ...enable subtitles by pressing the GREEN button of the remote control Press GREEN button again to disable subtitle function If Subtitle is on and a language option is set pressing the button causes the following warning message display on the screen for UK only Digital Teletext for UK only Press the button The digital teletext information appears Operate it with the coloured buttons cursor buttons a...

Страница 15: ...st Press or buttons to select the channel that will be moved Press or buttons to select the Move item on Channel List menu Following OSD will be displayed next to OK item to indicate that enter a number by using the numeric buttons on the remote control and press OK to confirm Note If you enter the same programme number of the channel that you want to move channel services will be replaced Do you ...

Страница 16: ...e Channel List menu Then press OK button and Edit Favourite List menu appears on the screen How to Add a Channel to a Favourites List By pressing or buttons highlight the channel that you want to add to the favourite list By pressing OK button the highlighted channel is added to the Favourite List F icon indicates that a channel is added to Favourite List Removing a Channel from Favourite List Hig...

Страница 17: ...button CAM set up menu is not displayed when it is not required To see the viewing contract information enter IDTV press the M button then highlight ConditionalAccess and press the OK button When no module is inserted No Conditional Access module detected message appears on the screen Refer to the module instruction manual for details of the settings Note Insert or remove the CI module only when t...

Страница 18: ...n Maturity Lock option will not be visible This setting is available only for EU countries When set this option gets the maturity information from the broadcast and if this maturity level is disabled does not show video audio Menu Lock In menu lock you can set locking for all menus or the Installation Menu to restrict access to these menus If the menu lock is disabled there will be free access to ...

Страница 19: ...movie subtitle language By pressing or button select the desired language option Guide By pressing or buttons change the guide language Current Audio if audio language is supported change the audio language by pressing or buttons Subtitle if subtitle is backed up alter the subtitle language with or buttons The chosen language will be seen in subtitles Note If the Country option is set to Denmark S...

Страница 20: ...al level and signal quality are shown on the screen In both manual and auto search any existing channel in the database is not re stored to avoid redundant duplicates of that channel Clear Service List This setting is visible only when the Country option is set to Denmark Sweden Norway or Finland Use this setting to clear channels stored Press or button to select Clear Service List and then press ...

Страница 21: ...o files from a USB memory stick Note If you plug USB stick while in analogue mode the TV will automatically switch to digital TV mode Note Some USB compliant devices may not be supported Note If the USB stick is not recognized after power off on or First Time Installation first plug the USB device out and power off on the TV set Plug the USB device in again Playing MP3 Files Play This OK button Pl...

Страница 22: ...ettings for selecting Movie Subtitle language Press EXIT button to switch back to previous menu Analogue TV Menu System Picture Menu Mode For your viewing requirements you can set the related mode option Press or button to select Mode Press or button to choose from one of these options Natural Cinema User and Dynamic You can adjust to mode according to your desired settings if you select user opti...

Страница 23: ...eadphone Mute function to On Also when the TV is in mute you can use this feature to activate or deactivate headphone sound Sound Mode Press or buttontoselectSoundMode Using or button youcanselectMono Stereo DualIorDualII mode only if the selected channel supports that mode AVL Automatic Volume Limiting AVL function adjusts the sound to obtain fixed output level between programmes For instance vol...

Страница 24: ...desired source from source menu and turn On to EXT Out from feature menu Ext Out should be On in order to use Timers function in the DTV mode Auto Tv Off Press or button to select Auto Tv Off Use or button to set the Auto Tv Off as Off 1H 2H 3H 4H 5H or 6H You can set the timeout value of auto off feature After the timeout value is reached the TV will switch off Backlight Optional This setting con...

Страница 25: ...utton The first letter of the selected name will be highlighted Press or button to change that letter and or button to select the other letters By pressing the RED button you can store the name Move Select the programme which you want to move by navigation buttons Press the GREEN button By navigation buttons move the selected programme to the decided programme space and press the GREEN button agai...

Страница 26: ...PC picture items do the following Press or button to select the second icon PC Picture menu appears on the screen Contrast Brightness Colour Temperature and Game Mode settings in this menu are identical to settings defined in TV picture menu under Analogue TV Menu System Note If you set Colour Temp as User you can define R G B settings manually Sound Feature and Source settings are identical to th...

Страница 27: ...ports and weather on your TV Note that if the signal degrades for example in poor adverse weather conditions some text errors may occur or the teletext mode may be aborted Teletext function buttons are listed below Teletext Activates teletext mode when pressed once Pressing again will quit the teletext mode Index Selects the teletext index page Mix Places the teletext screen over the programme Exp...

Страница 28: ... disconnect one of the peripherals No Picture Is the aerial connected properly Are the plugs connected tightly to the aerial socket Is the aerial cable damaged Are suitable plugs used to connect the aerial If you are in doubt consult your dealer No Picture means that your TV is not receiving a transmission Have you selected the correct button on the remote control Try once more Also make sure the ...

Страница 29: ...A 4 800 600 56 35 2 VESA 5 800 600 60 37 9 VESA 6 800 600 70 43 8 7 800 600 72 48 1 VESA 8 800 600 75 46 9 VESA 9 832 624 75 49 7 MAC 10 1024 768 60 48 4 VESA 11 1024 768 70 56 5 VESA 12 1024 768 72 57 7 13 1024 768 75 60 0 14 1152 864 75 67 5 VESA 15 1152 870 75 68 9 MAC 16 1280 768 60 47 7 VESA 17 1366 768 60 47 7 18 1280 960 60 60 0 VESA 19 1280 1024 60 64 0 VESA 20 1280 1024 75 80 0 VESA 21 16...

Страница 30: ...20P 60Hz O 1080I 50Hz O 1080I 60Hz O 1080P 24Hz X 1080P 25Hz X 1080P 30HZ X 1080P 50HZ O 1080P 60HZ O X Not Available O Available Note In some cases a signal on the LCD TV may not be displayed properly The problem may be an inconsistency with standards from the source equipment DVD Set top box etc If you do experience such a problem please contact your dealer and also the manufacturer of the sourc...

Страница 31: ...te 8K 48KHz Bit Rate 32K 320Kbps Photo jpg jpeg bmp gif Baseline JPEG WxH 14592x12288 Up to 179 Mega pixel Support format 444 440 422 420 Grayscale Progressive JPEG Up to 4 Mega pixel Support format 444 440 422 420 Grayscale External Subtitles srt Support Text File Format but do not support Picture File Format smi sub psb ass Note Necessary bitrates for some video types are higher than USB limits ...

Страница 32: ... modes Video MP ML PAL 4 3 16 9 Audio MPEG Layer I II 32 44 148kHz NUMBER OF PRESET CHANNELS 200 CHANNEL INDICATOR On Screen Display RF AERIAL INPUT 75 Ohm unbalanced OPERATING VOLTAGE 220 240V AC 50 Hz AUDIO German Nicam Stereo AUDIO OUTPUT POWER WRMS 10 THD 2 x 2 5 POWER CONSUMPTION W 45 W max 1 W Standby PANEL 19 wide display DIMENSIONS mm DxLxH With foot 118 x 459 x 344 Weight Kg 4 10 DxLxH Wi...

Страница 33: ...ise au rebut 33 Informations à l attention des utilisateurs des pays de l Union européenne 34 Débranchement de l appareil 34 Volume du casque 34 Installation 34 Écran LCD 34 Avertissement 34 Branchement à un système de distribution de télévision télévision par câble etc à partir d un tuner 34 Vue d ensemble de la télécommande 35 TV LCD et boutons de commande 36 Affichage des branchements Connecteu...

Страница 34: ...tre appareil Veuillez le conserver dans un endroit sûr car vous pourrez à nouveau en avoir besoin Le présent appareil a été conçu pour recevoir et afficher les programmes de télévision Les différentes options de connexion offrent une possibilité supplémentaire pour la réception et l affichage des sources disponibles récepteur lecteur de DVD enregistreur de DVD magnétoscope PC etc Le fonctionnement...

Страница 35: ...re sécurité Source d alimentation Ce téléviseur ne doit fonctionner qu à partir d une prise de courant 220 240 V AC 50 Hz Assurez vous de sélectionner la tension appropriée pour votre convenance Cordon d alimentation Ne placez pas l appareil ni une pièce de mobilier etc sur le cordon d alimentation alimentation secteur évitez tout pincement du cordon Tenez le cordon d alimentation par sa fiche Ne ...

Страница 36: ...rs le branchement secteur ou à travers un autre appareil avec branchement à la mise à la terre protectrice et sur un système de distribution de télévision utilisant un câble coaxial peut dans certaines circonstances provoquer un incendie Le branchement à un système de distribution par câble doit donc être assuré à travers un dispositif fournissant l isolation électrique inférieure à une certaine p...

Страница 37: ...Menu Son Page précédente Liste des 18 chaînes en mode DTV Menu marche arrêt 19 OK Sélectionner Mode TV analogique Liste 20 des chaînes en mode DTV Touche curseur vers la gauche 21 Source AV 22 Info 23 Volume haut bas 24 Muet 25 Sélection du mode Image 26 Heure Sous page en mode TXT Sous titre 27 activé Désactivé Activer désactiver le Télétexte 28 Mélanger en mode texte 29 Agrandir en mode texte Ta...

Страница 38: ...omposant Connectez le câble YPbPr sur celui du PC entre l ENTREE PC du téléviseur et les sorties vidéo composite de votre appareil La 3 Sortie coaxiale SPDIF envoie les signaux audio numériques de la source en cours Le Dolby D Audio est en mode Bypass pendant le mode Navigateur de média uniquement L entrée RF se branche à une antenne ou à un système de câble 4 Remarquez que si vous utilisez un déc...

Страница 39: ...es entrées audio du téléviseur Remarque Si vous branchez un périphérique au téléviseur via l ENTRÉE VIDÉO ou le câble PC YPbPr vous devez également brancher votre périphérique à l aide d un câble audio aux ENTRÉES AUDIO du téléviseur pour activer le son La prise jack du casque s utilise pour brancher un casque externe au système 5 Branchez la prise jack du CASQUE pour utiliser les casques Alimenta...

Страница 40: ...os enregistrés sur un support USB Il est possible que certains types de périphériques USB à l exemple des lecteurs MP3 soient incompatibles avec ce téléviseur Vous pouvez sauvegarder vos fichiers avant d effectuer tout branchement au téléviseur afin d éviter de probables pertes de données Veuillez remarquer que la responsabilité du fabricant ne saurait être engagée en cas de dommage de fichier ou ...

Страница 41: ...PC Facultatif Entrées audio du composant Entrée HDMI HDMI input Lecteur DVD Remarque Ces procédés de branchement réalisent la même fonction mais à des niveaux de qualité différents Il n est pas nécessaire d effectuer la connexion en recourant à toutes les trois méthodes Utilisation des connecteurs AV latéraux Vous pouvez brancher une gamme d équipement optionnel à votre TV LCD Les raccordements po...

Страница 42: ... Une fois les équipements externes connectés à votre téléviseur vous pouvez commuter entre différentes sources d entrée Appuyez sur la touche de la télécommande pour changer les sources en direct ou Sélectionnez l option Source à partir du menu principal en utilisant le bouton ou Puis utilisez les touches ou pour mettre une entrée en surbrillance et appuyez sur la touche pour la sélectionner Remar...

Страница 43: ... ou puis appuyez sur la touche OK Ensuite le menu Première installation s affiche à l écran En appuyant sur les boutons ou sélectionnez le pays que vous voulez et appuyez sur le bouton OK Pour les pays de l UE Remarque L OSD Sélection du pays selection ne sera pas disponible pour le RU Pressez le bouton OK sur la télécommande pour continuer et le message suivant s affichera à l écran Pour sélectio...

Страница 44: ...affiche les programmes dans les moindres détails Boutons numériques Sauter aller directement à la chaîne préférée via des boutons numériques OK Affichage de diffusions en cours rappel de programmes à venir P P saute sur la diffusion en cours Appuyez sur la touche 0 de la télécommande pour afficher le menu Recherche du guide Vous pouvez à l aide de cette fonctionnalité rechercher la base de données...

Страница 45: ...a diffusion intègre le flux AC3 le message d avertissement ci après s affichera à l écran Système de menu IDTV Appuyez sur le bouton M Le menu principal s affichera Liste des chaînes À l aide la touche ou de la télécommande veillez à ce que le premier élément Liste des chaînes soit mis en surbrillance et appuyez sur le bouton OK pour afficher la liste des chaînes À défaut vous pouvez aussi appuyer...

Страница 46: ...ment de nom Presser maintenant le bouton ou déplace vers le caractère précédent ou suivant En appuyant sur les touches ou vous changez le caractère en surbrillance par exemple le b devient un a ou un c En appuyant sur les touches numériques de 0 à 9 vous remplacez le caractère en surbrillance par les caractères marqués au dessus du bouton ils défilent un par un quand vous appuyez sur le bouton Pre...

Страница 47: ... sur le bouton JAUNE de la télécommande La fenêtre Ajouter un minuteur s affiche alors Mode Sélectionne le mode Liste des chaînes Chaîne Lestouches ou permettrontàl utilisateur de parcourir la liste des programmes TV ou radio Date Ladatededébutestsaisievialesboutonsgauche droite et via les boutons numériques Démarrage L heure de début est saisie via les boutons gauche droite et via les boutons num...

Страница 48: ...our afficher ce menu Pressez le bouton EXIT sur la télécommande pour sortir Faible son pour les pays de l UE uniquement en option Utilisez le bouton ou pour sélectionner l option Malentendant et appuyez ensuite sur le bouton ou pour activer ou désactiver ce paramètre Si le diffuseur active un quelconque signal particulier concernant le son vous pouvez activer ce paramètre afin de recevoir de tels ...

Страница 49: ...s ou du menu d installation pour restreindre l accès à ces menus Si le verrouillage du menu est désactivé l accès au système de menu sera libre Utilisez le bouton ou pour aller sur l option Verrouillage du menu Utilisez le bouton ou pour choisir le mode de verrouillage du menu DÉSACTIVÉ Tous les menus sont déverrouillés TOUS LES MENUS Tous les menus sont accessibles seulement avec la clé correcte ...

Страница 50: ...ue de sous titrage de film En appuyant sur le bouton ou sélectionnez l option de langue désirée Guide Pressez le bouton ou pour changer la langue du guide En cours Audio si la langue audio est prise en charge changez la en pressant le bouton ou Sous titrage si le sous titrage est supporté changez la langue des sous titres avec le bouton ou La langue choisie sera vue dans les sous titres Remarque S...

Страница 51: ... En balayage de chaîne manuel le numéro de multiplexage est saisi manuellement et seul ce multiplexage de programmes est utilisé pour la recherche de chaîne Pour chaque numéro de chaîne valide le niveau du signal et la qualité du signal sont affichés à l écran Tant en mode manuel qu automatique une chaîne quelconque existant dans la base de données n est pas mémorisée une seconde fois afin d évite...

Страница 52: ...e même lorsque vous branchez un périphérique USB l écran ci après s affiche Sélectionnez OUI en appuyant sur la touche ou et sur OK Le navigateur média s affiche Vous pouvez lire des fichiers de musique d image et vidéo à partir d une carte mémoire USB Remarque Si vous branchez une clé USB tout en étant en mode analogique la TV passera automatiquement en mode TV numérique Remarque Certains apparei...

Страница 53: ...ucle est activée à la fin du diaporama il recommencera et continuera ainsi Boucle Le diaporama continue en arrêt et l icône devient soulignée Info active la barre des opérations Lecture Vidéo Lecture Bouton Rouge Démarre la lecture vidéo Stop Bouton Bleu Arrête la lecture vidéo Pause Bouton OK Pause la lecture vidéo Rembobiner Touche directionnelle gauche Revient en arrière Réglage vers l avant To...

Страница 54: ...tionnez le Mode Jeu en appuyant sur le bouton ou Utilisez le bouton ou pour Activer ou Désactiver le mode Jeu Lorsque le mode Jeu est réglé sur Activé les réglages du mode jeu qui sont optimisés pour une meilleure qualité vidéo seront chargés De même les paramètres Mode image Contraste Luminosité Netteté Couleur et Température de couleur seront invisibles et désactivés pendant que le mode Jeu est ...

Страница 55: ...r sélectionner Réinitialisation Appuyez sur le bouton pour réajuster les modes d image aux paramètres de l usine Réinitialisation apparaîtra sur l écran Menu Option Minuteur de mise en veille Pressez le bouton ou pour sélectionner Minuteur de mise en veille Appuyez sur le bouton ou pour régler Minuteur de mise en veille Le minuteur peut être programmé entre Désactivé et 2 heures 120 minutes par in...

Страница 56: ...te atteinte le téléviseur s arrête Rétroéclairage en option Ce paramètre contrôle le niveau de rétroéclairage Sélectionnez Rétroéclairage Backlight en pressant le bouton ou Pressez le bouton ou pour régler le Rétroéclairage sur Moyen Maximum ou Minimum Menu Source Sélectionnez la sixième icône en appuyant sur la touche ou Le menu Source apparaît à l écran Dans le menu Source sélectionnez une sourc...

Страница 57: ...m d un programme sélectionnez le programme et appuyez sur le bouton ROUGE La première lettre du nom sélectionné sera mise en surbrillance Appuyez sur le bouton ou pour changer cette lettre et sur le bouton ou pour sélectionner les autres lettres En pressant le bouton ROUGE vous pouvez stocker le nom Déplacer Sélectionnez le programme que vous voulez déplacer avec les touches directionnelles Appuye...

Страница 58: ...l élément Phase à l aide du bouton ou Utilisez le bouton ou pour régler la valeur Fréquence pilote Les réglages de la fréquence pilote corrigent les interférences qui apparaissent comme des lignes verticales dans l image pour des présentations telles que les feuilles de calcul les paragraphes ou les textes dans des polices plus petites Sélectionnez l élément Fréquence pilote à l aide du bouton ou ...

Страница 59: ...e AUTO ne fonctionne pas correctement à cause de la mauvaise qualité du signal WSS ou lorsque vous voulez changer le mode ZOOM changez manuellement pour un autre ZOOM 16 9 Ceci étend uniformément les côtés gauche et droit d une image normale format d image 4 3 pour remplir l écran de Télévision Pour les images de format 16 9 qui ont été pressées en une image normale format d image 4 3 utilisez le ...

Страница 60: ...l image ou le télétexte sont méconnaissables Vérifiez si vous avez introduit la fréquence appropriée Veuillez régler à nouveau les chaînes La qualité d image peut se dégrader lorsque deux périphériques sont connectés au téléviseur en même temps Dans un tel cas déconnectez l un des périphériques Aucune image Est ce que l antenne est correctement branchée Est ce que les prises sont correctement bran...

Страница 61: ...7 9 VESA 3 640 480 75 37 5 VESA 4 800 600 56 35 2 VESA 5 800 600 60 37 9 VESA 6 800 600 70 43 8 7 800 600 72 48 1 VESA 8 800 600 75 46 9 VESA 9 832 624 75 49 7 MAC 10 1024 768 60 48 4 VESA 11 1024 768 70 56 5 VESA 12 1024 768 72 57 7 13 1024 768 75 60 0 14 1152 864 75 67 5 VESA 15 1152 870 75 68 9 MAC 16 1280 768 60 47 7 VESA 17 1366 768 60 47 7 18 1280 960 60 60 0 VESA 19 1280 1024 60 64 0 VESA 2...

Страница 62: ... O 1080I 50Hz O 1080I 60Hz O 1080P 24Hz X 1080P 25Hz X 1080P 30HZ X 1080P 50HZ O 1080P 60HZ O X Non disponible O Disponible Remarque Dans certains cas un signal sur l écran du téléviseur LCD peut ne pas s afficher correctement Le problème peut être une incompatibilité avec les normes de l équipement source DVD décodeur etc Si vous rencontrez un tel problème veuillez contacter votre fournisseur et ...

Страница 63: ...binaire 32K 320Kbps Photo jpg jpeg bmp gif JPEG de base WxH 14592x12288 jusqu à 179 Mega pixel Format du support 444 440 422 420 Echelle de gris JPEG Progressif Jusqu à 4 méga pixels Format du support 444 440 422 420 Echelle de gris Sous titres externes srt Prend en charge le format du fichier Texte mais ne prend pas en charge le format du fichier Image smi sub psb ass Remarque Les débits binaires...

Страница 64: ... Vidéo MP ML PAL 4 3 16 9 Audio MPEG Layer I II 32 44 148kHz NOMBRE DE CANAUX PRÉRÉGLÉS 200 INDICATEUR DE CHAÎNE Affichage à l écran ENTRÉE D ANTENNE RF 75 Ohms Non équilibré TENSION DE FONCTIONNEMENT 220 240V AC 50 Hz AUDIO Allemand Nicam Stéréo PUISSANCE DE SORTIE AUDIO WRMS 10 THD 2 x 2 5 CONSOMMATION ÉLECTRIQUE W 45 W max 1 W Veille PANNEAU 19 Écran large DIMENSIONS mm PxLxH Avec pied 118 x 45...

Страница 65: ...50176012 ...

Отзывы: