background image

English   - 22 -

   - 22 -

HELP LINE NUMBER 0845 543 0485

Power Save Mode

Use “ ” or “ ” button to select Power Save Mode.
Press “ ” or “ ” button to set Power Save Mode as 

On or Off.
See  the  section,  “Environmental  Information”  in 

this  manual  for  further  information  on  Power  Save 

Mode.

Note : Backlight function will be invisible if Power Save Mode 

is set to on.

Backlight

This  setting  controls  the  backlight  level.  Select 

Backlight

 by pressing “ ” or “ ” button. Press“

” or “ ” button to set 

Backlight

 to 

Auto, Medium

Maximum

 or 

Minimum

.

Menu Timeout

To set a specific display timeout for menu screens, 

set a value for this option.
Press “ ” or “ ” button to select 

Menu Timeout

. Use 

“ ” or “ ” button to change menu timeout to 

15 sec

30 sec

 or 

60 sec

.

Teletext Language

Press “ ” or “ ” button to select 

Teletext Language

Use “ ” or “ ” button to change 

Teletext Language

 to 

West, East

Turk/Gre

Cyrillic, Arabic

 or 

Persian

.

HDMI PC Full Mode (optional)

If you want to view PC screen in HDMI mode by using 

external connection, HDMI PC FULL MODE option 

should be On to adjust the screen ratio correctly. This 

item might be inactive in some resolutions.

Note

:  If  you  connect  an  HDMI  device  and  switch  the 

TV  to  HDMI  mode,  this  feature  will  be  visible  (except  for 

1080i/1080P resolution).

Full Mode (optional)

If you connect a device via HDMI or YPbPr connectors 

and set 1080i/1080P resolutions, Full Mode item will 

be visible.You can set Full Mode as 1:1 or Normal 

by using “ ”or “ ”.If you select 1:1, screen ratio will 

be adjusted correctly. If you set Normal, screen ratio 

may expand.

Ext Out

Press “ ” or “ ” button to select Ext Out. Use “ ” or 

“ ” button to set the Ext Out as On or Off.

Note

:

For copying from a DVD or VCR device, you should choose 

desired source from source menu and turn “On” to EXT Out 

from feature menu.

Ext Out should be On in order to use Timers function in the 

DTV mode.

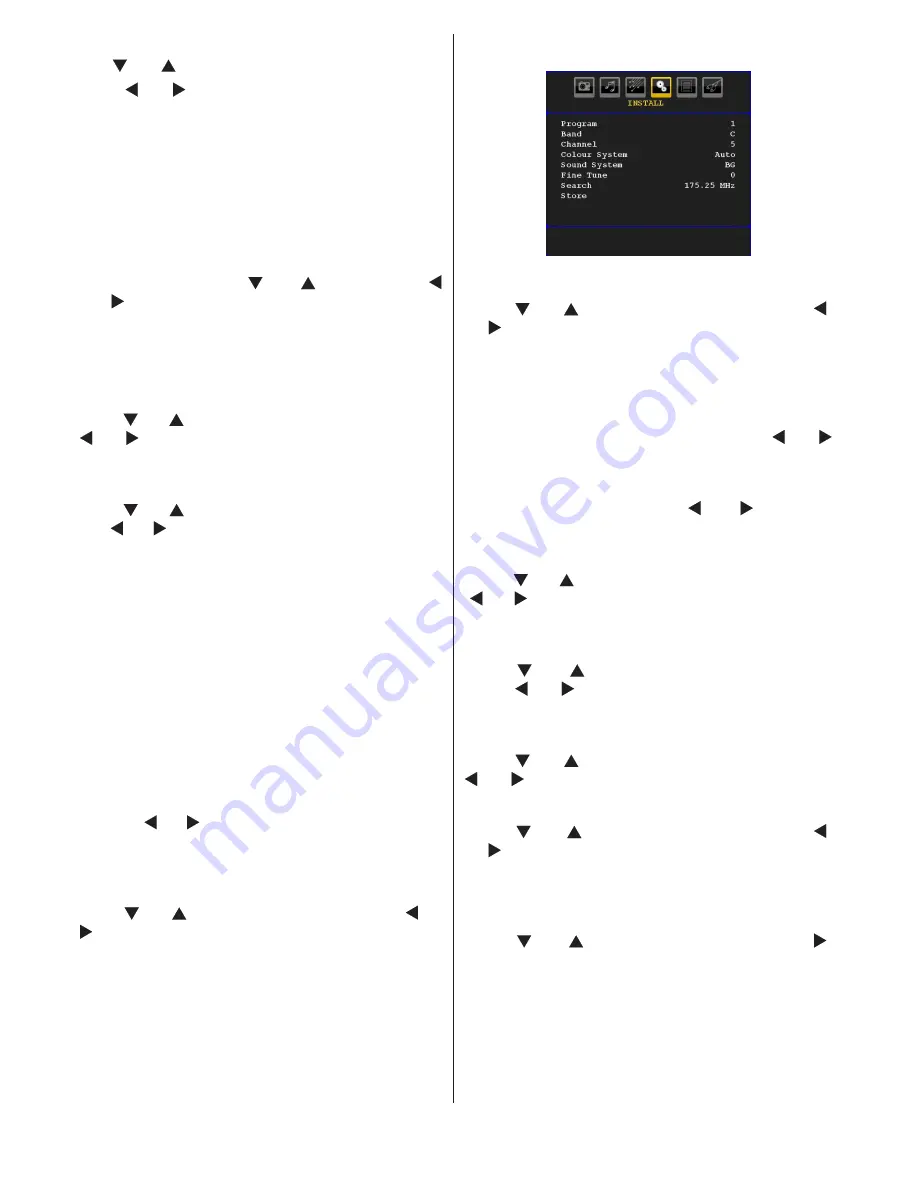
Install Menu

Program

Press “ ” or “ ” button to select Program. Use  “ ” 

or “ ” button to select the program number. You can 

also enter a number using the numeric buttons on the 

remote  control. There  are  200  programme  storage 

between 0 and 199.

Band

Band can be selected either C or S. Press “ ” or “

” button to set Band. 

Channel

Channel  can  be  changed  by  “ ”  or  “ ”  button  or 

numeric buttons.

Colour System

Press “ ” or “ ”  button to select Colour System. Use 

“ ” or “ ” button to change the colour system to PAL, 

PAL 60, SECAM or AUTO.

Sound System

Press “ ” or “ ” button to select  Sound System.  

Press “ ” or “ ” button to change the sound system 

to BG,DK, I, L or L’.

Fine Tune

Press “ ” or “ ” button to select Fine Tune. Press “

” or “ ” button to adjust the tuning.

Search

Press “ ” or “ ” button to select Search. Use  “ ” 

or “ ” button to start programme searching. You can 

also enter the desired frequency using the numeric 

buttons while Search item is highlighted.

Store

Press “ ” or “ ” button to select Store. Press “ ” 

or 

OK

 button to store the settings. “

Stored...

” will be 

displayed on the screen.

Install Menu in AV Modes

The following screen appears in the install menu when 

the TV is in AV modes. Note that limited options will 

be available. Switch to TV mode for viewing complete 

version of the 

Install

 menu.

Содержание 32884 HD DIGITAL

Страница 1: ...32884 HD DIGITAL OPERATING INSTRUCTIONS COLOUR TELEVISION WITH REMOTE CONTROL HELP LINE NUMBER 0845 543 0485 ...

Страница 2: ...tion 2 Safety Precautions 2 Power Source 2 Power Cord 2 Moisture and Water 3 Cleaning 3 Heat and Flames 3 Lightning 3 Replacement Parts 3 Servicing 3 Waste Disposal 3 Information for users in EU Countries 3 Disconnecting the Device 3 Headphone Volume 3 Installation 3 LCD Screen 3 Warning 3 Connection to a Television Distribution System Cable TV etc from Tuner 4 Environmental Information 4 Repair I...

Страница 3: ... will guide you for the proper operation of your TV Before operating the TV please read this manual thoroughly Please do keep this manual in a safe place for future references Preparation For ventilation leave a free space of at least 10 cm all around the set To prevent any fault and unsafe situations please do not place any objects on top of the set Use this device in moderate climates 10 cm 10 c...

Страница 4: ...te that this does not affect the performance of your product Warning Do not leave your TV in standby or operating mode when you leave your house Moisture and Water Do not use this device in a humid and damp place avoid the bathroom the sink in the kitchen and near the washing machine Do not expose this device to rain or water as this may be dangerous and do not place objects filled with liquids su...

Страница 5: ...ve Mode setting located in the Feature menu If you set Power Save Mode as On the TV will switch to energy saving mode and luminance level of TV set will be decreased to optimum level Note that some picture settings will be unavailable to be changed when the TV is in Power Save Mode When the TV is not in use please switch off or disconnect the TV from the mains plug This will also reduce energy con...

Страница 6: ... 10 Favourite Mode Selection in DTV mode 11 Volume Up 12 Info Reveal in TXT mode 13 Mute 14 Volume Down 15 Programme Down Page up in DTV mode 16 Electronic programme guide in DTV mode 17 Programme Up Page down in DTV mode 18 Sleep Timer 19 Picture Mode Selecion 20 Okay Store Select Hold in TXT mode 21 Cursor Down 22 Exit in DTV mode Return Index page in 23 TXT mode Cursor Right Subpage in TXT mode...

Страница 7: ...g PC input S PDIF Coaxial Out 3 outputs digital audio signals of the currently watched source RF Input connects to an antenna or a cable 4 Note that if you use a decoder or a media recorder you should connect the aerial cable through the device to the television with an appropriate antenna cable as shown in the illustration in the following pages HDMI 5 1 HDMI input HDMI Input is for connecting a ...

Страница 8: ...the TV and the VIDEO OUT jack on your device Audio Inputs are used for connecting audio signals of external devices 5 Connect the audio cable between the AUDIO INPUTS on the TV and the AUDIO OUTPUT jacks on your device Also to enable PC YPbPr sound connection in such a case use an appropriate audio cable between the connected device s audio outputs and the TV s audio inputs Note If you connect a d...

Страница 9: ...y before making any connections Use 15 pin D sub display cable to connect a PC to the LCD TV Use an audio cable between audio inputs of the TV side and audio output of your PC to enable sound connection When the connection is made switch to PC source See Input selection section Settheresolutionthatsuitsyourviewingrequirements Resolution information can be found in the appendix parts SPDIF SCART VG...

Страница 10: ... Recorder Inserting Batteries into the Remote Control Handset Remove the battery cover located on the back of the handset by gently pulling backwards from the indicated part Insert two AAA R3 or equivalent type batteries inside Observe the correct polarity when inserting batteries and replace the battery cover Note Remove the battery from remote control handset when it is not to be used for a long...

Страница 11: ...Functions of the menu system are described in the following sections Volume Setting Press V button to increase the volume Press V button to decrease the volume A volume level scale slider will be displayed on the screen Programme Selection Previous or Next Programme Press P button to select the previous programme Press P button to select the next programme Programme Selection DirectAccess Press nu...

Страница 12: ...the selected channel is locked you must enter the correct four numeric code to view the channel Enter PIN will be displayed on the screen in such a case Electronic Programme Guide EPG Some but not all channels send information about the current and next events Press EPG button to view the EPG menu EPG appears on the screen It is able to get Information of the channel programs weekly by means of 7 ...

Страница 13: ...e digital teletext screen will be displayed Analogue Teletext Use of teletext and its functions are identical to the analogue text system Please do refer to the TELETEXT explanations Widescreen Depending on the type of the broadcast being transmitted programmes can be viewed in a number of formats Press the SCREEN button repeatedly to change screen format When Auto is selected the format being dis...

Страница 14: ...ight the Edit Name item by pressing or button as illustrated below Press the OK button to activate the rename feature Now pressing or button moves to the previous next character Pressing or button toggles the current character i e b character becomes a by and c by Pressing the numeric buttons 0 9 replaces the highlighted character with the characters printed above the button one by one as the butt...

Страница 15: ... buttons Change Delete permits or prohibits any modifications for other users Duration Duration between Start and End time Repeat You can set a timer to be repeated as Once Daily or Weekly You can save the adjustments by pressing the GREEN key or cancel the process by pressing the RED button You can edit the list via GREEN key and delete with the RED button Conditional Access Pressthe MENU buttont...

Страница 16: ...or buttons to go to Channel List option Use or buttons to toggle Channel List Mode If you select TV Only with the or buttons you navigate through only TV channels If you select Radio Only with the or buttons you navigate through only radio channels If you select Text Only with the or buttons you navigate through only text channels Scan Encrypted Scan Encrypted Channel feature will always be ON aft...

Страница 17: ...s set using or buttons It can be set to AUTO or MANUAL WhenAUTO is selected Current Time and Time Zone options will not be available to be set If MANUAL option is selected as the Time Zone Setting Time Zone can be altered By pressing or buttons select Time Zone Use or buttons to change the Time Zone between GMT 12 or GMT 12 Current Time on the top of the menu list will then change according to the...

Страница 18: ...gs item by pressing or buttons Press OK and Language Settings submenu will be displayed on the screen Use or buttons to highlight the menu item that will be adjusted and then press or button to set Notes System Language determines the on screen menu language Audio Language is used for selecting the soundtrack of a channels Primary settings are the rst priority when multiple choices are available o...

Страница 19: ...Yes by pressing OK button while the Yes is highlighted will delete the existing channel table Then you will be asked to confirm for deleting all channels and settings By selecting Yes and pressing the OK button the existing channel table will be deleted After factory settings are loaded First Time Installation menu will be displayed The menu which is displayed for language selection appears on the...

Страница 20: ...l pictures in the folder Slideshow Options Pause Yellow button Pause the slideshow Continue Green button Continue with the slideshow Previous Next Left Right buttons Jump to previous or next file of slideshow Rotate Up Down buttons Rotate the picture using up down buttons RETURN Back to file list Shuffle Red button Shows the files randomly and continuous in current folder and icon turns the highli...

Страница 21: ...ium High or Off Game Mode optional Select Game Mode by pressing or button Use or button to set Game Mode as On or Off When Game Mode is set to On specific game mode settings which are optimized for better video quality will be loaded Also Picture Mode Contrast Brightness Sharpness Colour and Colour Temp settings will be invisible and disabled while Game Mode is on Note Picture mode selection butto...

Страница 22: ...elect Store Press or OK button to store the settings Stored will be displayed on the screen Feature Menu Sleep Timer Press or button to select Sleep Timer Use or button to set the Sleep Timer The timer can be programmed between Off and 120 minutes in steps of 10 minutes If Sleep Timer is activated at the end of the selected time the TV goes automatically to standby mode Child Lock Press or button ...

Страница 23: ...ou select 1 1 screen ratio will be adjusted correctly If you set Normal screen ratio may expand Ext Out Press or button to select Ext Out Use or button to set the Ext Out as On or Off Note For copying from a DVD or VCR device you should choose desired source from source menu and turn On to EXT Out from feature menu Ext Out should be On in order to use Timers function in the DTV mode Install Menu P...

Страница 24: ...move by navigation buttons Press the GREEN button By navigation buttons move the selected programme to the decided programme space and press the GREEN button again Delete To delete a programme press the YELLOW button Pressing the YELLOW button again erases the selected programme from the programme list and the following programmes shift one line up APS Auto Programming System When you press the BL...

Страница 25: ...item to get a clear picture by trial and error method Select Phase item by using or buttons Use or button to adjust the value Dot Clock Dot Clock adjustments correct the interference that appear as vertical banding in dot intensive presentations like spreadsheets or paragraphs or text in smaller fonts Select Dot Clock item by using or buttons Use or button to adjust the value PC Picture Menu For a...

Страница 26: ... aspect ratio to fill the screen without making the picture appear unnatural The top and bottom of the picture are slightly cut off 14 9 This zooms up the wide picture 14 9 aspect ratio to the upper and lower limits of the screen Cinema This zooms up the wide picture 16 9 aspect ratio to the full screen Subtitle This zooms up the wide picture 16 9 aspect ratio with subtitles to the full screen Zoo...

Страница 27: ...ystem has no power please check the main power cable and connection to the mains socket outlet Poor Picture Have you selected the correct TV system Is your TV set or house aerial located too close to a non earthed audio equipment or neon lights etc Mountains or high buildings can cause double pictures or ghost images Sometimes you can improve the picture quality by changing the direction of the ae...

Страница 28: ...lution Frequency Standard Hor Ver Ver Hz Hor KHz 1 640 480 60 31 5 VESA 2 640 480 72 37 9 VESA 3 640 480 75 37 5 VESA 4 800 600 56 35 2 VESA 5 800 600 60 37 9 VESA 6 800 600 70 43 8 7 800 600 72 48 1 VESA 8 800 600 75 46 9 VESA 9 832 624 75 49 7 MAC 10 1024 768 60 48 4 VESA 11 1024 768 70 56 5 VESA 12 1024 768 72 57 7 13 1024 768 75 60 0 14 1152 864 70 64 2 VESA 15 1152 864 75 67 5 VESA 16 1152 87...

Страница 29: ...0I 60Hz O 1080P 50Hz O 1080P 60Hz O HDMI 480I 60Hz O 480P 60Hz O 576I 50Hz O 576P 50Hz O 720P 50Hz O 720P 60Hz O 1080I 50Hz O 1080I 60Hz O 1080P 24Hz O 1080P 25Hz O 1080P 30HZ O 1080P 50HZ O 1080P 60HZ O X Not Available O Available Note In some cases a signal on the LCD TV may not be displayed properly The problem may be an inconsistency with standards from the source equipment DVD Set top box etc...

Страница 30: ...rogressive JPEG Up to 4 Mega pixel Support format 444 440 422 420 Grayscale External Subtitles optional srt Support Text File Format but do not support Picture File Format smi sub Note Necessary bitrates for some video types are higher than USB limits For this reason some video types cannot be played Products Battery Information for Users on Disposal of old Equipment and Batteries European Union o...

Страница 31: ...MHz for EU models Transmission standard DVB T MPEG 2 Demodulation COFDM with 2K 8K FFT mode FEC all DVB modes Video MP ML PAL 4 3 16 9 Audio MPEG Layer I II 32 44 148kHz NUMBER OF PRESET CHANNELS 200 CHANNEL INDICATOR On Screen Display RF AERIAL INPUT 75 Ohm unbalanced OPERATING VOLTAGE 220 240V AC 50 Hz AUDIO German Nicam Stereo AUDIO OUTPUT POWER WRMS 10 THD 2 x 6 POWER CONSUMPTION W 150 W max 1...

Страница 32: ...mbol or coloured green or green and yellow The wire which is coloured blue or black must be connected to the terminal which is marked with the letter N or coloured Black The wire which is coloured brown or red must be connected to the terminal which is marked with the letter L or coloured Red For continued protection against risk of fire replace only with same type and rating of fuse ASTA approved...

Страница 33: ...50183076 ...

Отзывы: