background image

English   - 21 -

IF YOU NEED ANY ASSISTANCE OR A CUSTOMER REFERENCE NUMBER PLEASE CONTACT THE 

TECHWOOD HELP LINE ON 0845 543 0485

 Ext Out 

 Press “ ” or “ ” button to select Ext Out. Use “ ” or 
“ ” button to set the Ext Out as On or Off. 

  Note 

:

For copying from a DVD or VCR device, you should choose 
desired source from source menu and turn “On” to EXT Out 
from feature menu.
Ext Out should be On in order to use Timers function in the 
DTV mode. 

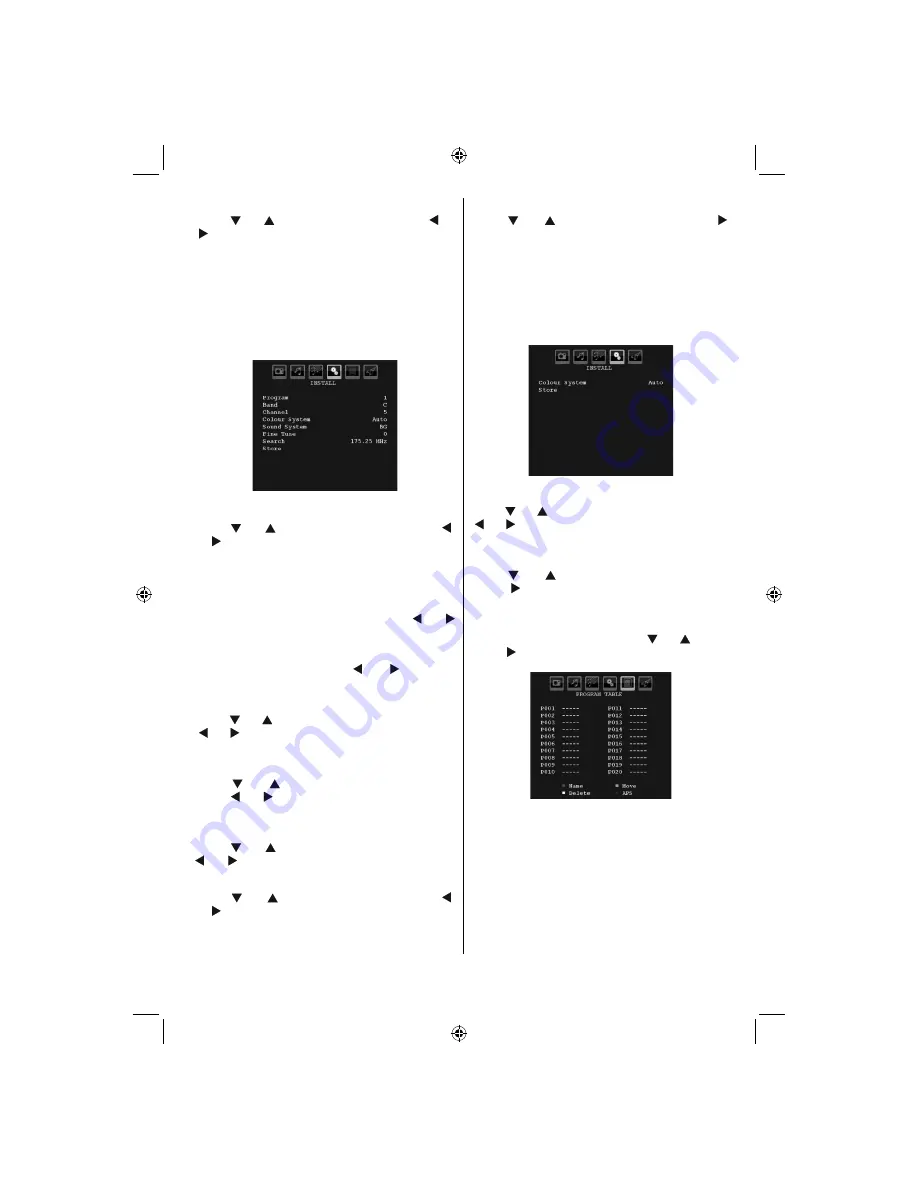
  Install Menu 


 Program 

 Press “ ” or “ ” button to select Program. Use  “ ” 
or “ ” button to select the program number. You can 
also enter a number using the numeric buttons on the 
remote control. There are 200 programme storage 
between 0 and 199. 

 Band 

 Band can be selected either C or S. Press “ ” or “
” button to set Band.  

 Channel 

 Channel can be changed by “ ” or “ ” button or 
numeric buttons. 

 Colour System 

 Press “ ” or “ ”  button to select Colour System. Use 
“ ” or “ ” button to change the colour system to PAL, 
PAL 60, SECAM or AUTO. 

 Sound System 

 Press “ ” or “ ” button to select  Sound System.  
Press “ ” or “ ” button to change the sound system 
to BG,DK, I, L or L’. 

 Fine Tune 

 Press “ ” or “ ” button to select Fine Tune. Press “

” or “ ” button to adjust the tuning. 

 Search 

 Press “ ” or “ ” button to select Search. Use  “ ” 
or “ ” button to start programme searching. You can 
also enter the desired frequency using the numeric 
buttons while Search item is highlighted. 

 Store 

 Press “ ” or “ ” button to select Store. Press “ ” 
or  

OK

  button to store the settings. “ 

Stored... 

” will be 

displayed on the screen. 

 Install Menu in AV Modes 

 The following screen appears in the install menu when 
the TV is in AV modes. Note that limited options will 
be available. Switch to TV mode for viewing complete 
version of the  

Install 

 menu. 


 Colour System 

 Press “ ” or “ ” button to select  

Colour System

 . Use 

“ ” or “ ” button to change the colour system to  

PAL, 

SECAM, PAL60, AUTO, NTSC 4,43 

or

 NTSC 3,58.


 Store 

 Press “ ” or “ ” button to select  

Store Program

 . 

Press “ ” or  “

OK

”  button to store the settings. 

“ 

Stored...

 ” will be displayed on the screen. 

 Program Table 

 Select  

Program Table

  by pressing “ ” or “ ” button. 

Press “ ” to display Program Table: 


 By moving the cursor in four directions you can reach 
20 programmes in the same page. You can scroll the 
pages up or down by pressing the navigation buttons 
to see all the programmes in TV mode (except for the 
AV modes). By cursor action, programme selection is 
done automatically. 

 Name 

 To change the name of a programme, select the 
programme and press the  

RED

  button.

01_MB45M_[GB]_3902UK_IDTV_BRONZE14_26884W_10073456_50191025.indd   21

01_MB45M_[GB]_3902UK_IDTV_BRONZE14_26884W_10073456_50191025.indd   21

11.05.2011   17:29:42

11.05.2011   17:29:42

Содержание 2443144

Страница 1: ...26 2443144 OPERATING INSTRUCTIONS COLOUR TELEVISION WITH REMOTE CONTROL IF YOU NEED ANY ASSISTANCE OR A CUSTOMER REFERENCE NUMBER PLEASE CONTACT THE TECHWOOD HELP LINE ON 0845 543 0485 ...

Страница 2: ...Waste Disposal 3 Information for users in EU Countries 3 Disconnecting the Device 3 Headphone Volume 3 Installation 3 LCD Screen 3 Warning 3 Connection to a Television Distribution System Cable TV etc from Tuner 4 Environmental Information 4 Repair Information 4 Overview of the Remote Control 5 LCD TV and Operating Buttons 6 Viewing the Connections Back Connectors 6 Viewing the Connections Side Co...

Страница 3: ...ide you for the proper operation of your TV Before operating the TV please read this manual thoroughly Please keep this manual in a safe place for future references Preparation For ventilation leave a free space of at least 10 cm all around the set To prevent any fault and unsafe situations please do not place any objects on top of the set Use this device in moderate climates 10 cm 10 cm 10 cm Saf...

Страница 4: ...f your product Warning Do not leave your TV in standby or operating mode when you leave your house Moisture and Water Do not use this device in a humid and damp place avoid the bathroom the sink in the kitchen and near the washing machine Do not expose this device to rain or water as this may be dangerous and do not place objects filled with liquids such as flower vases on top Avoid from dripping ...

Страница 5: ... You can use Power Save Mode setting located in the Feature menu If you set Power Save Mode as On the TV will switch to energy saving mode and luminance level of TV set will be decreased to optimum level Note that some picture settings will be unavailable to be changed when the TV is in Power Save Mode When the TV is not in use please switch off or disconnect the TV from the mains plug This will a...

Страница 6: ...letext Mix PAT in TXT mode 7 Cursor Left 8 Menu 9 AV Source 10 Favourite Mode Selection in DTV mode 11 Volume Up 12 Info Reveal in TXT mode 13 Mute 14 Volume Down 15 Programme Down Page up in DTV mode 16 Electronic programme guide in DTV mode 17 Programme Up Page down in DTV mode 18 Sleep Timer 19 Picture Mode Selecion 20 Okay Store Select Hold in TXT mode 21 Cursor Down 22 Exit in DTV mode Return...

Страница 7: ...se do not connect a device to YPbPr socket while using PC input S PDIF Coaxial Out 3 outputs digital audio signals of the currently watched source RF Input connects to an antenna or a cable 4 Note that if you use a decoder or a media recorder you should connect the aerial cable through the device to the television with an appropriate antenna cable as shown in the illustration in the following page...

Страница 8: ...o cable between the connected device s audio outputs and the TV s audio inputs Note If you connect a device to the TV via the VIDEO or PC YPbPr cable you should also connect your device with an audio cable to the AUDIO INPUTS of the TV to enable audio Headphone jack is used for connecting an external headphone to the system 4 Connect to the HEADPHONE jack to listen to the TV from headphones Power ...

Страница 9: ...ied If your DVD player has an HDMI socket you can connect via HDMI When you connect to DVD player as illustrated below switch to HDMI source See Input Selection section Most DVD players are connected through COMPONENT SOCKETS Use a component video cable to connect video input To enable sound connection use AUDIO IN located side of the TV YPbPr cable is not supplied When the connection is made swit...

Страница 10: ...from standby mode either Press the button P P or a numeric button on the remote control Press the P CH or P CH button on the TV The TV will then switch on Note If you switch on your TV via standby button on the remote control the programme source that you were watching last will be reselected By either method the TV will switch on To Switch the TV Off Press the button on the remote control or pres...

Страница 11: ...l to select programmes between 0 and 9 The TV will switch to the selected programme To select programmes between 10 500 for IDTV or 10 199 for analogue press the numeric buttons consecutively Press directly the programme number to reselect single digit programmes Initial Settings When the TV is turned on for the first time the menu for the language selection appears on the screen The message Welco...

Страница 12: ...enu EPG appears on the screen It is able to get Information of the channel programs weekly by means of 7 DAY EPG All programs of channels are displayed On the bottom of the screen info bar showing all the available commands will be displayed RED button Shrink makes the info boxes smaller GREEN button Expand makes the info boxes larger YELLOW button Prev Day displays the programmes of previ ous day...

Страница 13: ...dly to change screen format When Auto is selected the format being displayed is determined by the picture being broadcasted PLEASE NOTE Menu size changes depending on the chosen image size Notice If there is no audio available the following warning message will be displayed on the screen IDTV Menu System Press the MENU button Main menu will be displayed Channel List Using the or button on the remo...

Страница 14: ... the current character i e b character becomes a by and c by Pressing the numeric buttons 0 9 replaces the highlighted character with the characters printed above the button one by one as the button is pressed Press the MENU button to cancel the editing or OK button to save the new name Adding Locks to Channels Channel locking provides a password protected access to channels selected by parents In...

Страница 15: ... modifications for other users Duration Duration between Start and End time Repeat You can set a timer to be repeated as Once Daily or Weekly You can save the adjustments by pressing the GREEN key or cancel the process by pressing the RED button You can edit the list via GREEN key and delete with the RED button Conditional Access Pressthe MENU buttontodisplaythemainmenuand use the or button to hig...

Страница 16: ...navigate through only TV channels If you select Radio Only with the or buttons you navigate through only radio channels If you select Text Only with the or buttons you navigate through only text channels Scan Encrypted Scan Encrypted Channel feature will always be ON after performing first time installation When this setting is on search process will locate the encrypted channels as well If it is ...

Страница 17: ... MANUAL WhenAUTO is selected Current Time and Time Zone options will not be available to be set If MANUAL option is selected as the Time Zone Setting Time Zone can be altered By pressing or buttons select Time Zone Use or buttons to change the Time Zone between GMT 12 or GMT 12 Current Time on the top of the menu list will then change according to the selected Time Zone Audio Description Optional ...

Страница 18: ... press or button to set Notes System Language determines the on screen menu language Audio Language is used for selecting the soundtrack of a channels Primary settings are the first priority when multiple choices are available on a broadcast Secondary settings are the alternatives when the first options are not available Installation The Installation menu is mainly intended to help you for creatin...

Страница 19: ...r deleting all channels and settings By selecting Yes and pressing the OK button the existing channel table will be deleted After factory settings are loaded First Time Installation menu will be displayed The menu which is displayed for language selection appears on the screen at first By using or buttons select the desired language option and press OK button to activate After then First time inst...

Страница 20: ... OK button to reset the picture modes to factory default settings Sound Menu Volume Press or button to select Volume Press or button to change the level of the Volume Equalizer Press or button to select Equalizer Press button to view equalizer menu Press or button to change the preset In equalizer menu the preset can be changed to Music Movie Speech Flat Classic and User Select the desired frequen...

Страница 21: ...able this set Blue Background to On By pressing or button select Blue Background Press or button to set Blue Background as On or Off Menu Background Press or button to select Menu Background You can set menu background level by pressing or button Power Save Mode Use or button to select Power Save Mode Press or button to set Power Save Mode as On or Off See the section Environmental Information in ...

Страница 22: ...tart programme searching You can also enter the desired frequency using the numeric buttons while Search item is highlighted Store Press or button to select Store Press or OK button to store the settings Stored will be displayed on the screen Install Menu in AV Modes The following screen appears in the install menu when the TV is in AV modes Note that limited options will be available Switch to TV...

Страница 23: ... wait until the end of APS Program Table will be displayed with the programmes found and located Source Menu Press or button and select the sixth icon Then press or OK button Source menu appears on the screen In source menu highlight a source by pressing or button and switch to that mode by pressing button Source options are TV DTV EXT 1 FAV HDMI YPbPr and PC VGA Note Once you have connected optio...

Страница 24: ...amme Name Sound Indicator and Zoom Mode information is displayed on the screen when a new programme is entered or INFO button is pressed Mute Function Press button to disable sound Mute indicator will be displayed in the upper side of the screen To cancel mute there are two alternatives the first one is pressing the button and the second one is increasing the volume level Picture Mode Selection By...

Страница 25: ...ch as news sports and weather on your TV Note that is the signal degrades for example in poor adverse weather conditions some text errors may occur or the teletext mode may be aborted Teletext function buttons are listed below Teletext Mix PAT Activates teletext mode when pressed once Pressing the button for the second time activates teletext mix feature Pressing this button again will split the s...

Страница 26: ...Mountains or high buildings can cause double pictures or ghost images Sometimes you can improve the picture quality by changing the direction of the aerial Is the picture or teletext unrecognisable Check if you have entered the correct frequency Please retune the channels The picture quality may degrade when two peripherals are connected to the TV at the same time In such a case disconnect one of ...

Страница 27: ...z 1 640 480 60 31 5 VESA 2 640 480 72 37 9 VESA 3 640 480 75 37 5 VESA 4 800 600 56 35 2 VESA 5 800 600 60 37 9 VESA 6 800 600 70 43 8 7 800 600 72 48 1 VESA 8 800 600 75 46 9 VESA 9 832 624 75 49 7 MAC 10 1024 768 60 48 4 VESA 11 1024 768 70 56 5 VESA 12 1024 768 72 57 7 13 1024 768 75 60 0 14 1152 864 70 64 2 VESA 15 1152 864 75 67 5 VESA 16 1152 870 75 68 9 MAC 17 1280 768 60 47 7 VESA 18 1360 ...

Страница 28: ...0Hz O 480P 60Hz O 576I 50Hz O 576P 50Hz O 720P 50Hz O 720P 60Hz O 1080I 50Hz O 1080I 60Hz O 1080P 24Hz O 1080P 25Hz O 1080P 30HZ O 1080P 50HZ O 1080P 60HZ O X Not Available O Available Note In some cases a signal on the LCD TV may not be displayed properly The problem may be an inconsistency with standards from the source equipment DVD Set top box etc If you do experience such a problem please con...

Страница 29: ...EC 13522 5 UK engine Profile 1 for UK Object carousel support compliant with ISO IEC 135818 6 and UK DTT profile Frequency range 474 850 MHz for UK models 170 862 MHz for EU models Transmission standard DVB T MPEG 2 Demodulation COFDM with 2K 8K FFT mode FEC all DVB modes Video MP ML PAL 4 3 16 9 Audio MPEG Layer I II 32 44 148kHz NUMBER OF PRESET CHANNELS 200 CHANNEL INDICATOR On Screen Display R...

Страница 30: ...wire which is coloured blue or black must be connected to the terminal which is marked with the letter N or coloured Black The wire which is coloured brown or red must be connected to the terminal which is marked with the letter L or coloured Red For continued protection against risk of fire replace only with same type and rating of fuse ASTA approved 5A 250VAC fuse CAUTION TO PREVENT ELECTRIC SHO...

Страница 31: ...50191025 ...

Отзывы: