background image


Detailed operation


Fixed time axis: If you select [     
two-hours video content. The time range refers to 
2

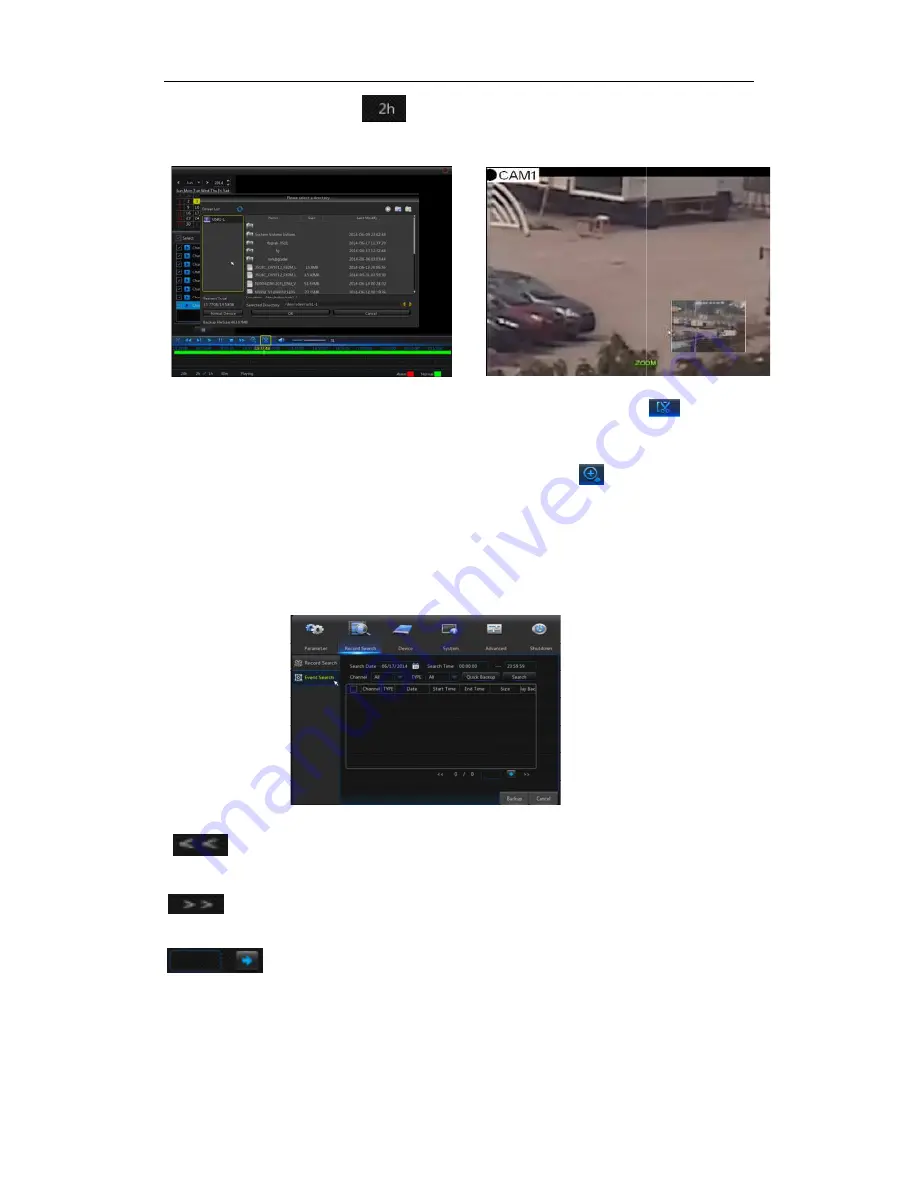
Record clip and backup function and playback zoom in/out function.


Picture 4-21-1                                                                   


Clip  and  backup:

When  it  is  under  single  channel  playback

appear in the Play Control bar shown as Picture 
clip function, click the icon
Picture 4-21-1. Now, you may 


Zoom out

When it is und

Play Control bar. Click the icon to zoom in certain area of the playback screen and 
right click mouse to return the Playback page. 

4.2.2.2 Event Search 

Go  to“Main  Menu”→“

shown as Picture 4-22. 

In  this  page,  user  may  search  details  by  date,  time,  channel  and  record  type.  The 

relevant operations are as follows:


  Next page; Click the button to go to next page when viewing events (except 

the last page). When viewing the last page, click this button to display the event list in the 
last page.   

Jump;  Input  the  desired  record  event  page  in  the  input  box  and  click 

arrow button to jump to the input page. 
Two types of backup

Quick Backup and Backup

If you want to back up a record in the detailed file list, you may tick 
of  the  record  (“√”means  it  has  been  selected)  and  click  “Backup”  to  enter  int
backup  type”  (Make  sure  U  disk  or  other  portable  storage  device  are  connected),  as 
shown in Picture 4-23.   

Previous  page;  Click  the  button  to  go  to  previous  page  when  viewing  events 

(except the first page). When viewing the first page, click this button to display the event 
list in the first page. 

USER  MANUAL

15


Fixed time axis: If you select [              ] option, that means the processing control bar cover 

hours video content. The time range refers to 1 hour before and after the middle point. 

ackup function and playback zoom in/out function. 

                                                                    Picture 4

When  it  is  under  single  channel  playback,  the  [           

ntrol bar shown as Picture 4-21-1. Click the icon to start video 

the icon again to end the function and pop up the dialog shown as 

you may save the clipped video file. 

When it is under single channel playback, the        icon will appear in the 

Play Control bar. Click the icon to zoom in certain area of the playback screen and 
right click mouse to return the Playback page.   


”→“Record  Search”→“Event  Search”to  enter  into  the  interface 

In  this  page,  user  may  search  details  by  date,  time,  channel  and  record  type.  The 

relevant operations are as follows: 

Picture 4-22 

Next page; Click the button to go to next page when viewing events (except 

the last page). When viewing the last page, click this button to display the event list in the 

Jump;  Input  the  desired  record  event  page  in  the  input  box  and  click 

ow button to jump to the input page.   

Quick Backup and Backup 

If you want to back up a record in the detailed file list, you may tick the checkbox at the left 
of  the  record  (“√”means  it  has  been  selected)  and  click  “Backup”  to  enter  int
backup  type”  (Make  sure  U  disk  or  other  portable  storage  device  are  connected),  as 

Previous  page;  Click  the  button  to  go  to  previous  page  when  viewing  events 

(except the first page). When viewing the first page, click this button to display the event 

USER  MANUAL 

] option, that means the processing control bar cover 

hour before and after the middle point.   

4-21-2 
            ]  icon  will 

. Click the icon to start video 

again to end the function and pop up the dialog shown as 

icon will appear in the 

Play Control bar. Click the icon to zoom in certain area of the playback screen and 

to  enter  into  the  interface 

In  this  page,  user  may  search  details  by  date,  time,  channel  and  record  type.  The 

Next page; Click the button to go to next page when viewing events (except 

the last page). When viewing the last page, click this button to display the event list in the 

Jump;  Input  the  desired  record  event  page  in  the  input  box  and  click 

the checkbox at the left 

of  the  record  (“√”means  it  has  been  selected)  and  click  “Backup”  to  enter  into  “Select 
backup  type”  (Make  sure  U  disk  or  other  portable  storage  device  are  connected),  as 

Previous  page;  Click  the  button  to  go  to  previous  page  when  viewing  events 

(except the first page). When viewing the first page, click this button to display the event 

Содержание QV-3012

Страница 1: ...USER MANUAL 1 USER MANUAL...

Страница 2: ...RTUP WIZARD 3 CHAPTER 4 NVR MENU 5 POPUP MENU 5 4 1 MAIN MENU GUIDE 6 4 2MAIN MENU 7 4 2 1 Parameter 7 4 2 1 2 Record 9 4 2 1 3 Network 11 4 2 3 Device 18 4 2 4 PTZ If available for NVR 18 4 2 4 4 Log...

Страница 3: ...USER MANUAL 3 5 3 2 Playback 27 5 3 3Parameter Setting 29 5 3 4 Local Setting 37 5 3 5 Logout 37 CHAPTER 6 APPENDIX 38 6 1TROUBLESHOOTING 38 6 2 USAGE MAINTENANCE 39 6 3SYSTEM CONNECTION DIAGRAM 40...

Страница 4: ...dealer or service center 7 Do not try to remove the upper cover Warning Do not remove the cap of NVR so as to avoid electric shock 8 Handle with care If NVR does not work normally because of hitting...

Страница 5: ...ive or Playback mode switch to Quad display Press the button to start manual record Enter into Main menu exit or stop playing Move down Enter into shortcut menu and select ENTER and EDIT Move up PTZ E...

Страница 6: ...AN network interface support POE can supply power to the camera Table 1 2 1 3 Remote Controller For reference only Table 2 3 Key functions of the remote controller Item Key title Key function 1 1 8 Ch...

Страница 7: ...rk cable and connect VGA port and HDMI port for output Refer to section 2 2 Rear Panel Refer to Chapter 7 System Connection Diagram 2 3Power Supply Connection Please use attached power adapter to conn...

Страница 8: ...network setup In network setup page user may set the network of NVR Picture3 2 Picture3 3 2 IPC Setup Picture3 4 In this page user may add and delete IPC Record Schedule Picture3 4 In this page user...

Страница 9: ...Menu Popup Menu Picture4 1 After finishing system initialization click right key of mouse on preview interface or slide the mouse to the bottom of screen to enter into Pop up Menu Now you could perfo...

Страница 10: ...Output Mainstream Schedule DDNS HDD PTZ Shutdown Main Menu Privacy Zone IP Camera Parameter Network Record Alarm Record Search Event Search Device General Users Info Log Substream Record Email Networ...

Страница 11: ...e settings for Parameter Record Search Device System Advanced and Shutdown Channel IPC camera channel Edit Modify the name and location of channels change other IPC or protocols etc as shown in Pictur...

Страница 12: ...User may set it as required VGA HDMI Resolution VGA output or HDMI output Including 1024 768 1280 1024 1440 900 1280 720 1920 1080 Transparency Set the transparency of the menu in the range of 0 128 C...

Страница 13: ...h setting right click the mouse to return to the Privacy Zone page 4 Click Save to save the setting Picture4 8 Picture4 9 4 2 1 2 Record 4 2 1 2 1 Record Go to Main Menu Record Record to enter into th...

Страница 14: ...current channel can be copied to any other channel or all channels Note 1 In the Record menu and Record Search menu No Color stands for no record 2 Green stands for normal record and yellow stands for...

Страница 15: ...address of NVR the extranet port shall be mapped on the router before visiting NVR through public network Note Save after setting to make effective If there are multiple NVR in a LAN make sure their M...

Страница 16: ...be displayed on the screen when moving object is detected and alarms are made Send Email When moving object is detected send Email to the specified Email Full Screen When moving object is detected mes...

Страница 17: ...llow you copy current channel parameters to any other channel setting of record channel can not be copied Alarm Type Functions Descriptions Video Loss When NVR fails to receive video signals due to so...

Страница 18: ...he default setting is from 0 00 to 24 00 Playback Channel Click a date and select corresponding channel in Playback Channel The selected channels shall not be more than 16 as shown in Picture 4 19 Pla...

Страница 19: ...en it is under single channel playback the icon will appear in the Play Control bar Click the icon to zoom in certain area of the playback screen and right click mouse to return the Playback page Reco...

Страница 20: ...If you want to back up with DVD select DVD and click OK to start processing and you may see the backup progress shown as Picture 4 24 After backup finishes message Backup Finishes will appear at down...

Страница 21: ...d pictures and set the display language of player as shown in picture USER MANUAL 17 Pause Click to pause Stop Click to stop playback Next Click to play next file Previous Click to play previous file...

Страница 22: ...ecording according to currently set Resolution Encoding Rate and Frame Rate of image Auto overwrite When set to ENABLE the NVR will overwrite the oldest files on the hard drive if hard drive space is...

Страница 23: ...ace shown as Picture 4 32 to set DST Time Offset Start Time and End Time NTP service Enable Disable NTP function Server Address Select NTP server time windows com time nist gov pool ntp org Time Zone...

Страница 24: ...ou set all the parameters Maintain allow you update version recover ex factory value device reboot and shut down Disk Management allow you manage and control the HDD and USB drive Remote Login allow y...

Страница 25: ...nto the interface shown as Picture 4 40 Auto Reboot Enable the auto maintenance function to reboot system regularly at every day week month When Auto Reboot is enabled NVR should be in the main interf...

Страница 26: ...t is recommended to load ex factory default after upgrading The auto maintain function can be effective only when NVR returns back to Preview mode with no any operation within the set auto maintain ti...

Страница 27: ...s have limitations for authorization and have to get authorization from administrator 4 4Split Mode There are many display modes in video channel including single channel display SEQ display and split...

Страница 28: ...C to help protect your computer and confirm OK Vista WIN7 Picture 5 1 Note If the ActiveX control is not downloaded successfully please check if your browser s safety level or firewall setting is set...

Страница 29: ...erface shown as picture 5 2 There is an option for opening all channel preview select it to open all live pictures Press Login to log in client and remotely visit NVR The default password is admin and...

Страница 30: ...after the function is enabled Snapshot Capture the selected live image and save it to a specified position on PC The image is saved as bmp format Open or close the images on Live window Or click the r...

Страница 31: ...ideo to enter into Playback interface to remotely view the records in NVR HDD as shown in Picture 5 6 Picture5 6 It supports 4 channels playback Record playback procedure Firstly select the date you w...

Страница 32: ...ayed on the time axis screen Click the icon or to zoom in out the time bar display ratio as shown in Picture 5 8 5 3 2 2Playback Control Playback control bar as shown in picture 5 9 Picture 5 9 Detail...

Страница 33: ...ture 5 11 Tick select the record file you want to download and click Start download System will download the record file in sequence and save to local PC The downloading file will be displayed in perc...

Страница 34: ...e Each channel can set 4 privacy zones as shown in Picture 5 14 The relevant parameters should be consistent with NVR local setting Select zones to be deleted and click Delete and click Save at up rig...

Страница 35: ...3 Stream setting User may set Mainstream and Substream as shown in Picture 5 17 1 and 5 17 2 The relevant parameters should be consistent with NVR local setting Picture 5 17 1 Picture 5 17 2 6 3 3 3 N...

Страница 36: ...user applies for DDNS service you could enable DDNS function under any one network type mode Static DHCP and PPPoE And you may remotely visit the NVR through domain name http domain name Web port No W...

Страница 37: ...Picture 5 21 Picture 5 21 2 I O alarm setting If available Set parameters for I O Alarm Alarm Out Alarm Record Send Email etc Detailed setting should be consistent with NVR local setting Shown as Pic...

Страница 38: ...ub options General Users and information 1 General User may check NVR language and video system and set system time date time format menu display time DST and NTP parameters shown as Picture 5 25 Deta...

Страница 39: ...shown as Picture 5 27 Picture 5 27 5 3 3 7 Advanced Click Advance to unfold its sub options FirmwareUpdate Load default Events and Maintain 1 Firmware Update User may remotely update NVR system as sho...

Страница 40: ...5 30 2 Load Default User may remotely restore default parameters of NVR with same setting method as that of NVR shown as Picture 5 31 Picture 5 31 3 Events User may configure Event Type Buzzer Send E...

Страница 41: ...l setting Picture 5 33 5 3 4 Local Setting User may set Record Path save Live record and Playback clip file Download Path for remote file SnapshotPath for captured pictures Interval for switching reco...

Страница 42: ...rk while the monitor screen is OK and panel keys are functional Why A Operate again by aiming the remote controller at the IR receiver on front panel If it still doesn t work please check if the batte...

Страница 43: ...stopping recording is to set channel in record setting as Off 6 2 Usage Maintenance 1 To shut down NVR please firstly shut down the system and then turn off the power Do not turn off the power direct...

Страница 44: ...System Connection Diagram NVR 7 2 Accessories USB Mouse Remote Controller USER MANUAL 40 System Connection Diagram USB Mouse CD Power Adapter Good in kind prevail USER MANUAL CD Warranty Card User Man...

Страница 45: ...t no guarantee is given as to the correctness of its contents We do not undertake any responsibility for the harms cause by using our product The model of the products in the user s manual only for re...

Отзывы: