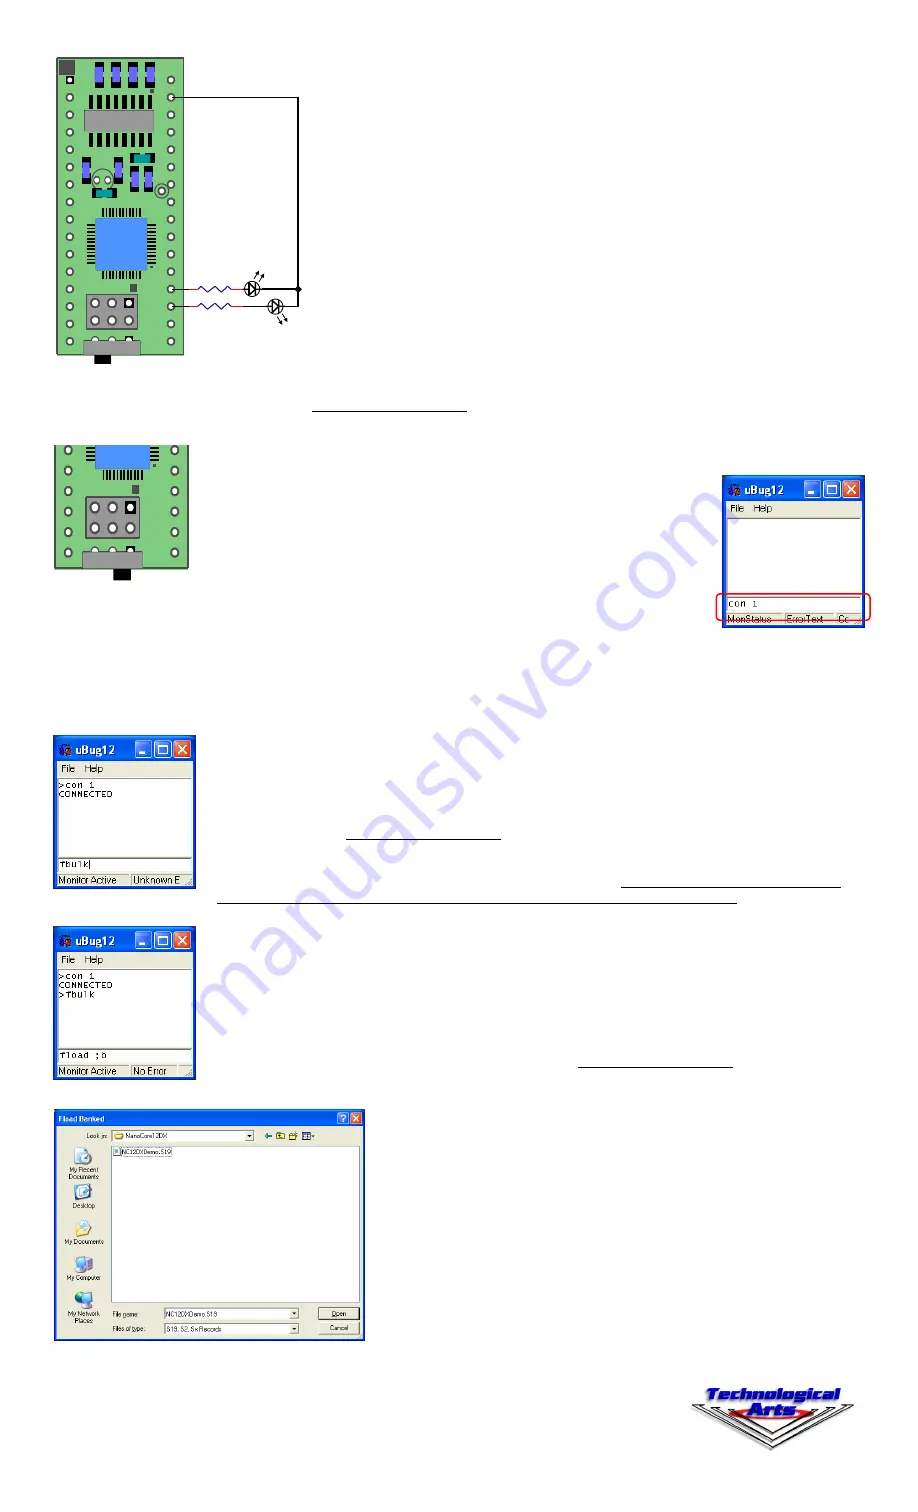
•Type the letter
F
to cause the LED connected to PT0 (pin 19) to flash twice.
Typing
E
,
H
,
M
, or
T
will cause a hexadecimal number to be displayed, whose bit
values represent the logic levels of the respective port pins. Those pins which
are not connected to external circuitry (i.e. floating pins) will assume a logic 1
level, due to internal pullup resistors. You can connect any one or more of these
pins to logic low (GROUND) and type the corresponding command to see how
the displayed value changes.
1.4 Loading a New Program Into Memory:
Whenever power is applied to the board, or whenever the Reset signal is
brought to logic low and released, the microcontroller resets. The startup code
in the Serial Monitor first examines the position of the LOAD/RUN switch to de-
termine whether to run the monitor or to jump to the user program. If the
switch is in the LOAD position, the Serial Monitor becomes active, waiting to
receive commands via the com port. To use the Serial Monitor to send com-
mands, you'll first need to install and launch uBug12.
1.41 Using uBug12.
Download uBug12 from
http://support.technologicalarts.ca/docs/uBug12/uBug12.zip
, unZIP it, and in-
stall it. You can also download it from the link on the Resources page of
www.NanoCore12.com.
1.42 Establishing a Serial Port Connection.
Once you have launched uBug12, place the
NanoCore12 switch in the
LOAD
position (see Figure 9) and reset your NanoCore12 (by bring-
ing the
Reset
pin momentarily to logic low, as described earlier). Then
click inside the command window of uBug12 (see Figure 10) and type the
command
con 1
in order to establish communication between uBug12
and the NanoCore12 module. If you're using a com port other than 1,
substitute the correct number (eg. type
con 3
if you are using com port
3). A
CONNECTED
message will appear in the uBug12 display window
showing that the connection was successful.
1.43 Loading a Program.
Loading a new program into Flash memory is a
two-step process-- first you must erase any existing program from
memory and then you load in your new program. Here's how to do it (reference Figures 11
through 13):
Type
fbulk
followed by <Enter>.
After erasing has finished, type
fload ;b
followed by <Enter>.
When the Windows file browser pops up, navigate to the file you want to load and click
OK
. After loading has finished,
move switch SW2 to the
RUN
position and reset NanoCore12. If the program you just loaded uses the serial port
(like the Demo Program, for example), you can just type the command
term
in uBug12 to
launch a TeraTerm window (assuming you have previously installed it). To use a different
terminal program, close uBug12 and open the terminal program of your choice.
For a list of all uBug12 commands, type
help
at the uBug12 command prompt. For more de-
tails on uBug12 and its commands, refer to the
NanoCore12 Manual
, found on the Docu-
mentation page of www.NanoCore12.com.
1.44 Using the Sample Programs.
Several simple programs have been created to get you
started. They can be found on the Documentation page of www.NanoCore12.com, or here:
http://support.technologicalarts.ca/docs/NanoCore12/Code/SBASIC/Simple/. Follow the steps
outlined in paragraph 1.43, above, to load and run them one by one. Here are the names of
the simple programs and a brief description of what they do:
simple1
: turn on an LED connected to PT0
simple2
: flash an LED connected to PT0
simple3
: alternately flash LEDs connected to PT0 and PT1
simple4
: send the message
Hello World!
out the serial port
simple5
: combines the above into a single menu-driven program
1.45 Going Further.
For troubleshooting help, or to start writing your own programs for
NanoCore12DXC32, visit the Documentation page of www.NanoCore12.com. Not only does it
cover all hardware details of the NanoCore12 family and accessories, but it contains thorough
tutorials and numerous examples for using Assembler, BASIC, and C.
31
20
19
Figure 8 - LEDs on PT0 and PT1
1K
1K
S
W
1
E
C
L
K
L
O
A
D
R
U
N
U
1
C
1
1
Y
1
R
3
R
1
C
7
C
5
C
1
0
C
1
5
C
1
3
C
1
4
C
1
6
BDM IN
R
E
V
1
b
J
1
U
4
Figure 10 -
Command Window
S
W
1
E
C
L
K
L
O
A
D
R
U
N
U
1
C
1
1
Y
1
R
3
R
1
C
7
C
5
C
1
0
C
1
5
C
1
3
C
1
4
C
1
6
BDM IN
R
E
V
1
b
J
1
U
4
Figure 9 -
Switch to Load Mode
Visit the Documentation page on
www.NanoCore12.com
for updates to this document
and related material
Figure 11
Figure 12
Figure 13
GROUND
©2010 Technological Arts, Inc.
For a free object-based programming
Language custom-made for NanoCore12,
Visit www.nqBASIC.com
Rev. 2


