TOP 600 XTPRO: Service & Maintenance Manual - rev. 2.0
7.9. DISASSEMBLING THE ALTERNATOR
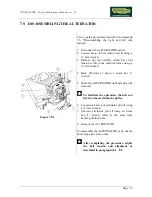
Figure 7.9-1
Carry out the procedures described in paragraph
7.6. “Disassembling the right and left side
casings”.
1. Disconnect the ALTERNATOR cables.
2. Loosen nut
a
of belt tension rod
b
using a
17-mm wrench.
3. Remove nut (not visible) which fixes belt
tension rod
b
to the machine frame using a
19-mm wrench.
4. Back off dowel
c
using a 4-mm hex T-
wrench.
5. Move the ALTERNATOR until belt
d
can be
removed.
To facilitate the operation, the belt can
first be removed from the pulley.
6. Loosen lock nut
e
of alternator pivot
f
using
a 19-mm wrench.
7. Unscrew alternator pivot
f
using an 8-mm
hex T wrench, while at the same time
backing off lock nut
e
.
8. Remove the ALTERNATOR.
To reassemble the ALTERNATOR, carry out the
above steps in reverse order.
After completing the procedure, adjust
the belt tension and alignment as
described in paragraphs 8.1. 8.2.
Page 7.9
Содержание Top 600 XTPRO
Страница 1: ...SERVICE MAINTENANCE MANUAL REV 2 0...
Страница 2: ......
Страница 4: ......
Страница 8: ...TOP 600 XTPRO Service Maintenance Manual rev 2 0 Page iv Page intentionally left blank...
Страница 12: ...TOP 600 XTPRO Service Maintenance Manual rev 2 0 Page 2 2 2 5 WIRING DIAGRAM WITH NON CODED RECEIVER...
Страница 18: ...TOP 600 XTPRO Service Maintenance Manual rev 2 0 Page 2 8 Page intentionally left blank...
Страница 26: ...TOP 600 XTPRO Service Maintenance Manual rev 2 0 Page 4 2 Page intentionally left blank...
Страница 58: ...TOP 600 XTPRO Service Maintenance Manual rev 2 0 Page 7 18 Page intentionally left blank...
Страница 70: ...TOP 600 XTPRO Service Maintenance Manual rev 2 0 Page 9 6 Page intentionally left blank...
Страница 82: ......
Страница 83: ...TOP 600 XTPRO Service Maintenance Manual rev 2 0 Page intentionally left blank Page 11 1...
Страница 84: ......
Страница 93: ......

