


Settings
18
AV equipment such as camcorders, video
recorders, DVD players, decoders, or satellite
receivers, can be connected to the TV set
using either the SCART sockets provided at
the back of the set, or via the sockets (cinch,
Hosiden) provided under the front flap of the
set. Wherever possible, AV cables with indivi-
dually insulated wires should be used.
In order to reproduce the TV sound channels,
a hi-fi set may be connected to the cinch
sockets provided on the back panel.
Options for connenction:
SCART1:
decoder, video recorder (VHS; Video
8). DVD player, satellite receiver
SCART2
:
video recorder (VHS; Video (; SVHS;
Hi8), DVD player, satellite receiver
Cinch Front:
camcorder (VHS; Video 8)
Hosiden Front
:
camcorder (SVHS; Hi8)
Cinch-Audio out
:
hi-fi set
When the front sockets/connections are in
use, the audio signals are directed towards
the front panel cinch sockets (red - right,
white - left)
Activating AV-inputs:
➜
Press the
EXT
key to switch through the various
AV inputs in the following order:
EC1
➩
EC2
➩
FRONT
➩
EC2 SVHS
In case of equipment fitted with a VGA interface,
VGA
will appear as a fifth switching option.
Hint:
AV equipment operating on switching current
will automatically activate the appropriate
SCART input.
➜
Use a SCART cable to connect the SCART output
of the video recorder to the SCART1 socket of the
TV set.
Recording and playback (direct or via the
timer of the TV set) can be controlled via the
TV set.
The copying is achieved via the two SCART
sockets of the TV set.
➜
Use a SCART cable to connect the SCART socket
of video recorder 1 with the SCART1 socket of the
TV set.
➜
Use a SCART cable to connect the SCART socket
of video recorder 2 with the SCART2 socket of the
TV set.
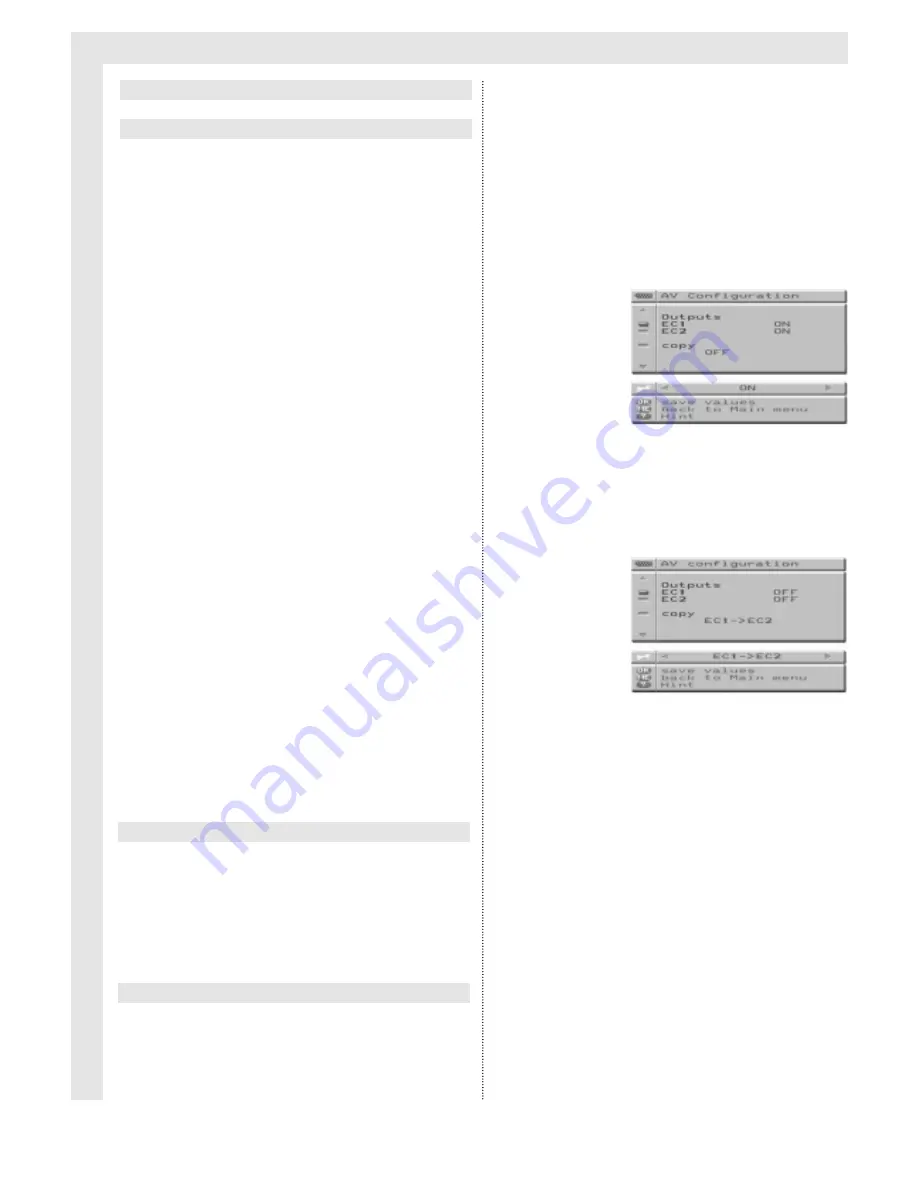
➜
Press the
MENU
key to display the
Main Menu.
➜
Use the
Programme
keys to mark the menu item
AV Configuration
, then press the
OK
key to sel-
ect.
The menu
AV Configuration
will be displayed.
➜
Use the
Programme
keys to mark
Copy.
➜
Use the
Volume
keys to set the direction of copy-
ing.
Once the copy direction has been set (e.g.
EC1
➜
EC2), the outputs of the appropriate
SCART sockets will switch to OFF.
If EC1 or EC2 are set to OFF, this means that
no TV output signals will be directed to the
SCART socket.
➜
Use the
RADIO/TV
key to exit from this menu.
This configuration allows you to make video
tape copies while at the same time viewing
television.
Use the
EXT
key to view either of the AV out-
puts at any stage in order to monitor the
copying process.
SVHS copies cannot be made using the copy
function.
Each time the TV set is switched off via the
Power switch, the
Copy
function is automati-
cally reset to
OFF,
thus permitting recording
of TV programmes again.
Copying between two video recorders
Connecting a video recorder (VHS /Video 8)
AV Configuration
Connecting AV equipment
Содержание 100Hz Television sets Colani-TV Classic Line
Страница 1: ...Instruction Manual for 100Hz Television sets Colani TV Classic Line Made in Germany...
Страница 32: ......


