Technics SX-PR54 Скачать руководство пользователя страница 25

25

QQTG0701

B

a

si

c fun

c

ti

on

s

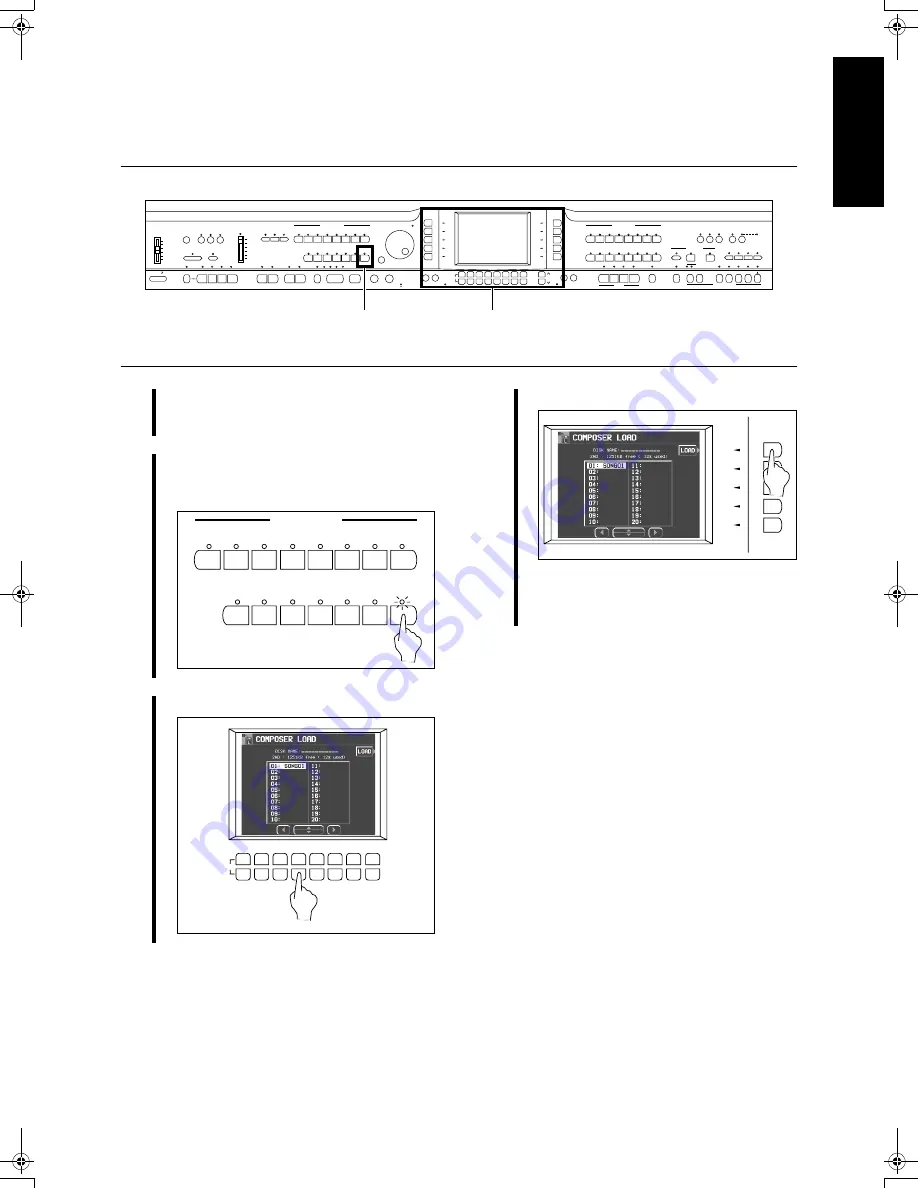
Load rhythm data from a Technics 
pattern disk 

(COMPOSER LOAD)

MAIN

VOLUME

MAX

MIN

MAX

OFF

AUTO PLAY CHORD

RHYTHM GROUP

TEMPO / PROGRAM

PROGRESSIVE

PIANIST

PIANO STYLIST

SPLIT
POINT

METRONOME POP

ROCK

FUNK &

SOUL

DISCO POP BALLAD BALLAD

BALLROOM

& SHOW

MEMORY

CONTRAST

LATIN &
WORLD

JAZZ &
SWING

WALTZ
& TRAD

USA

16 BEAT

8 BEAT

IN

OUT

SOUND

ARRANGER

SET

MODE

CHORD FINDER

OFF/ON

ONE TOUCH

PLAY

APC/SEQUENCER

VOLUME

DEMO

MUSIC STYLE ARRANGER

VARIATION

1

2

1

2

1

1

2

3

4 BEAT

LOAD

SEQUENCER

RESET

COUNT
INTRO

2

3

4

FADE

FILL IN

INTRO & ENDING

SYNCHRO & BREAK

START / STOP

TAP TEMPO

HELP OTHER PARTS/TR

- TRANSPOSE 

+

MUTE

PAGE

DISPLAY HOLD EXIT

GRAND

UPRIGHT ELECTRIC MODERN

SIMPLE PIANO

TECHNI-CHORD

BANK

A

B

C

P.MEM 5-8

SET

1 / 5

2 / 6

3 / 7

4 / 8

SOUND GROUP

SEQUENCER

PIANO

STRINGS

BASS

MALLET &

ORCH PERC WORLD

PIANO

MIXTURES

ORCH

MIXTURES

DIGITAL

DRAWBARS DRUM KITS MEMORY

LEFT

RIGHT 2

RIGHT 1

DIGITAL
EFFECT

MULTI

EFFECT CHORUS REVERB

CHORD STEP REC

VOCAL

GUITAR &

HARPSI

BRASS

PLAY

EASY

REC

FAVORITES

PROGRAM

MENUS

DISK

IN USE

DISK

LOAD

SAX &

WOODWIND

ORGAN &

ACCORDION SYNTH

SOUND

EXPLORER

CONDUCTOR

PANEL MEMORY

3·4

2

1

Insert a commercially sold Technics 
pattern disk into the Disk Drive slot.

2

In the 

RHYTHM GROUP

 section, press 

and hold the 

LOAD

 (

MEMORY

) button 

for a few seconds.

3

Select the name of the pattern to load.

RHYTHM GROUP

METRONOME POP

ROCK

FUNK &

SOUL

DISCO POP BALLAD BALLAD

BALLROOM

& SHOW

MEMORY

LATIN &
WORLD

JAZZ &
SWING

WALTZ

& TRAD

USA

16 BEAT

8 BEAT

LOAD

MUTE

4

Press the LOAD button.

• Rhythm data is loaded to the 

COMPOSER


memory (

MEMORY

). You can use the rhythms 

during your performance, just like the preset 
rhythms.

04_Basic functions.fm  25 ページ  2003年5月19日 月曜日 午後1時32分

Содержание SX-PR54

Страница 1: ... M DIGITAL ENSEMBLE Before connecting operating or adjusting this product please read these instructions completely Please keep this manual for future reference Operating Instructions This manual was printed with soy based ink ...

Страница 2: ...SYMBOL OR COLOURED GREEN OR GREEN YELLOW THIS PLUG IS NOT WATERPROOF KEEP DRY Before use Remove the connector cover How to replace the fuse The location of the fuse differ according to the type of AC mains plug figures A and B Confirm the AC mains plug fitted and follow the instructions below Illustrations may differ from actual AC mains plug 1 Open the fuse cover with a screwdriver 2 Replace the ...

Страница 3: ... and can radiate radio frequency energy and if not installed and used in accordance with the instructions may cause harmful interference to radio communica tions However there is no guarantee that interfer ence will not occur in a particular installation If this equipment does cause harmful interference to radio or television reception which can be determined by turning the equipment off and on th...

Страница 4: ...4 QQTG0701 ...

Страница 5: ...5 QQTG0701 ...

Страница 6: ... s ventilation 2 Foreign material Ensure objects and liquids do not get into the unit Avoid exposing the unit to excessive smoke dust mechanical vibration and shock 3 Magnetism Situate the unit away from equipment and devices that generate strong magnetic fields 4 Stacking Do not place heavy objects on top of this unit 5 Surface Place the unit on a flat level surface 6 Carts and stands Use the uni...

Страница 7: ...t in additional damage or some other unex pected damage or accident Because the power source is located inside the unit it is normal for the cabinet to become warm A word about the power cord If the power cord is scarred is partially cut or bronken or has a bad contact it may cause a fire or serious electrical shock if used NEVER use a dam aged power cord for any appliance Moreover the power cord ...

Страница 8: ... keyboard 34 Pedals 35 Touch Sensitivity 36 Effects 37 Transpose 39 Techni chord 40 Part II Playing the rhythm 41 Overview of rhythm performance 41 Selecting rhythms 41 Playing the rhythm 43 Auto Play Chord 44 Fade In Fade Out 48 Sound Arranger 49 One Touch Play 49 Piano Stylist 50 Music Style Arranger 51 Panel Memory 52 Part III Sequencer 54 Outline of the Sequencer 54 Sequencer parts 57 Easy Rec...

Страница 9: ...ilter Edit 114 Amplitude Edit 116 LFO Edit 117 Effect Edit 118 Controller Edit 118 Store the new sound 119 Part IX Control 120 Outline of Control functions 120 Pedal Setting 120 Part X Customize 122 Outline of Customize functions 122 Display Time Out 123 Data Protection 124 MIDI Setting Load Option 124 Part XI MIDI 125 What is MIDI 125 Outline of MIDI functions 126 Part Setting 127 Control Message...

Страница 10: ...AUTO PLAY CHORD Add an automatic accompaniment to your selected rhythm Refer to page 44 PIANO STYLIST You can choose to have all the settings of this instrument automatically set Refer to page 50 RHYTHM GROUP Various rhythm patterns are available for each rhythm group Refer to page 41 PROGRESSIVE PIANIST Your piano offers a fun method of learning to play piano Refer to page 14 FADE IN OUT Begin yo...

Страница 11: ... GROUP Various sounds are available for each sound group Refer to page 31 SEQUENCER Record and play back your performance Refer to page 54 CONDUCTOR Assign a different sound to each part then assign the desired parts to sections of the keyboard Refer to page 34 TECHNI CHORD Block chords are automatically added to the melody Refer to page 40 PANEL MEMORY Store the panel settings then recall them in...

Страница 12: ... 6 3 7 4 8 SOUND GROUP SEQUENCER PIANO STRINGS BASS MALLET ORCH PERC WORLD PIANO MIXTURES ORCH MIXTURES DIGITAL DRAWBARS DRUMKITS MEMORY LEFT RIGHT 2 RIGHT 1 DIGITAL EFFECT MULTI EFFECT CHORUS REVERB CHORD STEP REC VOCAL GUITAR HARPSI BRASS PLAY EASY REC FAVORITES PROGRAM MENUS DISK IN USE DISK LOAD SAX WOODWIND ORGAN ACCORDION SYNTH SOUND EXPLORER CONDUCTOR PANEL MEMORY 4 1 Plug the power cord in...

Страница 13: ...SA 16 BEAT 8 BEAT IN OUT SOUND ARRANGER SET MODE CHORD FINDER OFF ON ONE TOUCH PLAY APC SEQUENCER VOLUME DEMO MUSIC STYLE ARRANGER VARIATION 1 2 1 2 1 1 2 3 4 BEAT LOAD SEQUENCER RESET COUNT INTRO 2 3 4 FADE FILL IN INTRO ENDING SYNCHRO BREAK START STOP TAP TEMPO HELP OTHER PARTS TR TRANSPOSE MUTE PAGE DISPLAY HOLD EXIT GRAND UPRIGHT ELECTRIC MODERN SIMPLE PIANO TECHNI CHORD BANK A B C P MEM 5 8 S...

Страница 14: ...STEN button 5 Press the START STOP button on the control panel and listen to the model interpretation while watching the music on the display Press the START STOP button to stop the model performance Press it again to continue the interpretation from the point at which it was interrupted PROGRESSIVE PIANIST 6 When you have finished listening press the appropriate button to access the next step In ...

Страница 15: ...T LOAD SEQUENCER RESET COUNT INTRO 2 3 4 FADE FILL IN INTRO ENDING SYNCHRO BREAK START STOP TAP TEMPO HELP OTHER PARTS TR TRANSPOSE MUTE PAGE DISPLAY HOLD EXIT GRAND UPRIGHT ELECTRIC MODERN SIMPLE PIANO TECHNI CHORD BANK A B C P MEM 5 8 SET 1 5 2 6 3 7 4 8 SOUND GROUP SEQUENCER PIANO STRINGS BASS MALLET ORCH PERC WORLD PIANO MIXTURES ORCH MIXTURES DIGITAL DRAWBARS DRUMKITS MEMORY LEFT RIGHT 2 RIGH...

Страница 16: ...PIANO MIXTURES ORCH MIXTURES DIGITAL DRAWBARS DRUMKITS MEMORY LEFT RIGHT 2 RIGHT 1 DIGITAL EFFECT MULTI EFFECT CHORUS REVERB CHORD STEP REC VOCAL GUITAR HARPSI BRASS PLAY EASY REC FAVORITES PROGRAM MENUS DISK IN USE DISK LOAD SAX WOODWIND ORGAN ACCORDION SYNTH SOUND EXPLORER CONDUCTOR PANEL MEMORY 3 2 1 A 1 In the CONDUCTOR section on the panel press the RIGHT 1 button to turn it on 2 In the SOUND...

Страница 17: ...K LOAD SAX WOODWIND ORGAN ACCORDION SYNTH SOUND EXPLORER CONDUCTOR PANEL MEMORY 2 6 1 7 1 Press the PIANO STYLIST button to turn it on 2 Press the PIANO STYLES button 3 Use the ARRANGE MODE button to select the desired type of arrangement Select the type you wish to play PIANO SOLO PIANO COMBO PIANO ENSEMBLE 4 Use the SELECT MODE button to specify how you wish to select a style GENRE Select a styl...

Страница 18: ...CAL GUITAR HARPSI BRASS PLAY EASY REC FAVORITES PROGRAM MENUS DISK IN USE DISK LOAD SAX WOODWIND ORGAN ACCORDION SYNTH SOUND EXPLORER CONDUCTOR PANEL MEMORY 2 1 5 3 1 In the RHYTHM GROUP section press the button for a desired rhythm Do not select the METRONOME or the MEMORY button 2 Select a rhythm from the list of rhythms on the display 3 Press and hold the ONE TOUCH PLAY button for a few seconds...

Страница 19: ...s for the root notes ONE FINGER chords But you can also specify the chord by playing all the notes in the chord Refer to page 45 You can insert a fill in pattern while the preset rhythm pattern is playing by pressing either the FILL IN 1 or FILL IN 2 button C F G7 C C F G7 C C G7 F ...

Страница 20: ...AK START STOP TAP TEMPO HELP OTHER PARTS TR TRANSPOSE MUTE PAGE DISPLAY HOLD EXIT GRAND UPRIGHT ELECTRIC MODERN SIMPLE PIANO TECHNI CHORD BANK A B C P MEM 5 8 SET 1 5 2 6 3 7 4 8 SOUND GROUP SEQUENCER PIANO STRINGS BASS MALLET ORCH PERC WORLD PIANO MIXTURES ORCH MIXTURES DIGITAL DRAWBARS DRUMKITS MEMORY LEFT RIGHT 2 RIGHT 1 DIGITAL EFFECT MULTI EFFECT CHORUS REVERB CHORD STEP REC VOCAL GUITAR HARP...

Страница 21: ...P MEM 5 8 SET 1 5 2 6 3 7 4 8 SOUND GROUP SEQUENCER PIANO STRINGS BASS MALLET ORCH PERC WORLD PIANO MIXTURES ORCH MIXTURES DIGITAL DRAWBARS DRUMKITS MEMORY LEFT RIGHT 2 RIGHT 1 DIGITAL EFFECT MULTI EFFECT CHORUS REVERB CHORD STEP REC VOCAL GUITAR HARPSI BRASS PLAY EASY REC FAVORITES PROGRAM MENUS DISK IN USE DISK LOAD SAX WOODWIND ORGAN ACCORDION SYNTH SOUND EXPLORER CONDUCTOR PANEL MEMORY 4 B A 3...

Страница 22: ...O STRINGS BASS MALLET ORCH PERC WORLD PIANO MIXTURES ORCH MIXTURES DIGITAL DRAWBARS DRUMKITS MEMORY LEFT RIGHT 2 RIGHT 1 DIGITAL EFFECT MULTI EFFECT CHORUS REVERB CHORD STEP REC VOCAL GUITAR HARPSI BRASS PLAY EASY REC FAVORITES PROGRAM MENUS DISK IN USE DISK LOAD SAX WOODWIND ORGAN ACCORDION SYNTH SOUND EXPLORER CONDUCTOR PANEL MEMORY 2 3 1 Set up the desired panel settings sounds volumes etc 2 Us...

Страница 23: ...PIANO STRINGS BASS MALLET ORCH PERC WORLD PIANO MIXTURES ORCH MIXTURES DIGITAL DRAWBARS DRUMKITS MEMORY LEFT RIGHT 2 RIGHT 1 DIGITAL EFFECT MULTI EFFECT CHORUS REVERB CHORD STEP REC VOCAL GUITAR HARPSI BRASS PLAY EASY REC FAVORITES PROGRAM MENUS DISK IN USE DISK LOAD SAX WOODWIND ORGAN ACCORDION SYNTH SOUND EXPLORER CONDUCTOR PANEL MEMORY 2 5 1 Insert a disk you wish to save to into the Disk Drive...

Страница 24: ...QUENCER PIANO STRINGS BASS MALLET ORCH PERC WORLD PIANO MIXTURES ORCH MIXTURES DIGITAL DRAWBARS DRUMKITS MEMORY LEFT RIGHT 2 RIGHT 1 DIGITAL EFFECT MULTI EFFECT CHORUS REVERB CHORD STEP REC VOCAL GUITAR HARPSI BRASS PLAY EASY REC FAVORITES PROGRAM MENUS DISK IN USE DISK LOAD SAX WOODWIND ORGAN ACCORDION SYNTH SOUND EXPLORER CONDUCTOR PANEL MEMORY 2 3 5 4 1 1 Press and hold the DISK button for a fe...

Страница 25: ... B C P MEM 5 8 SET 1 5 2 6 3 7 4 8 SOUND GROUP SEQUENCER PIANO STRINGS BASS MALLET ORCH PERC WORLD PIANO MIXTURES ORCH MIXTURES DIGITAL DRAWBARS DRUMKITS MEMORY LEFT RIGHT 2 RIGHT 1 DIGITAL EFFECT MULTI EFFECT CHORUS REVERB CHORD STEP REC VOCAL GUITAR HARPSI BRASS PLAY EASY REC FAVORITES PROGRAM MENUS DISK IN USE DISK LOAD SAX WOODWIND ORGAN ACCORDION SYNTH SOUND EXPLORER CONDUCTOR PANEL MEMORY 3 ...

Страница 26: ...RO ENDING SYNCHRO BREAK START STOP TAP TEMPO HELP OTHER PARTS TR TRANSPOSE MUTE PAGE DISPLAY HOLD EXIT GRAND UPRIGHT ELECTRIC MODERN SIMPLE PIANO TECHNI CHORD BANK A B C P MEM 5 8 SET 1 5 2 6 3 7 4 8 SOUND GROUP SEQUENCER PIANO STRINGS BASS MALLET ORCH PERC WORLD PIANO MIXTURES ORCH MIXTURES DIGITAL DRAWBARS DRUMKITS MEMORY LEFT RIGHT 2 RIGHT 1 DIGITAL EFFECT MULTI EFFECT CHORUS REVERB CHORD STEP ...

Страница 27: ...O PLAY CHORD RT RIGHT METR METRONOME When setting the volume balance press the upper button to increase the volume and the lower button to decrease it Hold a button down to scroll the volume quickly Auto accompaniment part Pressing the OTHER PARTS TR button will dis play the auto accompaniment part setting screen DRM DRUMS ACP ACCOMP 䡲 䡲 䡲 䡲 MUTE To mute a part press both the corresponding upper a...

Страница 28: ...pressing the corresponding button to the left or right of the display indicated by the 䊴 and 䊳 arrows In this manual the steps describing how to select a func tion from a menu display are generally abbreviated as fol lows for example On the PROGRAM MENUS display select SOUND Setting display When you select an item from the menu display the setting display for the item is shown The buttons to the r...

Страница 29: ... When adjusting the CONTRAST the set value is shown shortly on the display HELP You can find an explanation of each button s function on the display 1 Press the HELP button The following display appears 2 Use the buttons below the display to select a language 3 Press the OK button 4 Press a button on the panel whose explana tion you wish to read An explanation of the button s function is shown on ...

Страница 30: ...press the OK button Your customized display is stored 䡲 䡲 䡲 䡲 Recall a FAVORITES display 1 Press the FAVORITES button to turn it on 2 Use the buttons to the left and right of the dis play to specify the ITEM you wish to recall The FAVORITES settings can be saved to a disk MAIN VOLUME MAX MIN MAX OFF AUTO PLAY CHORD RHYTHM GROUP TEMPO PROGRAM PROGRESSIVE PIANIST PIANO STYLIST SPLIT POINT METRONOME ...

Страница 31: ... disk with 16 part standard MIDI files SMF PART1 to 16 SMF song disk playback parts or parts for MIDI receive ACCOMP1 to 5 BASS DRUMS 1 2 Parts for the automatic accompaniment METRONOME METRONOME part MAIN VOLUME MAX MIN MAX OFF AUTO PLAY CHORD RHYTHM GROUP TEMPO PROGRAM PROGRESSIVE PIANIST PIANO STYLIST SPLIT POINT METRONOME POP ROCK FUNK SOUL DISCO POP BALLAD BALLAD BALLROOM SHOW MEMORY CONTRAST...

Страница 32: ...ons to select a GROUP of sound 4 Use the buttons on both side of the display to select the sound The numerical value that is displayed for each sound is the MIDI BANK MSB LSB PROGRAM CHANGE num ber GM2 sounds are selected on this display 䡲 䡲 䡲 䡲 ALPHABET Press the CTG button to show the sound names in alphabetical order Press the ALP button to return to the CATEGORY display Digital Drawbar You can...

Страница 33: ...t the time it takes for the drawbar sound to sound after a key is played RELEASE TIME Use the and buttons to adjust the time it takes for the drawbar sound to die out after the keys are released DECAY Use the and buttons to adjust the time it takes for the percussive tone to die out LEVEL Use the and buttons to adjust the vol ume of the percussive tone The above settings are effective for the RIGH...

Страница 34: ...RT STOP TAP TEMPO HELP OTHER PARTS TR TRANSPOSE MUTE PAGE DISPLAY HOLD EXIT GRAND UPRIGHT ELECTRIC MODERN SIMPLE PIANO TECHNI CHORD BANK A B C P MEM 5 8 SET 1 5 2 6 3 7 4 8 SOUND GROUP SEQUENCER PIANO STRINGS BASS MALLET ORCH PERC WORLD PIANO MIXTURES ORCH MIXTURES DIGITAL DRAWBARS DRUMKITS MEMORY LEFT RIGHT 2 RIGHT 1 DIGITAL EFFECT MULTI EFFECT CHORUS REVERB CHORD STEP REC VOCAL GUITAR HARPSI BRA...

Страница 35: ...few seconds the display exits the setting mode Whenever the keyboard is split you can select your cus tomized split point by pressing the SPLIT POINT button until none of the split point indicators is lit In this case the customized split point is indicated on the display Pedals 䡲 䡲 䡲 䡲 Sustain pedal When a key is released while this pedal is depressed the sound is sustained so that it lin gers an...

Страница 36: ...ressed very softly 4 When you have finished adjusting the settings press the PROGRAM MENUS button again MAIN VOLUME MAX MIN MAX OFF AUTO PLAY CHORD RHYTHM GROUP TEMPO PROGRAM PROGRESSIVE PIANIST PIANO STYLIST SPLIT POINT METRONOME POP ROCK FUNK SOUL DISCO POP BALLAD BALLAD BALLROOM SHOW MEMORY CONTRAST LATIN WORLD JAZZ SWING WALTZ TRAD USA 16 BEAT 8 BEAT IN OUT SOUND ARRANGER SET MODE CHORD FINDER...

Страница 37: ...the EFFECT EDIT button The display changes to the following 3 Use the PARAMETER and buttons to select the parameter 4 Use the VALUE and buttons to adjust the setting The parameters vary depending on the effect type selected as the base V is the abbreviation of VARIATION 5 Press the WRITE button 6 Press the EFFECT NAMING button and assign a name to the effect if necessary Refer to page 52 for detai...

Страница 38: ...all The procedure is the same as for MULTI EFFECT Refer to page 37 CHORUS Add breadth to the sound Press the CHORUS button to turn it on 䡲 䡲 䡲 䡲 Type and parameter settings 1 Press and hold the CHORUS button for a few seconds The display looks similar to the following 2 Use the and buttons to select the name of the effect group EFFECT MEMORY is an edited effect group 3 Use the buttons to the right...

Страница 39: ...all over again in a different key or to use the TRANSPOSE feature Adjust the key with the and buttons The key is changed in half tone increments up to plus or minus one octave If the two buttons are pressed at the same time the key returns to C When the TRANSPOSE function is active the trans posed key is shown on the HOME PAGE display Example transposed to D PROGRAM MENUS MAIN VOLUME MAX MIN MAX O...

Страница 40: ...the part for the harmony notes If CONDUCTOR is selected the harmony notes are pro duced in the sounds of the part which is currently selected in the CONDUCTOR RIGHT 1 RIGHT 2 In other words the harmony notes are produced in the same sound as the melody notes If both RIGHT 1 and RIGHT 2 are on the harmony notes are produced in the sound of the RIGHT 1 part In the case of EASY RECORD see page 58 whe...

Страница 41: ...ST page 50 and MUSIC STYLE ARRANGER page 51 etc this STYLE is summoned STYLE RHYTHM PANEL setting PANEL setting PANEL setting PANEL setting VARIATION 1 VARIATION 2 VARIATION 3 VARIATION 4 MAIN VOLUME MAX MIN MAX OFF AUTO PLAY CHORD RHYTHM GROUP TEMPO PROGRAM PROGRESSIVE PIANIST PIANO STYLIST SPLIT POINT METRONOME POP ROCK FUNK SOUL DISCO POP BALLAD BALLAD BALLROOM SHOW MEMORY CONTRAST LATIN WORLD ...

Страница 42: ...ors above the START STOP button light to indicate the beat 䡲 䡲 䡲 䡲 Synchronized start With the synchronized start feature the rhythm pattern starts when you play a key on the key board 1 Select a rhythm 2 Press the SYNCHRO BREAK button to turn it on 3 Play a key to the left of the keyboard split point The rhythm pattern begins to play You can use the synchronized start feature even when the keyboa...

Страница 43: ...button 2 Press the FILL IN 1 or FILL IN 2 button A fill in pattern is heard immediately for the remainder of the measure When a FILL IN button is pressed on the last beat of the measure the fill in pattern continues to the end of the fol lowing measure MAIN VOLUME MAX MIN MAX OFF AUTO PLAY CHORD RHYTHM GROUP TEMPO PROGRAM PROGRESSIVE PIANIST PIANO STYLIST SPLIT POINT METRONOME POP ROCK FUNK SOUL D...

Страница 44: ...Playing chords Choose from the 4 ways of playing chords 䡲 䡲 䡲 䡲 BASIC mode This mode lets beginners specify chords with just one finger With this mode chords can be speci fied either with one finger one finger or by pressing all of the chord s sound components fingered one finger In the one finger a major chord can be played just by pressing the key for its root note Example C chord 1 2 INTRO ENDI...

Страница 45: ...h or more below the lowest note of the chord the BASS part becomes a pattern based on that note APC HOLD If this function is assigned to the left pedal for example pressing the left pedal will play the cur rently specified chord in that timing allowing you to focus your performance on a solo melody The accompaniment continues in the same chord as long as the PEDAL is depressed and it does not chan...

Страница 46: ...is produced in the key of the lowest note of the played chord thus making it possible to play chords such as C on G For example with the ON BASS button on if you play a C chord by pressing the keys G C and E the BASS part is produced in the key of G Left Hold This setting determines how the LEFT part sounds when the LEFT button in the CONDUC TOR is on during a performance with the BASIC or ADVANCE...

Страница 47: ... FINDER The display changes to the following 3 Use the APC MODE button to select the auto matic accompaniment mode you will use to specify chords BASIC ADVANCED 1 In the list column are shown the chords which can be specified in each mode 4 Use the ROOT buttons to select the root note of the chord Use the TYPE buttons to select the type of chord A typical way to finger the specified chord TYPICAL ...

Страница 48: ...buttons to change the set ting FADE IN Time Specify the time elapsed between 0 volume to the set volume 1 measure to 16 mea sure FADE OUT Time Specify the time elapsed between the set volume and 0 volume 1 measure to 16 measure Auto Reset Specify whether the volume of each part automatically returns to its specified setting ON OFF Rhythm Auto stop Specify whether the rhythm turns off after fade ou...

Страница 49: ... MAX MIN MAX OFF AUTO PLAY CHORD RHYTHM GROUP TEMPO PROGRAM PROGRESSIVE PIANIST PIANO STYLIST SPLIT POINT METRONOME POP ROCK FUNK SOUL DISCO POP BALLAD BALLAD BALLROOM SHOW MEMORY CONTRAST LATIN WORLD JAZZ SWING WALTZ TRAD USA 16 BEAT 8 BEAT IN OUT SOUND ARRANGER SET MODE CHORD FINDER OFF ON ONE TOUCH PLAY APC SEQUENCER VOLUME DEMO MUSIC STYLE ARRANGER VARIATION 1 2 1 2 1 1 2 3 4 BEAT LOAD SEQUENC...

Страница 50: ...emble perfor mance that uses the many sounds and rhythms incorporated in this instrument 1 On the PIANO STYLIST display press the ENSEMBLE STYLES button The display looks similar to the following 2 Use the GROUP button the select a style group These are the same as the groups for the RHYTHM GROUP button 3 Use the RHYTHM button to select a rhythm and the STYLE button to select a style The AUTO PLAY...

Страница 51: ...ARRANGER mode You can define which panel settings change by pressing a FILL IN button when the MUSIC STYLE ARRANGER is used 1 Press and hold the MUSIC STYLE AR RANGER button for a few seconds The display changes to the following 2 Select the mode RHYTHM Only the rhythm changes SOUND RHYTHM The sound effects rhythms etc change PANEL MEMORY The PANEL MEMORY number BANK A 1 to 4 changes You can store...

Страница 52: ...e character input position with the POSITION but tons select the characters with the alphanumeric buttons and repeat name assignment Switch from upper to lower case letters with the ABC abc button Use the button to switch to the symbols character set Press the INS button to enter a space at the cursor posi tion Press the DEL button to erase the character at the cursor position Press the CLR button...

Страница 53: ...NEL MEMORY mode You can define which panel settings are recalled when the PANEL MEMORY is used 1 Press and hold the SET button for a few sec onds The display changes to the following 2 Select the mode NORMAL The sounds and volume balance and CON DUCTOR status are stored EXPAND All the instrument s settings are stored includ ing the rhythm except for SOUND ARRANGER on off status TRANSPOSE tempo etc...

Страница 54: ... allows you to bypass the more complex recording procedures so you can record and play back your perform ance quickly and easily You can also record an accompaniment from the AUTO PLAY CHORD Create a one man ensemble Use the REALTIME RECORD function to record your performance in up to 16 tracks and create your own orchestra or band Store individual data to create your song For repeating patterns o...

Страница 55: ...he display looks similar to the following The SONG and buttons are used to select a song You can press the NAMING button and assign a name to the song Refer to page 63 You can press the PANEL WRITE button to store the cur rent settings of the instrument at the beginning of the song Refer to page 63 3 Select RECORD EDIT COPY PASTE or RANGE EDIT and follow the corresponding procedure RECORD EDIT COP...

Страница 56: ...page 72 Erase the contents of a specific track SONG CLEAR page 72 Erase all the recorded data of a song MEASURE COPY page 76 Copy the contents of specific measures MEASURE ERASE page 76 Erase the contents of specific measures MEASURE DELETE page 77 Delete specific measures from the perfor mance MEASURE INSERT page 77 Insert additional measures in the perfor mance APC TO SMF CONVERT page 78 Save au...

Страница 57: ... volume settings PART EXPRESSION Contents of sound and effect settings that can be set on the MIXER display Refer to page 104 CONTROL CTL Recording changes in the panel button status REALTIME STEP Rhythm setting and selection changes RHYTHM VARIATION 1 4 setting REVERB on off AUTO PLAY CHORD status volume balance MUSIC STYLE ARRANGER status FILL IN 1 2 INTRO ENDING 1 2 on PANEL MEMORY selection ch...

Страница 58: ...hich to record 1 to 10 If you press the NAMING button you can assign a name to your song Refer to page 63 3 Set the desired sounds effects rhythms etc 4 Press the OK button The display changes to the REALTIME RECORD dis play 5 Play the keyboard Recording begins as soon as you start the rhythm or play the keyboard 6 When you have finished recording press the EASY REC button to turn it off The PLAY ...

Страница 59: ...ust also be on For parts that are not in the CONDUCTOR multiple parts cannot be recorded at one time To record AUTO PLAY CHORD APC parts turn on the AUTO PLAY CHORD s OFF ON button In this case press the START STOP button when beginning record ing The track for the RHYTHM RHY part can be selected for recording only when STEP RECORD is active 7 Set the sounds effects volumes etc for the parts you a...

Страница 60: ...own are played back and you can record in time with this If you turn on the REC for the CONTROL track and begin recording the rhythm start will not be recorded 4 Press the REC STOP button at the end of the recording 5 Repeat steps 2 to 4 for other tracks as desired 6 When multi track recording is finished turn off the PROGRAM MENUS button If you wish to store part settings that you modified after ...

Страница 61: ...ponding function does not work You can press the MIXER button and modify the settings for each part For information about LYRICS refer to page 91 7 To stop playback press the START STOP button If the START STOP button is pressed again playback will continue from the point it was interrupted 8 When you are finished playing back your per formance press the SEQUENCER PLAY but ton to turn it off CHORD...

Страница 62: ...ou can use the buttons below the display to select a song to add to the song list then press the ADD button to add it to the list Repeat these steps to create your own list of songs to have played back M01 M02 etc next to the file name indicates its order in the list You can delete a marked file from the medley song list by selecting it and pressing the ADD button Use the LOOP button to specify ON...

Страница 63: ...space at the cursor posi tion Press the DEL button to erase the character at the cursor position Press the CLR button to erase the entire name Press the button to center the name 4 Press the OK button Panel Write You can change the panel status which is in effect at the beginning of the song These are the settings which are recalled when the SEQUENCER RESET button is pressed 1 On the SEQ MENU disp...

Страница 64: ...part 1 On the SEQ MENU display use the SONG SELECT and buttons to select the song number Then select RECORD EDIT 2 On the RECORD EDIT display select PUNCH RECORD The display looks similar to the following 3 Select the track which contains the portion you want to correct You cannot select a track in which no data is stored On the display REC indicates tracks which are being recorded and PLAY indica...

Страница 65: ...gins from the measure indicated by MEA SURE on the display Pertinent information such as the FIRST MEASURE is shown in the upper section of the display 7 Correct the performance The mode changes automatically to the recording mode at the specified FIRST measure Begin playing at this point The mode automatically changes back to the play back mode at the specified LAST measure To discontinue punch r...

Страница 66: ...duced sound for the desired legato or staccato effect 8 Specify the pitch and velocity of the note by playing the keyboard The dot on the display where the note is stored changes to a mark When recording chords you can store multiple notes at one position Any panel setting changes for example changes in the sound selection button operation wheel operation etc are recorded at the cursor position Wh...

Страница 67: ... the ERS button to erase the data which is dis played You can also correct data which was stored in the REAL TIME RECORD mode Performance NOTE data can be recorded or edited on a piano roll display and there is also a specialized dis play for recording and editing the DRUMS part data Refer to page 73 or 74 Store a chord progression Store the chord progression for the AUTO PLAY CHORD in the track f...

Страница 68: ...on on the panel to store the desired pattern at the cur sor position An INTRO or COUNT INTRO can be stored only at the beginning Store a rest by pressing a note value key without specify ing a chord 5 At the end of the chord progression press the End key The Keyboard exits the recording mode During playback playback of the recorded chord progres sion stops at this point For automatic repeat playba...

Страница 69: ... 4 Use the MEAS and buttons to go to the measure you wish to record 5 Store the rhythm data Data which can be stored START STOP Changes in the rhythm selection RHYTHM VARIATION 1 4 COUNT INTRO INTRO FILL IN ENDING Tempo changes Be sure to store the START STOP data in the measure in which the rhythm starts or stops If you are storing a COUNT INTRO or INTRO store this data before the START STOP data...

Страница 70: ...rument s parts assigned to tracks set to OFF through this procedure use this setting to generate sound from an external sound source through the MIDI connectors You can use the MIDI OUT ON and OFF buttons to spec ify whether or not the data of the part assigned to this track is sent as MIDI data When set to OFF the data is not sent even if MIDI equipment is connected 5 When assigning the CONTROL A...

Страница 71: ... 100 is a convenient setting When set to 100 the per formance data is quantized exactly to the level specified for the VALUE just For example at 50 the data is quantized to a point that is half that of the just level By this setting you can attain an effect that is very slightly off beat from the rhythm 8 Use the WINDOW and buttons to specify the range affected by the quantize setting With the inc...

Страница 72: ... button The confirmation display appears Press the YES button to execute the function or press the NO button to cancel the function If the YES button is pressed COMPLETED appears on the display the specified songs are erased Track Clear Erase the contents of a specific track 1 On the SEQ MENU display select RECORD EDIT 2 On the RECORD EDIT display select TRACK CLEAR The display looks similar to th...

Страница 73: ...ent between incre ments the cursor will stop Use the POS and buttons to change the timing Example 10 2 48 indicates a point in measure 10 beat 2 point 48 one point is 1 96 of a quarter note q is shown at the point where the END command is stored 6 Select the data to edit it changes to a high lighted horizontal bar Edit the data Use the POS and buttons to move the timing the NOTE and buttons to cha...

Страница 74: ...elect RECORD EDIT 2 On the RECORD EDIT display select DRUM EDIT 3 On the PART SELECT display select the track for the DRUMS part The CHORD RHYTHM and CONTROL tracks cannot be selected The display looks similar to the following 4 Use the SOUND and buttons to select the percussion instrument you wish to edit The number to the left of the instrument name is its MIDI NOTE NUMBER in the Technics arrang...

Страница 75: ...tons to select the number of the song Then select COPY PASTE The display looks similar to the following 2 On the COPY PASTE display select a func tion 3 Perform the editing procedures See below During the editing procedure if the indicator for the TEMPO PROGRAM is lit you can use the TEMPO PRO GRAM dial for the editing function SONG COPY Copy all the recording data of a song to a spe cific song me...

Страница 76: ...umber you wish to copy the measures from You cannot select the track for the RHYTHM part or CHORD part in which a repeat command has been stored If ALL is selected the specified measures are copied to all tracks at the same time FIRST MEAS Specify the first measure to copy LAST MEAS Specify the last measure to copy 2 Specify where you wish to copy the selected measures to On the TO side specify th...

Страница 77: ...ncel the function MEASURE INSERT Insert specified measures at a specified point The length of the performance accordingly increases by the number of inserted measures 1 Specify the measures you wish to copy from the source track On the FROM side specify the settings with the corre sponding buttons TRACK Specify the track number you wish to copy the measures from This function does not work for the...

Страница 78: ...onversion takes the same length of time as playback If you wish to discontinue the conversion process mid way press the ABORT button Changing the note position etc of the recorded data You can change the note pitch and position etc of recorded data Select the function 1 On the SEQ MENU display use the SONG and buttons to select the number of the song Then select RANGE EDIT The display looks simila...

Страница 79: ...he track for the CONTROL RHYTHM or CHORD part If ALL is selected all tracks will be edited 2 Use the FIRST MEAS and buttons to specify the start point measure number of the transpose 3 Use the LAST MEAS and buttons to spec ify the end point measure number of the transpose 4 Use the TRANSPOSE and buttons to specify the change in pitch Increments are in semitones A value of 12 is one octave A value ...

Страница 80: ...e following 2 Select COMPOSER The display looks similar to the following MAIN VOLUME MAX MIN MAX OFF AUTO PLAY CHORD RHYTHM GROUP TEMPO PROGRAM PROGRESSIVE PIANIST PIANO STYLIST SPLIT POINT METRONOME POP ROCK FUNK SOUL DISCO POP BALLAD BALLAD BALLROOM SHOW MEMORY CONTRAST LATIN WORLD JAZZ SWING WALTZ TRAD USA 16 BEAT 8 BEAT IN OUT SOUND ARRANGER SET MODE CHORD FINDER OFF ON ONE TOUCH PLAY APC SEQU...

Страница 81: ...parts to each of which a style and variation is assigned 4 Use the STYLE and buttons to select a style 5 Use the VARI and buttons to select the variation number The number of variations differs depending on the selected style A part which is set to OFF does not sound Note that the BsDrum Snare part cannot be set to OFF 6 Repeat steps 3 to 5 to select styles for the other parts 7 Press the SET butt...

Страница 82: ... the NAMING button and assign a name to the MEMORY To assign a name to each VARIATION press the VARI button and select a number 3 On the RECORD MEMORY display press the OK button The display looks similar to the following 4 Press the CLEAR THE ENTIRE PATTERN button The display looks similar to the following 5 Press the YES button All the data for the selected pattern is erased 6 Press the MEASURE ...

Страница 83: ...ds may result in an unnatural awkward sound expression 4 Record the part The specified number of measures are repeatedly played back during which time any newly played notes are added to those already recorded The current measure number is shown on the display as MEASURE Record the performance in C major for correct chord pro gressions during playback Follow the KEY SETTING procedure if you wish t...

Страница 84: ...e used for the INTRO and ENDING patterns 1 On the RECORDING display press the CHORD MODIFY CHANGE button The display looks similar to the following 2 Use the PART and buttons to select the part you wish to set 3 Use the GROUP and MODIFY TYPE and buttons to select the corresponding progres sion type If a progression type for which the note name is displayed in C key was selected for the chord group...

Страница 85: ...ter point is CENTER REV Depth of the REVERB 0 to 127 CHO Depth of the CHORUS 0 to 127 BEND RANGE Adjust the range of pitch change when the PITCH BEND data is received 0 to 12 PAGE 3 EQ Hi Sound correction in the high range Use the FC and buttons to adjust the standard fre quency Use the GAIN and buttons to set the ratio of change EQ Low Sound correction in the low range Use the FC and buttons to a...

Страница 86: ...ded to that which you specified with the left buttons Example To record a dotted quarter note q q e 5 Use the PHRS and buttons to specify the actual length of the produced sound for the desired legato or staccato effect 6 Specify the pitch and velocity of the note by playing the keyboard The dot on the display where the note is stored changes to a mark When recording chords you can store multiple ...

Страница 87: ...ted measures to On the TO side specify the settings with the correspond ing buttons PART Select the part to copy to START MEASURE Specify the start point to copy the selected measures to 3 Press the OK button The confirmation display appears Press the YES button to execute the function or press the NO button to cancel the function If the FROM and TO parts are the same and the FROM and TO measures ...

Страница 88: ... 16 measures total can be inserted 3 Press the OK button The confirmation display appears Press the YES button to execute the function or press the NO button to cancel the function The Maj or Min data is inserted in the INTRO and END ING at the same time Pattern Copy Use this function to copy a pattern from a rhythm or from SEQUENCER data PATTERN COPY Copy a rhythm to the COMPOSER You can also cop...

Страница 89: ... and the time signature in the COMPOSER memory you are copying to are the same or the data will not be copied successfully 3 On the COMPOSER MENU display select SEQ TO COMPOSER COPY The display looks similar to the following 4 Use the FIRST MEAS and buttons to specify the number of the first measure to copy 5 Use the LAST MEAS and buttons to spec ify the number of the last measure to copy 6 Use th...

Страница 90: ...ERFORMANCE BACKUP When creating or saving song data it is recommended that you use the performance data in the PERFOR MANCE group Instead of using MIDI FAVORITES as frequently loaded and saved data it is recommended that you save it with other data as backup data The SEQUENCER contents can be saved in one song increments SEQUENCER SONG SAVE Please use 2HD disks to load save BACKUP data Main parts ...

Страница 91: ...aved to a disk in Standard MIDI File FORMAT 0 and can be used by other equipment Playback of commercial song disks DIRECT PLAY lets you enjoy playing commer cially sold song disks directly from a disk It s fast because you don t have to load the disk data into your instrument s memory DIRECT PLAY is possible from the following disks All product and company names are trademarks or registered tradem...

Страница 92: ...yback SONG MEDLEY page 96 Medley playback of songs in the disk Tech nics format DISK TOOLS page 99 Disk management procedures such as disk format PREFERENCES page 100 Used to specify which screen is to be jumped to as well as the preferred file when a disk is inserted MAIN VOLUME MAX MIN MAX OFF AUTO PLAY CHORD RHYTHM GROUP TEMPO PROGRAM PROGRESSIVE PIANIST PIANO STYLIST SPLIT POINT METRONOME POP ...

Страница 93: ... Technics models Note however that in this case the song is loaded into SONG 1 but the data in SONG memories 2 to 10 are erased You can also access the LOAD display by pressing the DISK button for a few seconds 䡲 䡲 䡲 䡲 LOAD OPTION Specify the kind of data you wish to load from the disk to your instrument 1 Use the PAGE buttons to access the PAGE 2 3 LOAD OPTION display The display looks similar to...

Страница 94: ...ta NX NX Active the NX SOUND settings and load NX data GM GM2 NX Activate the NX SOUND initialized settings and load GM GM2 data PREV TEC NX Activate the NX SOUND initialized settings and load SMF data that was saved in the TECHNICS mode on a previous model The volume balance and octave settings may differ from the saved settings If you select the setting which is different from that in which the ...

Страница 95: ... can use TEMPO PROGRAM or TAP TEMPO to adjust the tempo to your liking When the tempo is changed all the tempo data of that song is automatically changed by the same ratio Accord ingly even in song data in which tempo change data is stored a single adjustment of the tempo produces a nat ural sounding playback 䡲 䡲 䡲 䡲 The display during playback Example SMF During playback the buttons below the dis...

Страница 96: ...a in the TECHNICS FORMAT can be played back in a medley 1 On the DISK MENU display select SONG MEDLEY from the display The display looks similar to the following 2 Select the order of files in the medley If ALL is pressed all the files are selected and the songs are played back in numerical in a medley You can select a file and song then press the ADD but ton to add it to the song list Repeat thes...

Страница 97: ...isplay to specify the file number you wish to save to The types of data that can be saved are shown in a frame on the right side of the display If you press the SAVE button all the indicated data is saved Ordinarily PER FORMANCE data is selected but you can use the SAVE OPTION to select specific data to save 2 If you wish to assign a name to the file press the NAME button The display looks similar...

Страница 98: ...F format FORMAT 0 is ordinary performance data such as note data Data such as chord and rhythm data COMPOSER data etc is not saved If you wish to also save this special Technics data save the data in the Technics File format If you use the APC TO SMF CONVERT function of the SEQUENCER you can convert the patterns of the auto matic accompaniment etc to SMF data Refer to page 78 1 To overwrite a file...

Страница 99: ...CH Copy a file 䡲 䡲 䡲 䡲 MOVE TECH Replace a file 䡲 䡲 䡲 䡲 INFO DISK SONG SMF files only Select whether to display the disk data or the song names 䡲 䡲 䡲 䡲 FORMAT Disks which are used for the first time with this instrument have to be formatted through the fol lowing procedure When an unformatted disk is inserted into the Disk Drive slot and you attempt to execute the save or load procedure the DISK F...

Страница 100: ...ing 2 Use the buttons to the left of the display to select the item and the and buttons to change the setting DISK INSERT OPTION The display automatically changes to a disk procedure display when a disk is inserted in the Disk Drive OFF DISK MENU LOAD DIRECT PLAY SONG MEDLEY During playback recording or changing the settings the displays unrelated to the settings made here do not change FILE TYPE ...

Страница 101: ...SIC STYLE ARRANGER VARIATION 1 2 1 2 1 1 2 3 4 BEAT LOAD SEQUENCER RESET COUNT INTRO 2 3 4 FADE FILL IN INTRO ENDING SYNCHRO BREAK START STOP TAP TEMPO HELP OTHER PARTS TR TRANSPOSE MUTE PAGE DISPLAY HOLD EXIT GRAND UPRIGHT ELECTRIC MODERN SIMPLE PIANO TECHNI CHORD BANK A B C P MEM 5 8 SET 1 5 2 6 3 7 4 8 SOUND GROUP SEQUENCER PIANO STRINGS BASS MALLET ORCH PERC WORLD PIANO MIXTURES ORCH MIXTURES ...

Страница 102: ...e cen ter The display indicates the selected position Even at the same numerical value the stereo balance may differ slightly depending on the sound SUS PEDAL Use the SUSTAIN and buttons to adjust the length of the sustain 1 8 Use the ON OFF but tons to enable or disable the sustain effect when the sustain pedal is depressed KEY SHIFT Use the KEY and buttons to specify the amount of key shift 24 t...

Страница 103: ... sound 0 to 127 VIBRATO RATE Use the RATE and buttons to specify the vibrato speed 0 to 127 VIBRATO DEPTH Use the DEP and buttons to specify the vibrato depth 0 to 127 VIBRATO DELAY Use the DEL and buttons to specify the time interval from when the keys are played until the vibrato starts 0 to 127 The center value is 64 0 PAGE 5 MONO POLY MODE Use the MONO POLY and buttons to select the output mod...

Страница 104: ...f the corre sponding part 0 to 127 To mute a part press both the corresponding balance buttons as the same time To cancel the mute press either balance button for the part PAGE 2 REVERB Select REVERB Use the buttons below the display to set the level of the REVERB for the corresponding part 0 to 127 MULTI Select MULTI Use the buttons below the dis play to set the MULTI EFFECT to ON or OFF for each...

Страница 105: ... modify the sounds PAGE 1 VIBRATO RATE Select VIBRATO RATE Use the buttons below the display to adjust the vibrato speed for each part 0 to 127 VIBRATO DEPTH Select VIBRATO DEPTH Use the buttons below the display to adjust the vibrato depth for each part 0 to 127 VIBRATO DELAY Select VIBRATO DELAY Use the buttons below the display to specify the time interval from when the keys are played until th...

Страница 106: ... to 5 SLENDRO and PELOG 5 Use the SHIFT and buttons to select the key to perform in 6 Repeat steps 3 to 5 for each part as neces sary 7 Press the SET button The OCTAVE TUNING for the specified type and key is automatically set Settings for each key On the KEY SCALING display you can adjust the tuning for each key After selecting a key with the KEY SELECT 䊴 and 䊳 buttons the pitch can be adjusted u...

Страница 107: ... The display looks similar to the following 2 Use the and buttons to select an item Use the and button to set the filter to ON or OFF APC Reverb Setting Although an appropriate REVERB is applied for the automatic accompaniment parts depending on the rhythms by default you can adjust the REVERB level for each part 1 On the SOUND MENU display select APC REVERB SETTING The display looks similar to th...

Страница 108: ...WALTZ TRAD USA 16 BEAT 8 BEAT IN OUT SOUND ARRANGER SET MODE CHORD FINDER OFF ON ONE TOUCH PLAY APC SEQUENCER VOLUME DEMO MUSIC STYLE ARRANGER VARIATION 1 2 1 2 1 1 2 3 4 BEAT LOAD SEQUENCER RESET COUNT INTRO 2 3 4 FADE FILL IN INTRO ENDING SYNCHRO BREAK START STOP TAP TEMPO HELP OTHER PARTS TR TRANSPOSE MUTE PAGE DISPLAY HOLD EXIT GRAND UPRIGHT ELECTRIC MODERN SIMPLE PIANO TECHNI CHORD BANK A B C...

Страница 109: ...ding sound press the NOTE SELECT button To edit the DIGITAL DRAWBAR settings first adjust the settings then enter the SOUND EDIT mode press the WRITE button and follow the procedure on the display MAIN VOLUME MAX MIN MAX OFF AUTO PLAY CHORD RHYTHM GROUP TEMPO PROGRAM PROGRESSIVE PIANIST PIANO STYLIST SPLIT POINT METRONOME POP ROCK FUNK SOUL DISCO POP BALLAD BALLAD BALLROOM SHOW MEMORY CONTRAST LAT...

Страница 110: ...119 If a sound is stored in the EASY EDIT mode and is later selected in the EASY EDIT mode the displayed value of an attribute may be different from the value when it was stored The sound itself however is exactly as it was stored Tone Edit Modify the separate tones which comprise the sound About tones A sound may be made up of at most four tones BRILLIANCE Adjust the brightness of the sound VIBRA...

Страница 111: ...d output 10 Select TRIGGER and use the and but tons to select a trigger mode KEY ON The normal mode in which sound is emitted when the key is played KEY OFF Sound is emitted when the key is released like muted strings for example LEGATO Sound is emitted only when the key is played legato NON LEG Sound is not emitted when the key is played legato PEDAL The sound is produced only while the SUS TAIN ...

Страница 112: ...the lower range 4 Select HIGH and use the and buttons and select H FADE and use the and buttons to define the ff sound output area for the higher range By overlapping the L FADE and H FADE curves of each different tone you can change the way the tone sounds relative to how hard or softly the keyboard is played 5 Repeat steps 2 to 4 for the other tones as desired TONE DYNAMICS You can adjust the se...

Страница 113: ...ct a setting item and then the and buttons to specify a selection 2 Use the buttons to the left of the display to select a tone 3 Adjust the settings for the pitch change enve lope Use the buttons below the display to set the correspond ing values The envelope is created on the display as you input the settings Select TOTAL DEPTH and use the and buttons to specify the maximum level Select START PI...

Страница 114: ...cify the resonance value dB Resonance is effect which adds character to the sound by emphasizing the harmonic components of frequencies close to the cut off frequency Equalizer For LPF 6 EQ HPF 6 EQ filters the sound quality can be modified by the EQUALIZER RANGE Select the setting range HIGH or LOW FREQUENCY Set the standard frequency GAIN Set the level increase or decrease from the value set for...

Страница 115: ... ENVELOPE TOUCH KEY FOLLOW Specify how the filter envelope curve changes relative to touch or note pitch 1 Use the PAGE buttons to view the 4 4 display The display looks similar to the following Use the and buttons to select a setting item and then the and buttons to specify a selection 2 Use the buttons to the left of the display to select a tone 3 Modify how the respective filter envelopes chang...

Страница 116: ...sound dies out 1 Use the PAGE buttons to view the 2 3 display The display looks similar to the following Use the and buttons to select a setting item and then the and buttons to specify a selection 2 Use the buttons to the left of the display to select a tone 3 Adjust the settings for the volume envelope Use the buttons below the display to set the correspond ing values The envelope is created on ...

Страница 117: ... to 12 SPEED Adjust the modulation speed KEYSYNC When playing more than one note specify whether the LFO starts or not each time a key is pressed ON OFF When KEYSYNC is set to ON if while playing one note you play a second note the LFO is applied to the second note as well PHASE Degree of phase change 5 Select CONNECTION and use the buttons to specify whether or not the LFO is applied to the tone ...

Страница 118: ...d buttons to select the type of effect ON OFF button Specify whether the DIGITAL EFFECT button turns on or off when the sound is selected When set to ON the DIGITAL EFFECT button turns on automatically when the sound is selected STEREO MONO button Select stereo STEREO or monaural MONO output of the effect 3 Use the buttons along the bottom of the dis play to select the attribute you wish to adjust...

Страница 119: ...he display to assign a name Set the character input position with the POSITION but tons select the characters with the alphanumeric buttons and repeat name assignment Switch from upper to lower case letters with the ABC abc button Use the button to switch to the symbols character set Press the INS button to enter a space at the cursor posi tion Press the DEL button to erase the character at the cu...

Страница 120: ... turn it off Pedal Setting By assigning one of the many programmable functions to the soft pedal you can then control the function during your performance just by pressing the pedal 1 On the CONTROL MENU display select PEDAL SETTING The display looks similar to the following MAIN VOLUME MAX MIN MAX OFF AUTO PLAY CHORD RHYTHM GROUP TEMPO PROGRAM PROGRESSIVE PIANIST PIANO STYLIST SPLIT POINT METRONO...

Страница 121: ...for some sounds TECHNI CHORD TECHNI CHORD button on off DIGITAL EFFECT DIGITAL EFFECT button on off MULTI EFFECT MULTI EFFECT button on off ROTARY SLOW FAST TREMOLO SLOW FAST of the DIGITAL DRAWBAR MIC REVERB MIC REVERB on off MIC EFFECT MIC EFFECT on off PUNCH RECORD Punch in Punch out Refer to page 64 APC HOLD Memorize the chord specified for the auto matic accompaniment FADE IN FADE IN button o...

Страница 122: ...ettings when the TEMPO PROGRAM indicator is lit it indicates that the TEMPO PROGRAM is available for setting the current function 5 When you have finished setting the functions press the PROGRAM MENUS button to turn it off MAIN VOLUME MAX MIN MAX OFF AUTO PLAY CHORD RHYTHM GROUP TEMPO PROGRAM PROGRESSIVE PIANIST PIANO STYLIST SPLIT POINT METRONOME POP ROCK FUNK SOUL DISCO POP BALLAD BALLAD BALLROO...

Страница 123: ...eration successfully completed OFF DEFAULT HOLD 1 to 10 sec ARE YOU SURE Display requires user action for confirmation OFF DEFAULT HOLD ERROR MESSAGE Error notification display DEFAULT HOLD 1 to 10 sec SOUND RHYTHM SELECT Sound Rhythm selection display DEFAULT HOLD 1 to 10 sec EASY SETTING Display time when the setting display was accessed pressing and holding a panel button DEFAULT HOLD 1 to 10 s...

Страница 124: ...le Specify whether MIDI data is also loaded when panel data is loaded NO YES From Sequencer Song Specify whether MIDI data is loaded or changed when SEQUENCER data is loaded or when the SONG is changed by the SEQUENCER SONG SELECT SONG COPY or TRACK ASSIGN NO YES The MIDI settings are always stored at the start of each recorded SEQUENCER SONG and when PANEL WRITE is executed In the initialized sta...

Страница 125: ...ction examples 䡲 䡲 䡲 䡲 To generate sound from a connected instrument by playing this instrument 䡲 䡲 䡲 䡲 To generate sound from this instrument by operating a connected instrument 䡲 䡲 䡲 䡲 To connect with a MIDI sequencer MIDI channels Many different kinds of performance data are sent using just one MIDI cable This is possible because MIDI signals are sent and received through 16 different basic cha...

Страница 126: ...S page 128 Enable or disable the exchange of various CONTROL data REALTIME MESSAGES page 128 Enable or disable the exchange of REAL TIME COMMANDS and select the CLOCK mode COMMON SETTING page 129 Set the functions which are common to all parts INPUT OUTPUT SETTING page 130 Settings which determine how various per formance data is treated during data trans mission and reception MIDI PRESETS page 13...

Страница 127: ... for the control operation is exchanged OFF Data for the control operation is not exchanged The BANK SELECT setting is effective only when PRG CHANGE is set to ON The EFFECT REVERB setting controls the DIGITAL EFFECT CHORUS MULTI and REVERB on off RPN is the general term for KEY SHIFT TUNING PITCH BEND RANGE and MODULATION SENSITIVITY 4 Repeat steps 2 and 3 for each control as desired Realtime Mes...

Страница 128: ...e PREVIOUS TECH Program change numbers are standardized among non NX SOUND Technics models which are set to this mode The program change number assigned to a given sound on one model is assigned to the same sound on all models which are set to the same mode MAP R GS basic sounds are transmitted and received as GS program change numbers MAP Y XG basic sounds are transmitted and received as XG progr...

Страница 129: ... parts is received OFF Data for the above parts is not received MIDI channels should be assigned to the above parts before exchanging data VELOCITY INPUT DIRECT The VELOCITY value of received NOTE ON data is treated as is OFFSET The VELOCITY value of received NOTE ON data is offset 50 to 50 Select VELOCITY OFFSET VALUE Use the and buttons to change the value All the values are offset from the curr...

Страница 130: ...PLAY CHORD 3 Press the OK button When the settings have been successfully stored COM PLETED appears on the display 䡲 䡲 䡲 䡲 Storing user settings After you change the MIDI settings you can store your customized settings in USER 1 Adjust the various MIDI settings 2 Go to PAGE 4 4 of the MIDI PRESETS dis play The display looks similar to the following 3 Use the WITH SPLIT POINT button to spec ify whe...

Страница 131: ...computer to the USB ter minal on the rear of this instrument 3 Turn on the power to this instrument 4 On the MIDI MENU display select COM PUTER CONNECTION The display looks similar to the following 5 Use the and buttons to select a mode NORMAL Ordinary mode PC as master The mode which is appropriate for data trans mission PR as master The mode when this instrument is used as the master keyboard PR...

Страница 132: ...e Key board returns to the normal performance mode The USER MIDI and FAVORITES are not initialized by this procedure PROGRAM MENUS You can also reset all the PERFORMANCE items with the following procedure Turn off the power to this instrument once Then while pressing the three lower left but tons in the RHYTHM GROUP section 8BEAT 16BEAT and USA at the same time turn the power on again Power on set...

Страница 133: ...able type AB cable Used with the applications on the included CD ROM you can record this instrument s audio sound or manage the instrument data with your PC Applications Audio Recorder Application for Recording this instrument s sounds and for saving recorded digital audio files in WAV WMA Win dows Audio Format and MP3 formats Song Manager Application for managing this instrument s data on your PC...

Страница 134: ...each screw 5 or 6 times Push the piano body forward so that the screws are fully inserted in the cutout of the metal piece on either side plank This enables you to easily position the piano body on the stand 2 Adjust the piano body so that the right and left sides project evenly over the stand 3 Positioning the piano body on the stand confirm that the 4 screws can easily be inserted 4 Tighten the ...

Страница 135: ...ou hear is different from the sound you selected This sometimes occurs when you play back SEQUENCER or COMPOSER data which was cre ated on a different model or when MIDI data is received from a connected instrument Select the desired sounds again The rhythm does not start The DRUMS volume is set to the minimum level Use the balance buttons to set the DRUMS volume to an appropriate level A SEQUENCE...

Страница 136: ...the load procedure Data cannot be exchanged through MIDI termi nals Match the channels on the transmitting side and the receiving side Refer to page 127 The sound quavers or is distorted When the USB terminal or both the MIDI IN and OUT terminals are connected to a computer depending on the computer software the received data may be sent back to the instrument just as it is Because of this the sou...

Страница 137: ...rd and control cannot be merged 27 It is only possible to copy melody tracks Tracks such as rhythm chord and control cannot be copied 28 This song is too long to be saved as a MIDI file 29 The MIDI file that you have tried to load exceeds the memory capacity of this instrument and cannot be played The SEQUENCER memory has been cleared 30 It is not possible to change the time signature of a COMPOSE...

Страница 138: ...that you want to name 65 It is not possible to use the CHORD FINDER in this mode Please select CHORD FINDER from HOME page or CHORD STEP RECORD page 66 SOLO pads are special pads which include Chord information Pleases use SOLO pads when the rhythm and accompaniment is playing 67 There are no APC or CHORD tracks Select and APC track or CHORD track and try again 68 It is not possible to record dire...

Страница 139: ... 93 LOCAL MIDI 128 M MAIN VOLUME 12 MASTER TUNING 106 MEMORY RHYTHM GROUP 85 MEMORY SOUND GROUP 119 MIC 134 MIDI 125 MIDI PRESETS 131 MIDI SETTING LOAD OPTION 124 MIXER 104 MULTI EFFECT 37 Music stand 12 MUSIC STYLE ARRANGER 51 MUTE 27 N NOTE EDIT 73 O ONE TOUCH PLAY 49 OTHER PARTS TR 27 P PAGE 28 PAN 104 PANEL MEMORY 52 PART SETTING 102 PEDAL 120 PERFORMANCE 90 PIANIST 45 PIANO STYLIST 50 PROGRES...

Страница 140: ...QUENCER VOLUME BALANCE MUTE START STOP INTRO ENDING 1 INTRO ENDING 2 FILL IN 1 FILL IN 2 COUNT INTRO SYNCHRO BREAK TEMPO PROGRAM TAP TEMPO FADE IN OUT SPLIT POINT AUTO PLAY CHORD MODE BASIC ADVANCED 1 ADVANCED 2 PIANIST MEMORY ON BASS CHORD FINDER LEFT HOLD MUSIC STYLE ARRANGER 嘷 SOUND ARRANGER 嘷 PIANO STYLIST 嘷 ONE TOUCH PLAY 嘷 TECHNI CHORD 嘷 PANEL MEMORY 3 BANKS 8 SEQUENCER 16 TRACKS RESOLUTION ...

Страница 141: ... 40 1 USER DRUM KIT MIDI PART SETTING CONTROL MESSAGES REALTIME MESSAGES COMMON SETTING INPUT OUTPUT SETTING MIDI PRESETS MODE SETTING COMPUTER CONNECTION DISPLAY LCD PAGE CONTRAST EXIT DISPLAY HOLD OTHER PARTS TR HELP 嘷 DEMO 嘷 TERMINALS PHONES 2 LINE OUT R MONO L AUX IN R MONO L USB MIDI IN OUT PEDAL IN MIC VOLUME OUTPUT 80 W 40 W 2 SPEAKERS 14 cm 2 POWER REQUIREMENT 110 W AC120 220 230 240V 50 6...

Страница 142: ...lar to the following 2 Select MIDI The display looks similar to the following 3 Select a function 4 Follow the procedure to adjust the settings While you are adjusting the settings when the TEMPO PROGRAM indicator is lit it indicates that the TEMPO PROGRAM is available for setting the current function 5 When you have finished setting the functions press the PROGRAM MENUS button to turn it off MAIN...

Страница 143: ...Factory Servicenter or other Authorized Servicer or damage that is attributable to acts of God THERE ARE NO EXPRESS WARRANTIES EXCEPT AS LISTED UNDER LIMITED WARRANTY COVERAGE THE WARRANTOR IS NOT LIABLE FOR INCIDENTAL OR CONSEQUENTIAL DAMAGES RESULTING FROM THE USE OF THIS PRODUCT OR ARISING OUT OF ANY BREACH OF THIS WARRANTY INCLUDING WITHOUT LIMITATION LOSS OF GOODWILL PROFITS OR REVENUE LOSS O...

Страница 144: ...ENGLISH QQTG0701 Se0503S0 Matsushita Electric Industrial Co Ltd Web Site http www panasonic co jp global Printed in Japan ...

Отзывы: