Technics SLDZ1200 - SD/CD D/D TURNTABLE Скачать руководство пользователя страница 20

RQT7115

20

Changing the sound

Before use

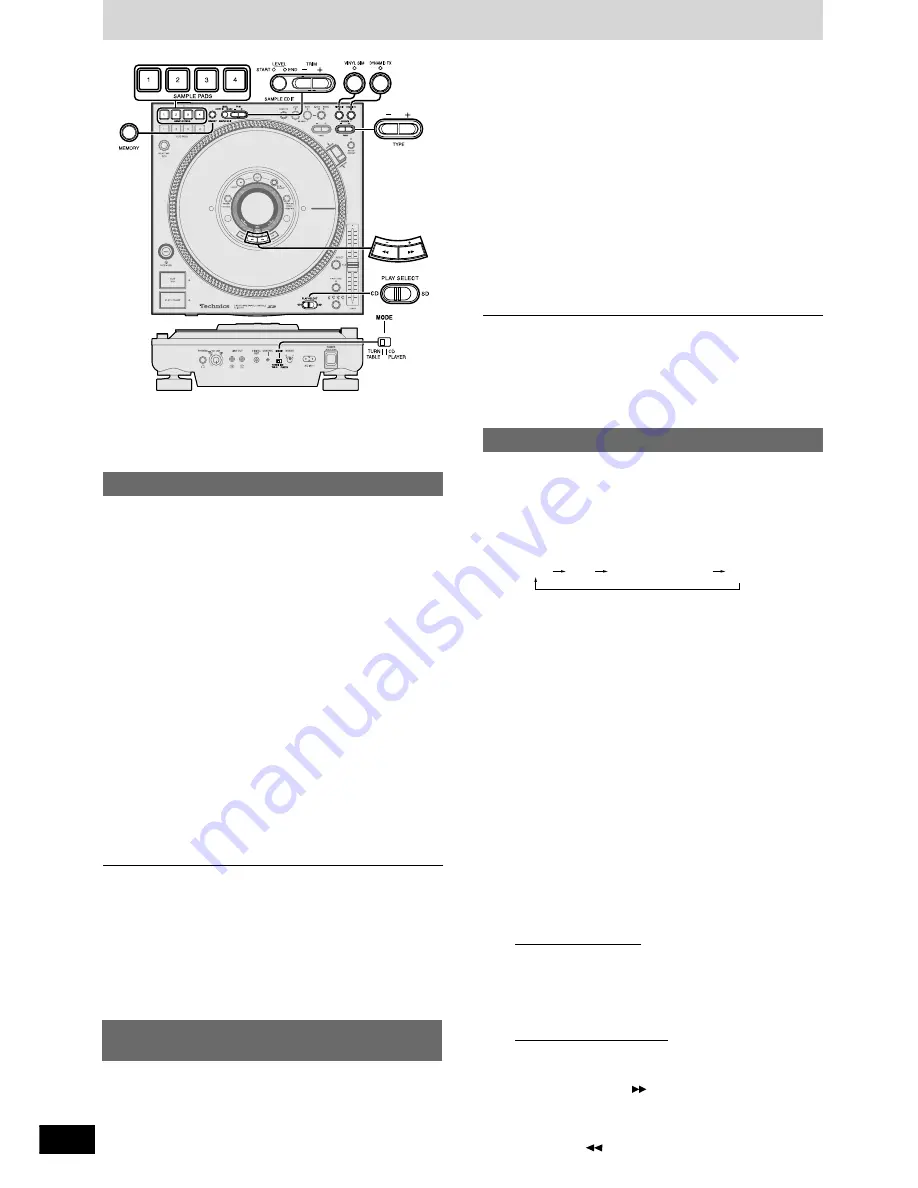
Switch [PLAY SELECT] to select the media to be used

Turn [MODE] on the rear panel to TURNTABLE

Insert the SD Memory Card or CD to be used

1

Press [VINYL SIM]

The VINYL SIM lamp lights.

During play, the sound changes to the type that has been
set.

You can change CD or SD Memory Card audio to simulate an ana-
logue turntable.

2

To select the type

Press [– + TYPE] to select the type

Analogue simulation type: TYPE 1 to TYPE 8

1 SL1200:

 Like using a SL1200 analogue turntable

2 MAKE UP:

 Like using a cartridge that emphasizes high

and low range sounds

3 WIDE RANGE:

 Like using a cartridge with wide range char-

acteristics

4 VIVID:

 Like using a cartridge with vivid characteristics

5 LOW RANGE:

 Only low range sound is output producing

a muffled sound

6 HIGH RANGE:

 Only high range sound is output producing

a crisp sound

7 OLD RADIO:

 Like listening to an old radio

8 TELEPHONE:

 Like speaking on an analogue telephone

If no buttons are pressed for more than 5 seconds, the dis-

play returns to its original state.

Changing sound to simulate analogue

This feature simulates the fine acoustic characteristics of an ana-

logue turntable’s cartridge. Depending on the external equipment
connected, the difference between analogue simulation types may
be difficult to notice.

You can use together with DYNAMIC FX.

Press [VINYL SIM] again to cancel.

The set type for each CD or SD Memory Card is stored to memory,

and the setting is restored once the set media is re-inserted.

1

Press [DYNAMIC FX]

The DYNAMIC FX lamp lights.

During play, the sound changes to the type that has been
set.

You can change the sound when using the platter slip surface.

2

To select the type

Press [– + TYPE] to select the type

Special effect types: TYPE 1 to TYPE 8

1 ONE WAY:

 Generates sound only when the platter slip

surface is operated in the forward direction.

2 TT DIST:

 Distorts the sound. The depth of the distortion

can be changed using the platter slip surface.

3 TT WAH:

 Introduces a Wah Wah effect.

4 AIR HAMMER:

 Changes the sound intermittently

5 TT PAN:

 Changes the sound image from left or right by

use of the platter slip surface.

6 AUTO PAN:

 Automatically rolls the sound image from left

or right and back.

7 CRUSH RING:

 Distorts the sound. The speed of distortion can

be changed by using the platter slip surface.

8 RING STORM:

 Sound simulates ringing of the wind.

If no buttons are pressed for more than 5 seconds, the dis-

play returns to its original state.

Change sound with combined per-
formance

Effects are different in the CD PLAYER mode, and there are also

some effect types that are not output unless the platter slip surface
is being rotated.

You can use together with VINYL SIM.

Press [DYNAMIC FX] again to cancel.

The set type for each CD or SD Memory Card is stored to memory,

and the setting is restored once the set media is re-inserted.

2

Press one of the recorded [SAMPLE
PADS 1-4]

The selected sample pad plays and the sample pad lamp
flashes.

You can edit the start point or end point and volume of data recorded
to SAMPLE PADS.

Editing the SAMPLE PADS

1

Press [SAMPLE EDIT] and select the
item to be edited

Each time you press the button:

START

END

EDIT WRITING
OK?

LEVEL
PLAY MODE SELECT

START : Beginning of data segment (START lamp indicator lights)
END

: Ending of data segment (END lamp indicator lights)

LEVEL : Volume (START and END lamp indicators light)
PLAY MODE SELECT : (When selecting the play mode)
EDIT WRITING OK?

: (Select to store to memory or not)

3

Press [– + TRIM] to change the data

Time or level appears in the display.

Smallest unit of adjustment

START, END

: 1 frame (1 sec. per 75 frames)

LEVEL

: 1 dB (–24dB to + 24 dB)

Pressing selected sample pads while editing confirms
changes.

Sound may be distorted if the LEVEL is too high.

If data is trimmed and stored, you cannot restore to the origi-

nal length.

5

Storing to memory

Press [MEMORY]

“COMPLETED” appears in the display and all sample pad
data is stored.

The selected sample pad lamp lights and the lamp of the
edit item goes out.

Not storing to memory

Press [SAMPLE EDIT] to select “EDIT
WRITING OK?”,
And press [+ 

] to select “NO” from

the display

The lamp of the selected sample pad changes to a station-

ary light, and the original data is returned.

Pressing [– 

] to select “YES” from the display will store

to memory.

4

Modifying other data

Perform steps 1-3 indicated above.

Содержание SLDZ1200 - SD/CD D/D TURNTABLE

Страница 1: ...T7115 B Direct Drive Digital Turntable EB EP Note EB on the packaging indicates the United Kingdom Before connecting operating or adjusting this prod uct please read these instructions completely Plea...

Страница 2: ...P3 albums and SD audio 22 Using with other equipment 23 Start play using the mixer s fader 23 Using two units for relay play 23 Using the amplifier and other equipment 23 Linking different tracks 24 U...

Страница 3: ...N HAZARDOUS RADIATION EXPOSURE DO NOT OPEN COVERS AND DO NOT REPAIR YOUR SELF REFER SERVICING TO QUALIFIED PERSONNEL CAUTION DO NOT INSTALL OR PLACE THIS UNIT IN A BOOKCASE BUILT IN CABINET OR IN ANOT...

Страница 4: ...et For United Kingdom EB area code model only For your safety please read the following text carefully This appliance is supplied with a moulded three pin mains plug for your safety and convenience A...

Страница 5: ...the pause state SD CARD LOAD and SAVE You can SAVE and LOAD sample pad cue point panel data etc to the SD Memory Card VINYL SIM You can simulate sound simi lar to an analogue player DYNAMIC FX You ca...

Страница 6: ...CHANGE Play direction switch REVERSE FORWARD Display angle setting function setting button DISPLAY ANGLE FUNCTION SD Memory Card access indicator SD ACCESS Normal tempo button lamp RESET Tempo pitch...

Страница 7: ...isplay angle Change display angle corresponding to position of the main unit page 11 Setup The stoppers are used to lock the platter protecting the unit from shock during shipping 1 Remove the 3 platt...

Страница 8: ...the volume using the phones VOLUME control Avoid listening for prolonged periods of time to prevent hearing damage For the United Kingdom BE SURE TO READ THE CAUTION FOR THE AC MAINS LEAD ON PAGE 4 B...

Страница 9: ...g the DJ mixer Connect to the digital input terminal on the DJ mixer or amplifier with digital input terminals using the connection cables not included SD Audio cannot be output from this unit s digit...

Страница 10: ...c Note Do not insert a disc when the power is off Do not insert 2 or more discs Do not try to insert the disc using unnecessary force that may bend the disc When the unit is loading or ejecting a disc...

Страница 11: ...return the time display to its original state When you are playing a MP3 file from a CD R or CD RW the remaining play time will not be displayed if you press REMAIN AUTO CUE When there is less than 30...

Страница 12: ...a track has been skipped or when advancing to the next song while playing the auto cue point automatically sets and pauses at the point just before audio begins skipping the null sound area at the be...

Страница 13: ...ack s audio begins Searching forward or backward During play or while paused Press and hold Hold the button to search You cannot search beyond a track with MP3 files on CD R CD RW Sounds heard when se...

Страница 14: ...nce the end of track is reached the PLAY PAUSE lamp goes out and play stops Display indicator when stopped When using CD SD Audio Total play time is displayed When using CD R CD RW MP3 files The total...

Страница 15: ...e previous track You can also use TEMPO to change the tempo page 16 Changing play with your hand Using the platter slip surface you can improvise play with the platter slip surface speed and direction...

Страница 16: ...po is at normal setting When the dots appear to be stationary the tempo setting has changed about 3 5 Note The strobo dot illuminator is a synchronized and precise frequency quartz illuminator Red LED...

Страница 17: ...becomes the cue point Make certain the platter slip surface is completely stopped 4 Press CUE STOP The CUE lamp lights the selected cue bank number reverses display and is stored in memory When the r...

Страница 18: ...loop beyond a track When setting the loop setting again perform the above steps after canceling loop play by pressing EXIT RELOOP You can also control the platter slip surface and make tempo ad justme...

Страница 19: ...ain and play begins from the start ONE SHOT STOP Plays from the start and ends once the end of play is reached During play press again and play stops LOOP Plays from the start and after reaching the e...

Страница 20: ...es the sound image from left or right by use of the platter slip surface 6 AUTO PAN Automatically rolls the sound image from left or right and back 7 CRUSH RING Distorts the sound The speed of distort...

Страница 21: ...to select DEL from the display SD DELETE screen appears in the display 2 Press EXECUTE to perform deletion Files with no data cannot be deleted Trying to delete them will result in a FILE SELECT ERROR...

Страница 22: ...begin therefore we recommend reducing the number of sessions to a minimum You cannot play a file that was recorded with packet write This unit is not compatible with HighMATTM Creating SD audio for pl...

Страница 23: ...B switch to 4 2 Push the cross fader all the way toward CH4 3 During play or while paused on unit 1 press CUE STOP Back cue 4 When you want to start play push the cross fader in the opposite direction...

Страница 24: ...ition from track A to track B is complete BPM Using with other equipment Initializing this unit s memory Unit s initialize memory function You can re initialize all memory content on this unit restori...

Страница 25: ...ng Do not place or store CDs in the following places Locations exposed to direct sunlight Humid or dusty locations Locations directly exposed to a heat vent or heating appliance In the glove compartme...

Страница 26: ...CD PLAYER mode selected Is the cue point set Is the loop in point start point set Have you inserted a SD Memory Card that already has the panel data for the corresponding media In this case the SD Mem...

Страница 27: ...he wrong file was selected You cannot format this SD Memory Card The inserted disc is unrecognizable The disc has been inserted upside down You tried to save to a SD Memory Card but there is no sample...

Страница 28: ...RQT7115 B M0304TK2054 En Matsushita Electric Industrial Co Ltd Web Site http www panasonic co jp global...

Отзывы: