


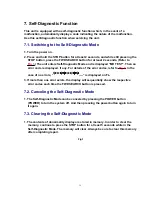


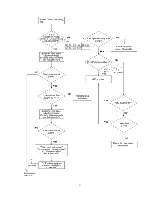


7. Self-Diagnostic Function
This unit is equipped with a self-diagnostic function which, in the event of a
malfunction, automatically display a code indicating the nature of the malfunction.
Use this self-diagnostic function when servicing the unit.
7.1. Switching to the Self-Diagnostic Mode
1. Turn the power on.
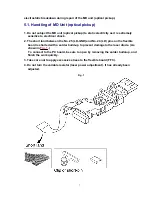
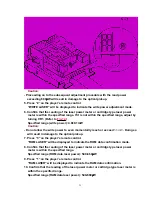
2. Press and hold the STOP button for at least 2 seconds, and while still pressing the
STOP button, press the FWD SEARCH button for at least 2 seconds. (Refer to
Fig.1
.) The unit enters Self-Diagnostic Mode and is displayed “MD TEST”. Then an
error code is displayed, if any. For details of the error codes, refer to
Fig.2
. In the
case of no errors, “
----” is displayed on FL.
3. If more than one error exists, the display will sequentially show the respective
error codes each time the FWD SEARCH button is pressed.
7.2. Canceling the Self-Diagnostic Mode
1. The Self-Diagnostic Mode can be canceled by pressing the POWER button
(POWER) to turn the system off. And then pressing the power button again to turn
it again.
7.3. Clearing the Self-Diagnostic Mode
1. The contents of abnormality display are stored in memory. In order to clear the
memory, continue to press the STOP button for at least 5 seconds while in the
Self-Diagnostic Mode. The memory will clear. Always be sure to clear this memory
after completing repair.
Fig.1
15
Содержание SJ-HD501
Страница 3: ...1 Accessories AC power supply cord 1pc Optical cable 1pc RJL1X001B05D 3...
Страница 5: ...2 Precation of Laser Diode 5...
Страница 9: ...Procedures 9...
Страница 10: ...10...
Страница 11: ...11...
Страница 12: ...12...
Страница 13: ...13...
Страница 14: ...14...
Страница 16: ...Fig 2 16...
Страница 27: ...27...
Страница 28: ...28...
Страница 29: ...29...
Страница 30: ...30...
Страница 31: ...31...
Страница 32: ...32...
Страница 33: ...33...
Страница 46: ...20 MMOD Connected to GND 46...
Страница 59: ...L4 8 RLQU2R2MT W COIL 5 59...


