


AC Power Cord Connection
To connect the power cord to your PRE50 simply plug female side of the power cord into the power
cord input which is on the rear of the unit. Then plug the male side of the power cord to an electric
outlet. The AC power cords supplied purposefully have 2 blades and one grounding prong. If your
outlet is not equipped to handle this type of plug, do not attempt to forcefully plug this AC power cord
into the outlet, and do not alter the plug so that it can fit in the outlet. The only course of action you
can take is to find another outlet which is properly equipped to handler a grounded plug or have an
electrician upgrade your electrical outlet.Be sure that the plug is well connected so that it does not
disconnect in the middle of usage. If at any point in time the supplied AC power cord is punctured or
damaged replace it with a new power cord from a local electrician.
NOTE: ONLY PLUG IN THE AC POWER CORD WHILE THE UNIT’S POWER IS OFF AND THE
VOLUME IS TURNED DOWN. TURNING ON THE UNIT WITH THE VOLUME TURNED UP MAY
CAUSE THE UNIT OR ANY SPEAKERS CONNECTED TO IT TO BE DAMAGED. ALWAYS TURN
DOWN THE VOLUME PRIOR TO TURNING OFF THE UNIT.
The active speakers should be connected via the speaker wire outputs on the rear of the PRE50.
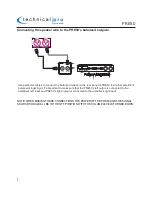
Connecting the PRE50 to Active Loudspeakers
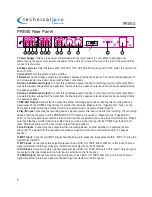
Input / Output Connections
Connecting the Signal Source to the PRE50(DVD/MIXER/MP3 etc.)
NOTE: BE SURE NOT TO CONNECT AN AMPLIFIER OR ANY AMPLIFIER SIGNAL INTO THE RCA INPUT
JACKS. AS THIS COULD DAMAGE THE PRE50. ALWAYS MAKE SURE THAT THERE IS ONLY ONE
AMPLIFIER IN THE SIGNAL PATH.
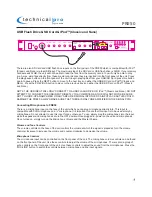
There are also input jacks for USB flash drive and SD card on the front panel of the PRE50 which is
compatible with iPod™(Classic and Nano) via the USB input. Just plug the USB flash driver,SD card or
iPod™(Classic and Nano) into their respective input jacks and set the PRE50 to the corresponding input.
Be sure that the volume of the PRE50 are turned down at first and then slowly raise the volume to prevent
damage the speakers or any of your other equipment.
The unit has three RCA input jacks on the rear of the unit which are designed to receive the signal
directly from your CD,mixer or any of your other sources.To ensure that you have correctly connected
your CD player (other sound sources) to the unit, make sure that the CD player has a RCA cord
coming from its output and that this cord is plugging into the RCA Input on the rear of the PRE50.
NOTE: WHEN MAKING THESE CONNECTIONS THE POWER OF THE PRE50 AND THE SIGNAL SOURCE
SHOULD ALL BE IN THE OFF POSITION WITH THE VOLUME LEVELS TURNED DOWN. ONCE THE UNITS
ARE ALL POWERED ON, SLOWLY INCREASE THE VOLUME TO AVOID DAMAGING ANY OF YOUR
EQUIPMENT.
Power Cord, MP3 Cable, User Manual, Warranty, Catalog.
Accessories
PRE50
iPod™ & iPhone™ are registered trademarks of Apple Computers, Inc. Apple Computers, Inc. is not endorsing, sponsoring, or otherwise affiliated with this manufacturer.


