background image

PASOS

STEPS

STEPS

1

6PCS

6X35 MM

A

1

2

2

2PCS

6X35 MM

A

6PCS

6X40 MM

B

C

16PCS

3X20 MM

2

3

4

4

1

6

6

5

5

1

5

5

6

2

2

6

10

10

Using Screws (A) , fix the Bottom Side 
Panels (2) to the Bottom Panel (1).
Make sure that on panel (1) the side with holes 
in the middle is facing down.

Using Screws (A) , fix the Bottom Side 
Panels (2) to the Bottom Panel (1).
Make sure that on panel (1) the side with holes 
in the middle is facing down.
Use Tornillos (A) para fijar los Paneles 
Laterales inferiores (2) al Panel Inferior (1). 
Aseg rese que en panel (1) el lado con los 
hoyos en el medio quede mirando hacia 
abajo.

ú

Using Screws (A) , fix the Back 
Panel (4) to the Bottom Panel (1).

Using Screws (A) , fix the Back 
Panel (4) to the Bottom Panel (1).

Use Tornillos (A) para fijar el Panel 
Posterior (4) al Panel Inferior (1).

Insert Bolts (B) on the back of the Top Panels (5) and secure them with
the screwdriver (E). Place the Upper Side Panels (6) over the Bolts (B) and
secure them tightening the connecting piece in the Upper Side Panels (6).

Insert Bolts (B) on the back of the Top Panels (5) and secure them with
the screwdriver (E). Place the Upper Side Panels (6) over the Bolts (B) and
secure them tightening the connecting piece in the Upper Side Panels (6).

Inserte los Pernos de Ajuste (B) en los agujeros de la cara 
posterior de los Paneles 
Superiores (5) y ajustelos
bien, luego ensamble los 
Paneles Laterales 
Superiores (6) sobre los 
Pernos de Ajuste y apriete 
los conectores en los lados 
de los Paneles Laterales (6).

Take the completed Bottom Panel (1) and both Top Panels (5) 
and place them together side by side as illustrated above. Use
Screws (C) to secure both sides with Hinges (10). 

Take the completed Bottom Panel (1) and both Top Panels (5) 
and place them together side by side as illustrated above. Use
Screws (C) to secure both sides with Hinges (10). 

Coloque los Paneles de los Pasos 2 y 3, como lo muestra la figura,
de forma tal que los paneles Laterales superiores e inferiores(2 y 6) 
queden uno al lado del orto. Luego,  use Tornillos (C) para fijar las 
Bisagras (10) en  los Paneles Laterales inferiores y Superiores (2 y 6)

TORNILLOS

SCREWS 

SCREWS 

TORNILLOS

SCREWS 

SCREWS 

TORNILLOS

BOLTS 

BOLTS 

PERNOS

SCREWS 

SCREWS 

TORNILLOS

RTA-SIB006

P.5

Содержание RTA-SIB006

Страница 1: ...aces or structural tubes ASSEMBLY INSTRUCTION ASSEMBLY INSTRUCTION MOBILE LAPTOP CART STORAGE MOBILE LAPTOP CART STORAGE Thanks for purchasing one of our products please read carefully the assembly instructions before the installation Attention Do not tighten the screws before all screws are in place Thanks for purchasing one of our products please read carefully the assembly instructions before t...

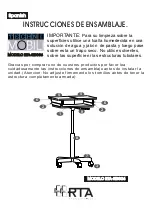
Страница 2: ...ornillos antes de tener la estructura completamente armada MODELO RTA SIB006 MODELO RTA SIB006 IMPORTANTE Para su limpieza sobre la superficies utilice una toalla humedecida en una soluci n de agua y jab n de pasta y luego pase sobre esta un trapo seco No utilice solventes sobre las superficie ni las estructuras tubulares ó ó MODELO RTA SIB006 MODELO RTA SIB006 Spanish Spanish 5 5 2 6 1 8 7 9 2 6 ...

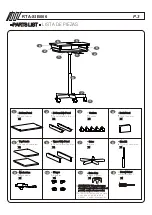
Страница 3: ...e Gas Lift Gas Lift Cilindro Pneumatico Mechanism Mechanism Mecanismo Hinges Hinges Bisagras Base Cap Base Cap Base Support 5 5 2 6 1 8 7 9 2 6 3 E Screw Driver Screw Driver Destornillador ATTENTION This part comes already inserted in the middle of part 7 and is of same color ATTENTION This part comes already inserted in the middle of part 7 and is of same color ATENCION Esta parte ya viene coloca...

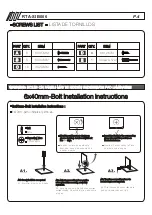
Страница 4: ...pieza de ajuste este desviada debe alinearla antes de insertar el perno Inserte el Perno cuando la Pieza de ajuste este alineada 6x40mm Bolt Installation Instructions 6x40mm Bolt Installation Instructions E E Screw Driver RTA SIB006 P 4 WARNING HOLES ON PANELS MAY BE HIDDEN UNDERNEATH PVC LAMINATE WARNING HOLES ON PANELS MAY BE HIDDEN UNDERNEATH PVC LAMINATE A1 Screw bolt into one panel A1 Screw b...

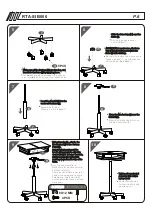
Страница 5: ...Insert Bolts B on the back of the Top Panels 5 and secure them with the screwdriver E Place the Upper Side Panels 6 over the Bolts B and secure them tightening the connecting piece in the Upper Side Panels 6 Inserte los Pernos de Ajuste B en los agujeros de la cara posterior de los Paneles Superiores 5 y ajustelos bien luego ensamble los Paneles Laterales Superiores 6 sobre los Pernos de Ajuste y ...

Страница 6: ...s D attach the Mechanism 9 to the Bottom Panel 1 Use Tornillos D para fijar el Mecanismo 9 a la cara posterior del Panel Inferior 1 Height Adjustment push the handle 9 upwards to adjust to desired height To lower the table pull the handle 9 again while pushing down from the top of the table Height Adjustment push the handle 9 upwards to adjust to desired height To lower the table pull the handle 9...

Страница 7: ... colocar objetos sobre las superficies DIMENSIONS DIMENSIONS MAXIMUM WEIGHT CAPACITIES MAXIMUM WEIGHT CAPACITIES Product Size Product Size DO NOT exceed this limit Please use care and good judgement when placing objects on this product DO NOT exceed this limit Please use care and good judgement when placing objects on this product ...

Страница 8: ......

Страница 9: ...ded hereunder is in lieu of any and all other warranties express or implied including without limitations any implied warranty or merchantability or of fitness for a particular purpose Please note all desks made with PVC Laminate surface should not be exposed to direct sunlight as it may damage the material Damage of this nature is not covered under this warranty RTA Products will not be responsib...

Отзывы: