6
EN
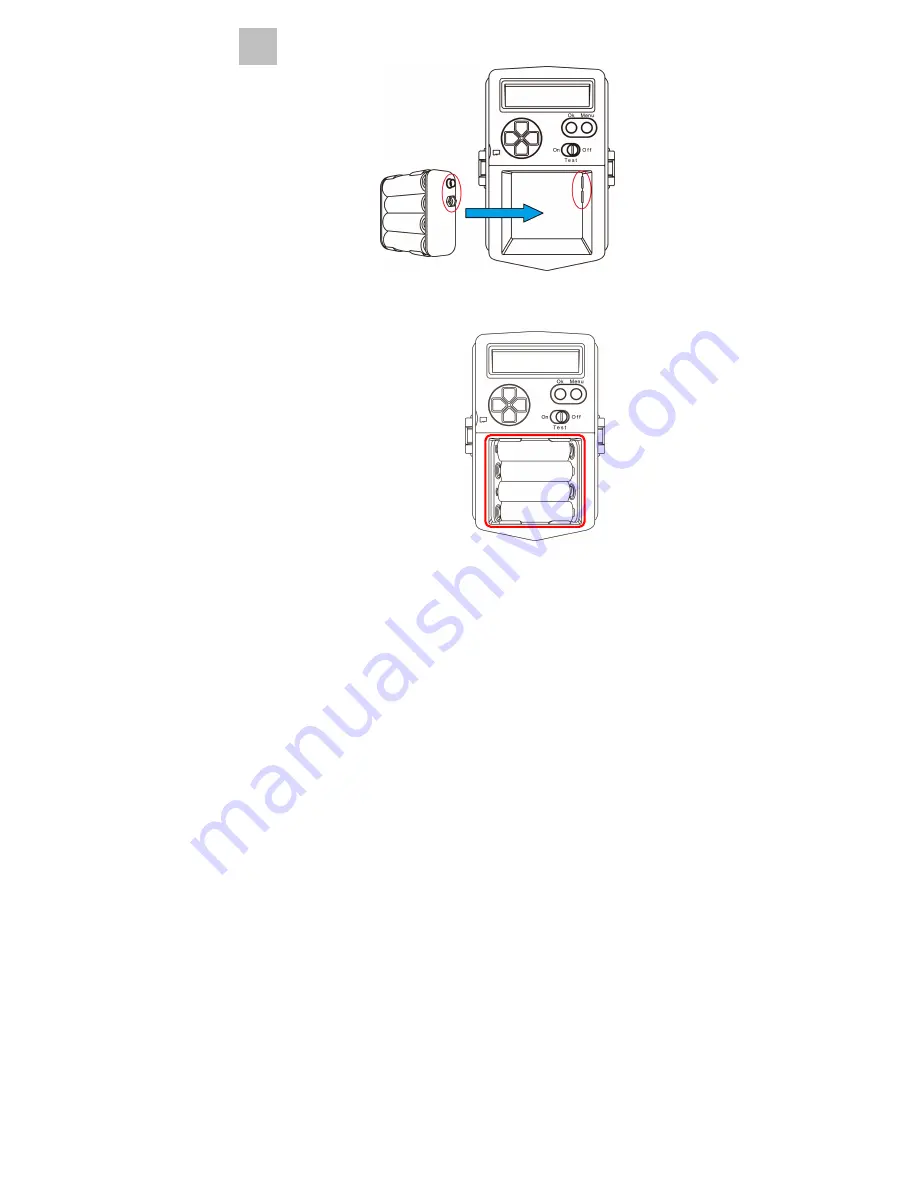
6. Put the Battery Box into the Battery Room of the
camera and make sure to observe correct polarity.
7. Press the Battery Box to the end of the Battery Room.
Make sure the Battery Box has fixed in the Battery Room.
Страница 1: ...43 14 cent minute from German fixed line and 42 cent minute from mobile networks Free Email support technaxx de Features Security camera for indoor and outdoor use Ideal for viewing wild animals and f...
Страница 2: ...ew 3 3 Basic Camera Operation 4 Installing Batteries and MicroSD Card 5 Power On 7 3 Operation Mode 8 PIR Photo 9 PIR Video 11 Time Lapse 14 5 Setting 16 6 TEST Mode 22 7 Surveillance Mode 24 8 Playba...
Страница 3: ...D ATi Radeon 9200 or above DirectX 9 0 or higher Windows XP SP2 or higher Windows Vista Windows 7 Windows 8 Note If your system is Windows XP Service Pack I please go to www microsoft com It s free to...
Страница 4: ...3 EN 2 Getting to know your camera Part Names Front View Rear View...
Страница 5: ...4 EN 3 Basic Camera Operation Installing Batteries and SD Card 1 Release 2 Fastener Locks of the camera 2 Than take out the Rear Cover...
Страница 6: ...e MicroSD card Be sure to observe the correct polarity with clipped corner on the card to the right All the pictures and videos will be saved in the memory card 5 Install 8 brand new alkaline AA cell...
Страница 7: ...ut the Battery Box into the Battery Room of the camera and make sure to observe correct polarity 7 Press the Battery Box to the end of the Battery Room Make sure the Battery Box has fixed in the Batte...
Страница 8: ...Slide the Power Switch to ON in the left side 2 It will initial the camera system Wait until the LCD display the default mode on the preview screen 3 Slide the Power Switch to the right side to turn...
Страница 9: ...de Define use which operation mode to record image 1 Power On the camera 2 Press the Menu button to enter the Main Menu 3 Use the Up Down key and change the Menu to Operation Mode Operation Mode defau...
Страница 10: ...Use Up Down Keys to change the operation mode to PIR PHOTO then press OK Button again PIR PHOTO default PIR VIDEO TIME LAPSE 3 Use Up Down Keys to change settings of PIR PHOTO 4 Press the Menu Button...
Страница 11: ...0 5MP BEST 8 0MP interpolated PHOTO DELAY Define how longer of the interval time to active the PIR sensor The PIR sensor only activate after the end of the interval time These settings are amount of t...
Страница 12: ...continuous shoot SINGLE default 9 PHOTOS 8 PHOTOS 2 PHOTOS PIR VIDEO 1 In OPERATION MODE menu press the OK Button then the mode item is blinking 2 Use Up Down Keys to change the operation mode to PIR...
Страница 13: ...20 X 480 VIDEO LENGTH Define the time length of video record for each clip The camera will record a video clip and start to countdown when the PIR sensor has detected a moving object Then stop record...
Страница 14: ...e another video The delay time of PIR sensor will recount after the video record finish For example The Rec Time is 15 seconds and PIR delay time is 30 seconds 5S default 30M 10M 5M 1M 30S 15S 10S REC...
Страница 15: ...eration mode to TIME LAPSE then press OK Button again T L QUALITY Set the resolution of time lapse picture The higher resolution can provide high quality picture But it needs more memory space to save...
Страница 16: ...e one by one after every 15 seconds automatic until the memory full or battery power empty or terminate it by manual For example Time Lapse is 15s 5S default 1S 30M 10M 5M 1M 59S 6S Example 4GB 750 pi...
Страница 17: ...16 EN 5 Setting For change all default settings if need 1 Power On the camera 2 Press the Menu button to enter the Main Menu 3 Use the Up Down keys and change the Menu to Setting...
Страница 18: ...M D Y SETUP TIME Adjust the current time Use the Up Down keys to adjust the number and use the Left Right keys to shift next item HR mm ss 12HR 10 50PM default 24HR 22 50 TIME START Set the working t...
Страница 19: ...o only in the daytime night or all day The daytime or night was determined by the light sensor of the camera OFF default NIGHT ONLY DAY ONLY CAMERA NAME Define a name for your camera If you have over...
Страница 20: ...the record date time and some other information from the picture directly ON default OFF Temperature Record the temperature during this picture taken Camera Name Define an index name for this camera...
Страница 21: ...pful to search the animals Capture Time Record the time information when this picture taken Capture Date Record the date information when this picture taken LANGUAGE Select a language version for the...
Страница 22: ...in the hard disk or other storage device before format it 2 Strong recommend to format the memory card FAT32 before reuse your camera which can make sure every data can be saved normally RESET Restore...
Страница 23: ...wn keys and change the Menu to Version 4 The firmware version show on the screen 6 TEST Mode Before use the camera Make sure the PIR sensor work normally Test its sensitivity and a correct detection z...
Страница 24: ...23 EN 1 Slide the Power Switch to TEST position 2 Close the rear cover 3 Lock Fastener Locks completely then fix the camerawhere you want to monitor...
Страница 25: ...sensor has detected you Using this method you can accurately position your camera as desired Note This TEST LED does not illuminate in Surveillance mode 7 Surveillance Mode When all settings of the ca...
Страница 26: ...lay Time Counter 4 Before the delay time countdown completely and enter the Surveillance Mode You can press the OK button to take picture record video manually 5 At the last 2 seconds of the countdown...
Страница 27: ...26 EN 8 Playback Download 1 Release 2 Fastener Locks of the camera 2 Than take out the Rear Cover 3 Make sure the Power Switch of the camera is Off...
Страница 28: ...VI which can be played by Windows Media PlayerTM with PC Windows 7 The videos can be viewed by the built in Windows Media Player TM or QuickTime TM Windows XP The videos can be viewed by the Windows M...
Страница 29: ...o File Format AVI Still Picture 0 5M 1024x576 2M 1920x1080 5M 3072x1728 by interpolation 8M 3840x2160 by interpolation Picture File Format JPG Audio Input Built in MIC Photo Flash Type High Power IR L...
Страница 30: ...OT SINGLE default 9 PHOTOS 8 PHOTOS 2 PHOTOS PIR VIDEO VIDEO QUALITY 1280 X 720 default 720 X 480 VIDEO LENGTH 10 S default 5 S 2 M 1 M 30 S 20 S VIDEO DELAY 5 S default 30 M 10 M 5 M 1 M 30 S 15 S 10...
Страница 31: ...E START 06 00PM TIME STOP 18 00PM TIME SHOT OFF default NIGHT ONLY DAY ONLY CAMERA NAME TECHNAXX INFO BAR ON default OFF LANGUAGE ENG default TEMP UNIT F default C ERASE ALL NO default YES DELETEING R...
Страница 32: ...ight polarity and of batteries Always change all batteries Never use old and new batteries or batteries of different types together Never short open deform or load up batteries Risk of injury Never th...