


3
4A
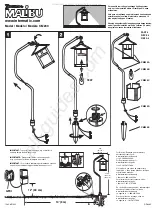
Remove the two socket head screws and O-rings using
the proved Allen wrench to access the locking set screw.
Make sure to only loosen the two set screws marked by
padlock symbol.
Loosen (do not remove) the locking set screw on each
side of the fixture head with the provided Allen wrench.
1
Adjust the Fixture Head
2
ALLEN
WRENCH
SOCKET CAP
SCREW & O-RING
LOCKING
SET SCREW
Adjust the fixture head to the desired position and re-
tighten the set screws to secure in place.
NOTE: Maximum rotation of the fixture head is 300º.
Re-install the O-rings and socket cap screws (reversal of
step 1).
3
4
4B
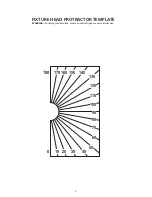
5A
Use the following instructions along with the provided
template to adjust multiple fixtures to the same angle:
1
Adjust Multiple Fixture Heads
Insert the template in between the head and fixture,
then align the template edge with the fixture edge.
Adjust the head to the desired angle and take note of
the angle using the locking set screw as a guide in
reference to the template.
Adjust the other fixtures to the same angle using the
template and locking set screw as a point of
reference.
a
b
c
TEMPLATE
LOCKING
SET SCREW
A
B
C
TEMPLATE