background image

E6-1

6. INSTALLATION PROCEDURE

ENGLISH VERSION EO1-33016

6. INSTALLATION PROCEDURE

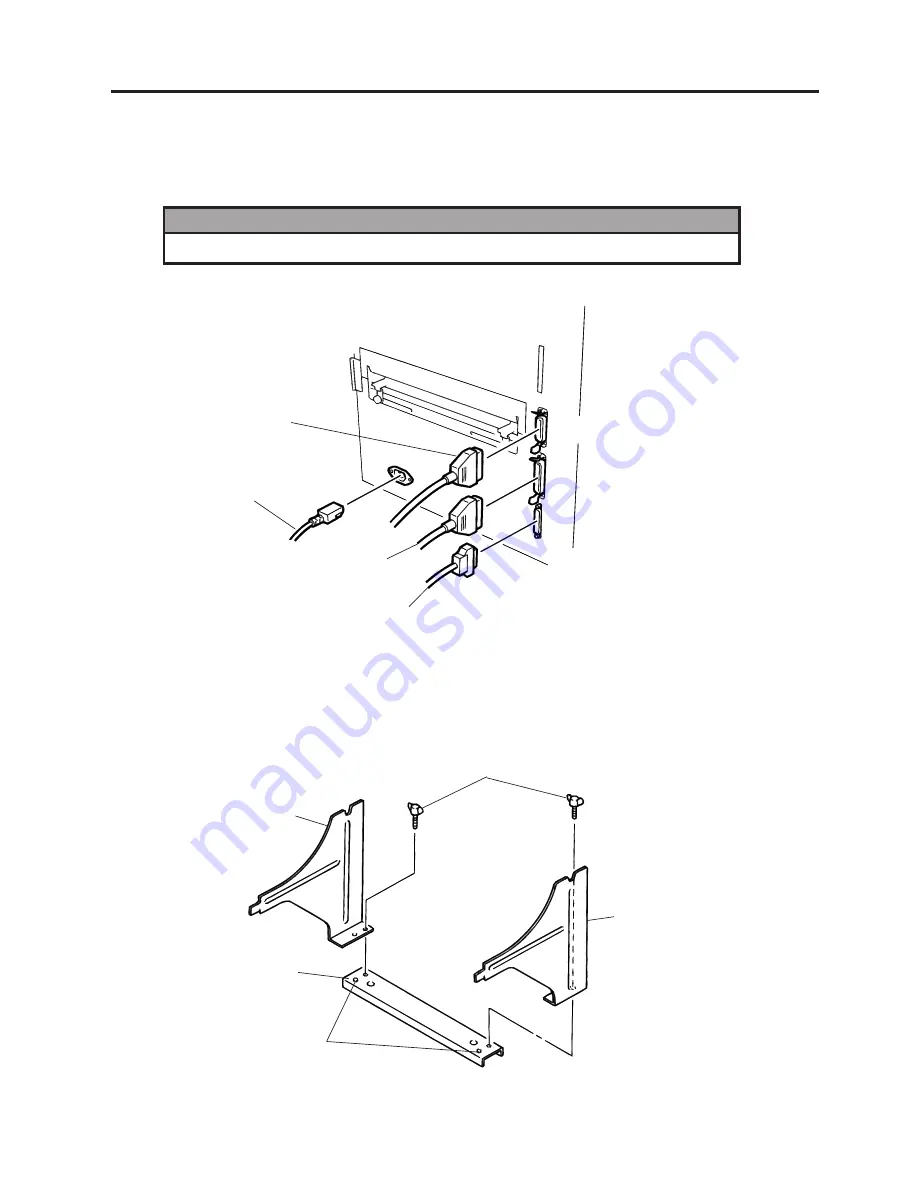
6.1 CONNECTING THE POWER CORD AND CABLES

6.1 CONNECTING THE POWER CORD AND CABLES

Fig. 6-2

NOTES:

Different cables cannot be used at the same time.

6.2 HOLDER STAND INSTALLATION

Fit the left and right side holders into the dowels of the holder base and fasten the side holders to the
holder base with the thumbscrews.

Left Side Holder

Thumbscrew

Right Side Holder

Dowel

Holder Base

WARNING!

Turn the POWER SWITCH to OFF before connecting the power cord or cables.

Fig. 6-1

Expansion I/O Cable

Parallel I/F Cable
(Centronics)

Serial I/F Cable (RS-232C)

Power Cord

Содержание TEC B-670 SERIES

Страница 1: ...TEC Thermal Printer B 670 SERIES Owner s Manual...

Страница 2: ...ssly approved by manufacturer for compliance could void the user s authority to operate the equipment WARNING This is a Class A product In a domestic environment this product may cause radio interfere...

Страница 3: ...to this indication Prohibited Do not plug in or unplug the power cord plug with wet hands as this may cause electric shock Do not place metal objects or water filled containers such as flower vases f...

Страница 4: ...per and ribbons DO NOT STORE the paper or ribbons where they might be exposed to direct sunlight high tem peratures high humidity dust or gas Ensure the printer is operated on a level surface Any data...

Страница 5: ...12 GENERAL MAINTENANCE E12 1 12 1 CLEANING E12 1 12 2 UNDER THE MEDIA GUIDES E12 3 12 3 COVERS AND PANELS E12 3 12 4 REMOVING JAMMED MEDIA E12 4 12 5 THRESHOLD SETTING E12 6 13 TROUBLESHOOTING E13 1 P...

Страница 6: ...nter This new generation high performance quality printer is equipped with the latest hardware including the newly developed high density 12 dot mm 305 dot inch edge print head This will allow very cl...

Страница 7: ...t width 170 6 mm 6 72 inches Dispensing modes Batch Continuous Strip On demand and Cut modes Bothcutandstripmodesareavailableonlywhentheirrespectivemodules are fitted Message display 20 characters x 1...

Страница 8: ...nd PC This module strips the label from the backing paper with the take up block and strip block AflashROMcard 1MBand4MB forstoringlogos writable characters and formats Option Name Cutter module High...

Страница 9: ...swiderthanmediaby5mmormore However too much difference in width between the two may cause wrinkles 5 When the print speed is 8 sec the width will be 115 to 160 mm Type Spool type Width 115 mm 185 mm S...

Страница 10: ...hts when a communication error occurs when the media ribbon ends or the printer does not operate correctly FEED Key Feeds paper RESTART Key Resets the printer when paused or when an error occurs Used...

Страница 11: ...u p t u o s i F F O X o N S T R Y S U B Y D A E R e m i t n o r e w o p e h t t a t u p t u o s i N O X o N e m i t f f o r e w o p e h t t a t u p t u o s i F F O o N F F O N O Y S U B Y D A E R F F...

Страница 12: ...be tied to power line conduits RS 232C Cable description The serial data cable used to connect the printer to the host computer should be one of the following two types NOTE Use the RS 232C cable whi...

Страница 13: ...same time 6 2 HOLDER STAND INSTALLATION Fit the left and right side holders into the dowels of the holder base and fasten the side holders to the holder base with the thumbscrews Left Side Holder Thum...

Страница 14: ...paper OPEN Ribbon media replacement 3 As Fig 7 2 shows unroll and loosen the ribbon a little 4 Insert the ribbon under the print block so that the ribbon supply end is positioned backside of the prin...

Страница 15: ...7 If the ribbon wrinkles while printing move the ribbon levers back or forth until the wrinkle is removed Protrusion Ribbon Core Notch Ribbon Ribbon Lever STEP 1 STEP 2 Spring Guide Wheel Guide Wheel...

Страница 16: ...older Holder Shaft Media Holder Holder Shaft Lock Lever Media Lock Lever Release Lock CAUTION DO NOT MOVE the Media Guides using the screw 1 Install the holder stand on the rear of the printer 2 Loose...

Страница 17: ...in the bushes of the Holder Shaft into notches of the Holder Stand securely 6 The black mark feed gap sensor is selectable between the fixed type and the movable type by changing the DIP switch Refer...

Страница 18: ...dia back on it s self and feed it under the print head past the sensor so that the black mark can be seen from above 2 Adjust the sensor position to that of the black mark the upper hole indicates the...

Страница 19: ...fitted load the media as standard and feed it through the cutter module NOTES 1 Be sure to cut the backing paper of label Cutting label will cause the glue to stick to the cutter which may affect the...

Страница 20: ...e strip roller and the backing paper holder After taking up any slack of the media set the backing paper release bar in position Fig 8 8 Media Backing Paper Backing Paper Holder Backing Paper Release...

Страница 21: ...by wiping it with a wet cloth or storing it in a damp place 5 Before inserting or removing the card make sure that the power switch is turned off 6 The following flash cards can be used The 1MB card i...

Страница 22: ...emperature high humidity dust or gas The thermal paper used for direct thermal printing must not have the specifications which exceed Na 800 ppm K 250 ppm and CL 500 ppm Some ink used on pre printed l...

Страница 23: ...the high quality and performance of your printer it should be regularly cleaned The greater the usage of the printer the more frequent the cleaning i e low usage weekly high usage daily 1 Turn the po...

Страница 24: ...lingtheribbonendsensorplate besuretofitbothstudsinthenotchesoftheribbon end sensor plate 9 Remove the pinch roller block then clean the roller belt and feed roller with cloth moistened by alcohol Fig...

Страница 25: ...cleaned by wiping with a dry cloth or a cloth slightly dampened with a mild detergent solution NOTE Clean printer cover with an electrostatic free cleaner for automated office equipment Screw Media G...

Страница 26: ...the jammed media DO NOT USE any sharp implement or tool as these could damage the printer 7 Clean the print head and platen then remove any further dust or foreign substances 8 Place the portion of th...

Страница 27: ...unit 1 Lower the backing paper release bar to remove the jammed media 2 Clean the strip roller and backing paper holder with ethyl alcohol White Screw Cutter Unit Swing Cutter Media Guide Screw Fixed...

Страница 28: ...tly even when using pre printed labels 6 If the printer continues to print out of position after setting the threshold adjust the feed gap sensor in the system mode Reset the threshold again Make sure...

Страница 29: ...RESTART key Load a new ribbon Press the RESTART key Problem 1 The media is not fitted correctly 2 The media path is jammed and does not feed smoothly 3 The installed media type does not match the sel...

Страница 30: ...A card and retry 3 Turn the power off and contact your Authorized Service representative Replace the card with a new one and re send data In case of flash memory card only 1MB and 4MB cards can be use...

Страница 31: ...vice representative if necessary 1 Clean the cutter blades 2 The blades are worn Call your Authorized Service representative Problem No print Dots missing in the print Unclear or blurred printing Powe...

Страница 32: ......

Страница 33: ......

Страница 34: ...PRINTED IN JAPAN EO1 33016 E...

Отзывы: