


44
41
27
31
48
42
28
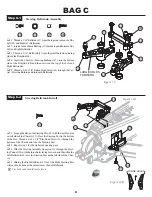
Step C-1
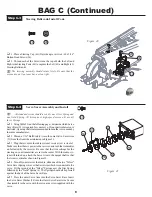
Step C-2
Figure 18
Figure 19A
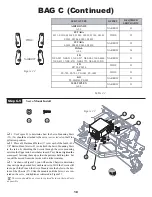
BAG C
8
43
31
Figure 19B
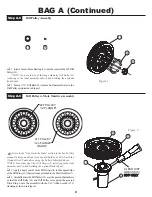
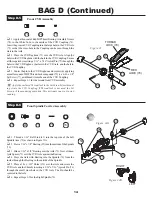
Steering Bellcrank Assembly
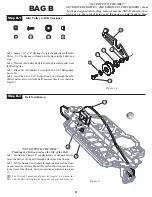
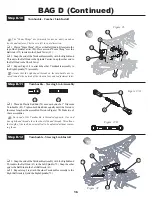
Steering Bellcrank Install
13
LARGE HOLES
q
1. Thread a 3/16" Ballstud (43), from the top side, into each of the
Left (42) and Right (41) Bellcranks.
q
2. Insert a 5mm x 8mm Bearing (13) into the top and bottom of the
Left and Right Bellcranks.
q
3.Thread a 3/16" Ball Stud (43) into the small hole from the top
side of the Draglink (48).
q
4. Insert the 2 Carrier / Steering bushings (47), into the bottom
side of the Draglink (48) and then rest it on the top of the Left and
Right Bellcranks.
q
5. Thread a 4-40 x 3/8" Button Head Screw (49) through the Car-
rier / Steering Bushing and into each Bellcrank.
41
42
13
43
LARGE HOLES
FORWARD
48
47
43
49
47
49
q
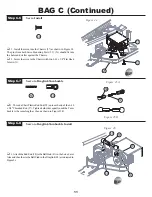
1. Line up the Hex on the Steering Post (44) with the rear Hex area
on left side of the Chassis (27). Press the Steering Post to the bottom
of the Hex. Thread a 4-40 x 3/8" Flat Head Screw (31) through the
bottom of the Chassis and into the Steering Post.
q
2. Repeat step 1 for the right side steering post.
q
3. Slide the Steering Assembly from step C-1 through the Steer-
ing Tunnel (28) with the large holes facing forward, and then slide the
Left Bellcrank (41) over the Steering Post on the left side of the Chas-
sis.
q
4. Sliding the Right Bellcrank (42) over the Right Steering Post
will need to be done at the same time as the Left Bellcrank.
The bellcrank should rotate freely.