7
TKG GRB 1006
ASSEMBLY
1.
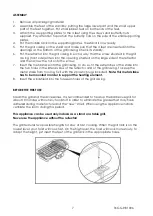
Remove all packaging material.
2.
Assemble the feet of the stand by putting the large lower part and the small upper
part of the feet together. Put small rubber feet on both ends of the feet.
3.
Attach the 4 supporting plates to the 4 feet using the screws and butterfly nuts
supplied. Pay attention to position the butterfly nuts on the side of the small supporting
plates.
4.
Put the middle rack on the supporting plates. The stand is now ready.
5.
Put the grill casing on the stand and make sure that the 4 feet are inserted into the
openings at the bottom of the grill casing. Check its stability.
6.
Put the reflector into the grill casing in such a way that the screw situated in the grill
casing (front side) enters into the opening situated on the large side of the reflector,
and then screw the nut onto the screw.
7.
Insert the metal stake into the grill casing. To do so, fit the extremities of the stake into
the two holes in the lateral sides of the reflector
and of the grill casing. To keep the
metal stake from moving, fix it with the 2 plastic plugs included.
Note: this metal stake
has to be mounted in order to support the heating element.
8.
Insert the windshield into the foreseen holes of the grill casing.
BEFORE THE FIRST USE
Clean the grill and the accessories. It is recommended to heat up the barbecue grill for
about 10 minutes without any foodstuff in order to eliminate the grease that may have
adhered during ma
nufacture and the “new”
smell. When using the appliance indoors,
ventilate the room during this period.
This appliance can be used only indoors as a stand or a table grill.
Never use the appliance without the reflector!
The grill features two possible heights for slow or fast cooking. When the grill rack is on the
lowest level, your food will cook fast. On the high level, the food will cook more slowly. To
adapt the height, just insert the feet of the grill rack in the appropriate holes.


