2023.10.03
•
Blinking Blue: Mute
•
Solid Red: 10% Battery Remaining
•
Blinking Red: 5% Battery Remaining
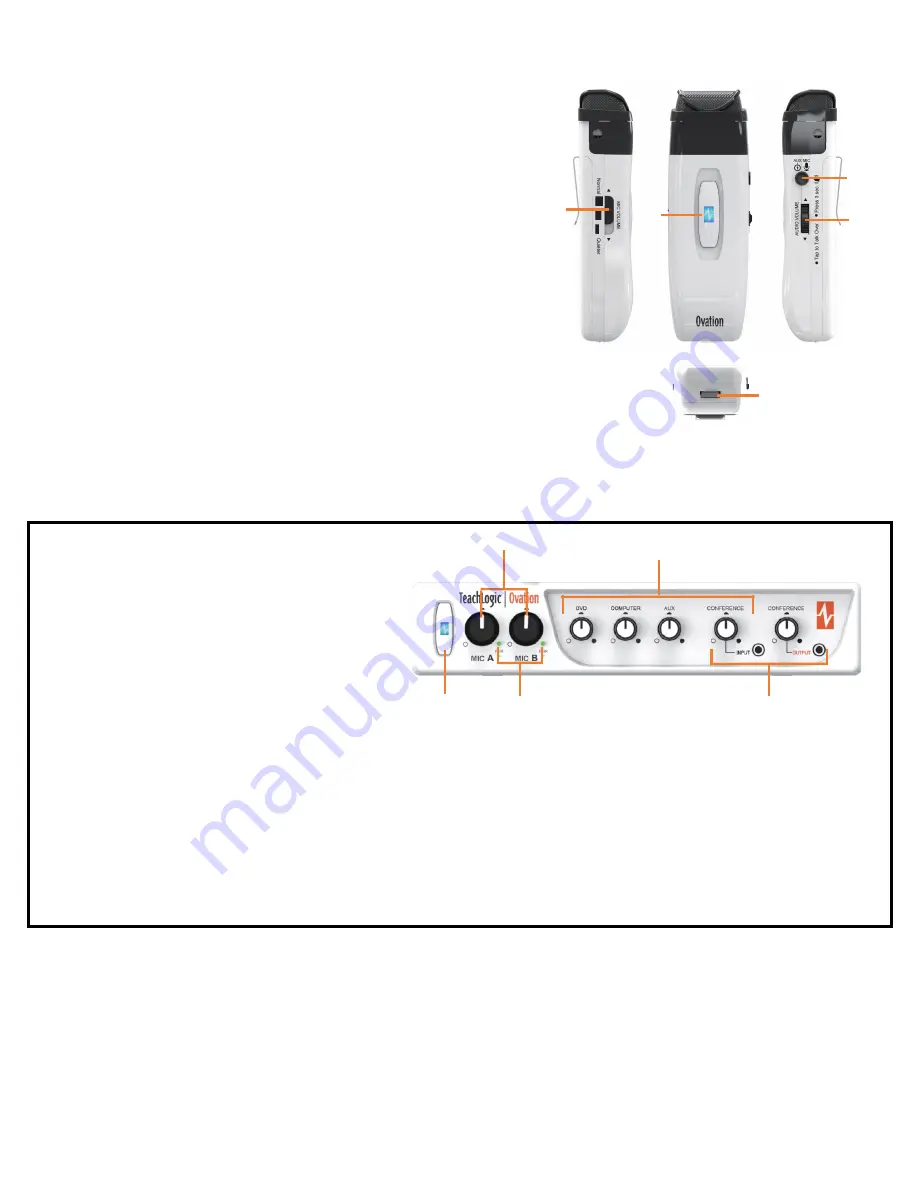
STEP 4. USING THE OVATION
™
PENDANT MICROPHONE
1. Status Indicator LED
•
No Light: OFF
•
Solid Blue: ON and Connected
•
Solid Yellow: ON and Unpaired
•
Fast Blinking Green: Pairing Mode
2. Logo Button for Power and Muting
•
To turn mic ON tap power button, to turn OFF press and hold for 3 seconds.
•
Mute Microphone: Tap power button once (blinking blue).
•
Unmute Microphone: Tap power button again (solid blue).
3. Aux Input:
Connects devices (like music player) to microphone.
4. Audio Volume Switch:
Changes volume of devices plugged into amp inputs
•
To increase/decrease volume level: Slide button up or down
•
To immediately quiet volume level of external device: Push button once
•
To resume volume level of external device: Push button again
5. Activate Security Alert Feature (when enabled)
•
Hold Audio Volume Switch down for 3 seconds. Microphone LED will flash green 3 times indicating
its successful alert.
6. Mic Volume Switch
•
You may increase/reduce the volume to accommodate changes in room noise.
•
There are 3 levels to adjust your microphone volume: Normal | Quiet | Quieter
7. USB Charge Port
(found on the bottom of the mic)
•
Uses micro
-
USB charging cable
3
4,5
2
1
6
7
Bottom View
STEP 5. USING THE OA
-
50 AMPLIFIER
1
.
Power Button & Status Indicator LED
•
To turn OA
-
50 ON or OFF, press power button once
•
To put OA
-
50 into STANDBY mode, double tap the power button; it
will automatically enter standby mode after 2 hours of no use and
automatically exit standby when next used
•
Red: OFF
•
Blue: ON and Activated
•
Blue Slow Blinking: STANDBY
2. Mic Volume Control
•
Controls volume of MIC A and MIC B.
•
Turn clockwise to increase volume and counter
-
clockwise to
decrease
3. MIC A and MIC B Pairing Buttons & LEDs
•
Green light: Microphone is paired and connected
•
Press and hold pairing button for 3 seconds to enter pairing mode,
light will fast blink green when in pairing mode
4. Input Volume Controls
•
Knob controls the volume of each corresponding connected external device
5. Conference Input & Output Volume Control & Jacks
•
Use one input + one output to connect to computer for video conferencing
•
Knob controls the volume of each corresponding connected external device
•
The conference output may also be used to connect devices for recording
lessons or for assistive listening systems
1
3
4
5
2
TROUBLESHOOTING
1. System is turned on but there is no LED indicator light
•
Check if system has been unplugged.
•
Verify that electrical outlet is generating power.
2. System has power (LED indicator blue) but no sound
•
Make sure microphone is on and connected (Solid Blue).
•
Ensure the mic pairing button light is illuminated solid green.
3. Voice is distorted or sound drops
•
Ensure amp and antenna are placed waist height or above and
antenna is not blocked by any metal or thick objects.
•
Avoid covering mic with hands.
4. Receiver does not
“
wake up
”
from standby
•
Volume of external device may be too low when played.
•
Microphone not on or not paired.
5. Knobs on front of amp do not change the volume of inputs
•
Check back of amp to ensure the RS
-
232 switch is in the
“
OFF
”
position unless using external RS
-
232 controller.
(2)


