background image

EN

G

LI

SH

5

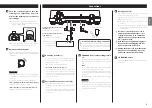
Connections

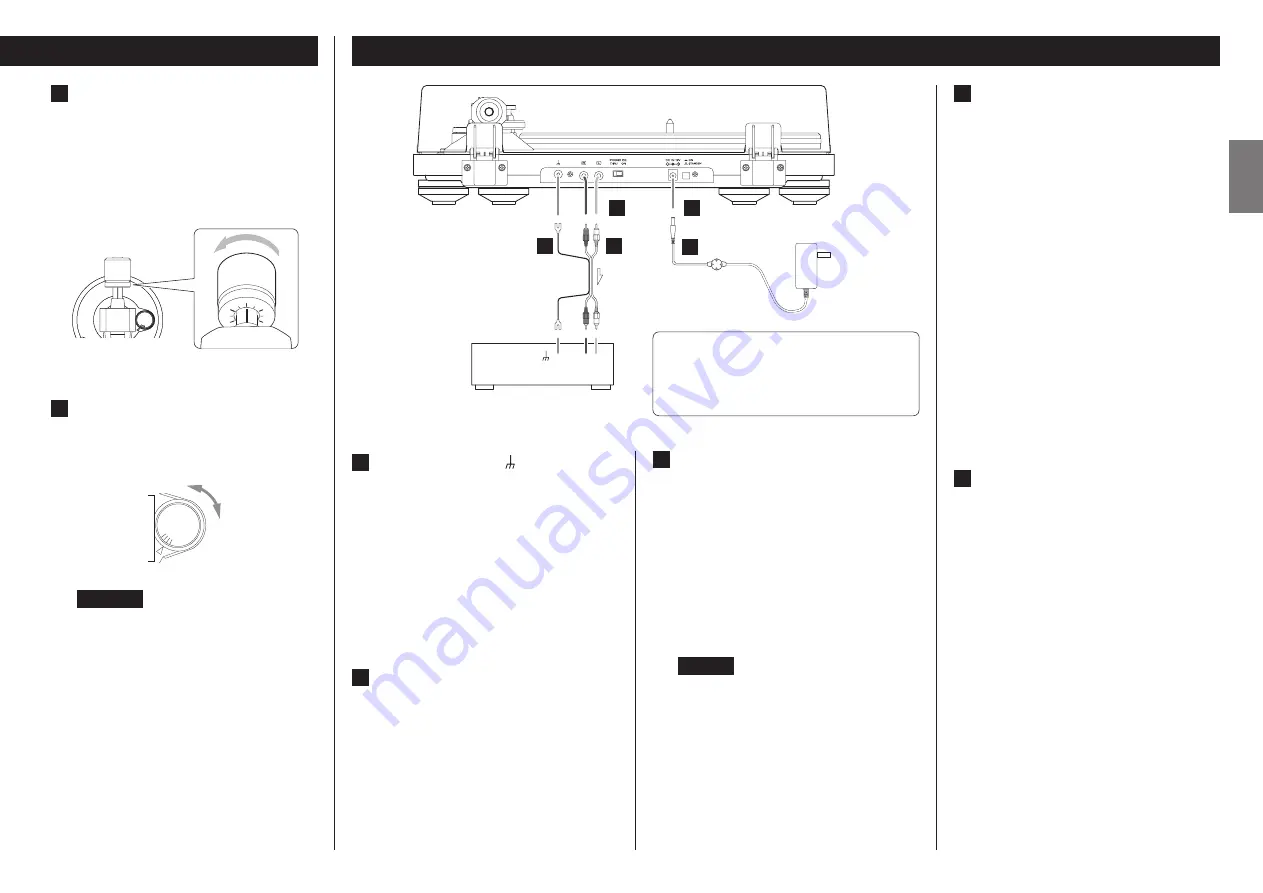
Grounding terminal ( )

Use the grounding wire of the included RCA audio cable 
to connect this connector to the grounding terminal of 
the amplifier, for example.


o

This is NOT an electrical safety ground.

If noise from speakers is conspicuous

If connecting the grounding wire of the audio cable 
to the grounding terminal of this unit does not reduce 
noise, disconnect the grounding wire and check the 
sound again. Use the method (connected/disconnected) 
that has the least noise.

Analog audio output connectors (L/R)

These output analog audio signals.
The PHONO EQ switch setting changes the type of out-
put signal.
Use the included audio cable (or commercially-available 
ones) to connect other equipment to the output connec-
tors of this unit.

PHONO EQ (audio output setting) switch

ON

Signals that have been amplified by the built-in equalizer 
amp are output from the analog audio output connectors 
(L/R).

THRU

The MC or MM cartridge signal is output directly through 
the analog audio output connectors (L/R).
Connect to a device with phono inputs, such as a phono 
equalization preamplifier or an amplifier with phono input 
connectors.


o

When shipped new from the factory, this is set to ON.

CAUTION

When set to ON, if connected to the PHONO inputs of 
an amplifier, for example, the output from speakers and 
headphones will be very loud, which could damage 
equipment or harm hearing.

DC input connector

After completing all other connections, connect the 
included AC adapter to this connector.
Confirm that the power plug of the AC adapter is 
plugged into a power outlet.


o

Do not use any AC adapter other than the one 
included.


o

The included AC adapter has plugs that can be 
changed. Attach the plug that suits the region where 
it is being used.


V

Be sure to connect the power cord to 

an AC outlet that supplies the correct 

voltage. Connection to an outlet that 

supplies incorrect voltage could cause 

fire or electric shock. 


V

Hold the power plug when plugging it 

into an outlet or unplugging it. Never 

pull or yank on the power cord. 


V

Unplug the power cord from the outlet 

when you are not planning to use the 

unit for an extended period of time.

STANDBY/ON button

Press the STANDBY/ON button to turn the unit on or put 
it in standby.

C

D

A

B

E

L

R

Connect to line input connectors of 
amplifier, etc.

Set the PHONO EQ switch to ON. 

Connect to phono input connectors 
of amplifier, etc.

Set the PHONO EQ switch to THRU.

Included AC adapter


V

Precautions when making connections


o

Do not plug the unit in until after making all connections.


o

Carefully read the manuals of the devices that you are 
connecting and follow their instructions when making 
connections.

Amplifier, speaker system 

with built-in amp,  

recording device, etc.

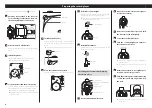
Turn the counterweight so that the 
tracking force adjustment ring scale 
matches the tracking force specified for 
the cartridge.


o

The tracking force of the included cartridge is 2.0 g.
So, turn it to 2 on the counterweight scale when 
using the included cartridge.

A

N

T I

– S K A T IN

G

3

0

A

N

T I

– S K A T IN

G

3

0

0

2.5

2

1.5

1

0.5


o

Turn it in the direction of the arrow in the illustration 
above so that the value changes from 0 to 1 to 2.

Adjust the anti-skating dial.

Start with it set at 2 and adjust it during record playback 
(page 6) to the position where the left and right volumes 
are balanced.

A N

T I – S K A T

IN

G

3

0

ATTENTION

Depending on the condition of a record, the left-right 
volume balance could become uneven and skipping 
could occur.
In such cases, try making the following adjustments.

If the sound jumps backward (stylus skips backward)

Slightly lower the anti-skating dial setting.

If the sound jumps forward (stylus skips forward)

Slightly increase the anti-skating dial setting.

Содержание TN-3B-SE

Страница 1: ...ENGLISH 한국어 OWNER S MANUAL 사용자 설명서 ANALOG TURNTABLE TN 3B SE Z OPTN3BXTEA06 A N T I S K A T I N G 3 0 A N T I S K A T I N G 3 0 ...

Страница 2: ... POWER or STANDBY ON switch not in the ON position o o The mains plug is used as the disconnect device the disconnect device shall remain readily operable o o Caution should be taken when using earphones or headphones with the product because excessive sound pressure volume from earphones or head phones can cause hearing loss CAUTION TO REDUCE THE RISK OF ELECTRIC SHOCK DO NOT REMOVE COVER OR BACK...

Страница 3: ...lways remove the record before relocating or moving this unit Moving the unit with a record on the platter could damage the record the stylus and the cartridge or could cause a malfunction o o The voltage supplied to the unit should match the voltage as printed on the rear panel If you are in any doubt regard ing this matter consult an electrician Maintenance If the surface of the unit gets dirty ...

Страница 4: ...erweight over the end of the tonearm and press it gently as you turn it right to attach it o o When the counterweight can be moved toward the bearing installation is complete A N T I S K A T I N G 3 0 A N T I S K A T I N G 3 0 Counterweight Bearing 8 Install the headshell Insert the headshell on the end of the tonearm and turn the nut to secure it in place Headshell Nut Balancing the tonearm and a...

Страница 5: ...connect the power cord to an AC outlet that supplies the correct voltage Connection to an outlet that supplies incorrect voltage could cause fire or electric shock V V Hold the power plug when plugging it into an outlet or unplugging it Never pull or yank on the power cord V V Unplug the power cord from the outlet when you are not planning to use the unit for an extended period of time E STANDBY O...

Страница 6: ...ers for example when opening and closing the dust cover Basic operation Playing records o o Remove the protective cap from the cartridge stylus before using the turntable 1 Press the STANDBY ON button on the back of the unit to turn it on 2 Open the dust cover slowly V V Be careful not to pinch your hand for example when opening and closing the dust cover 3 Place a record on the platter When playi...

Страница 7: ...to accidentally swallow styluses o o Be aware that bent styluses for example that result from insufficient customer caution or an outside cause are not covered by the warranty 4 Select the rotation speed indicated on the record The rotation speed can be set to 33 1 3 or 45 RPM 5 Move the tonearm clasp to the right to release the tonearm Clasp A N T I S K A T I N G 3 0 A N T I S K A T I N G 3 0 6 R...

Страница 8: ...o We recommend that you attach the protective cap to the cartridge stylus before doing this task Headshell Cartridge Shell leads Screws Nuts embedded 1 Disconnect the shell lead terminals from the cartridge 2 Loosen the screws and remove the cartridge 3 Attach the new cartridge and tighten the screws See the illustration below for the position of the screws when attached 52 8 0 5 mm 4 Connect the ...

Страница 9: ...Replacement stylus model Audio Technica AT VMN95E Output voltage PHONO EQ THRU 4 0 mV 1 kHz 5 cm s PHONO EQ ON 224 mV 13 dBV Output connectors RCA General AC adapter power Input AC 100 V AC 240 V 50 60 Hz Output DC 12 V 500 mA Power consumption Standby 0 5 W or less On 33 45 2 0 W or less Weight 5 0 kg 11 1 8 lb Operating temperature range 5 C to 35 C Dimensions W H D including protrusions When th...

Страница 10: ...합니다 o o 이 장치는 POWER 또는 STANDBY ON 스위치 가 ON 위치가 아니어도 AC 콘센트에서 비작동 전력을 사용합니다 o o 전원 플러그를 차단 장치로 사용하려면 손에 닿 기 쉬운 곳에 설치하셔야 합니다 o o 이어폰이나 헤드폰에서 과도한 음압 볼륨 으로 인해 청각이 손상이 발생할 수 있으므로 제품과 함께 이어폰이나 헤드폰을 사용할 때 주의해야 합니다 국내에서는 제품을 220V 에서만 사용하십시오 주의 감전 위험이 있으니 커버 후면 포함 을 제거 하지 마십시오 내부에 사용자가 수리할 수 있는 부 품이 없습니다 공인 서비스 센터 극동음향 02 2234 8804 에 서비스를 의뢰하십시오 M 정삼각형의 번개 화살표는 제품의 인클로저 내 부에 절연되지 않은 위험한 전압 이 있음을 경고하여 사용자에게...

Страница 11: ...치가 손상될 수 있습니다 o o 이 장치를 재배치하거나 이동하기 전에 항상 레코드를 제거하십시오 턴테이블 플래터 에있는 레코드를 사 용하여 장치를 옮길 경우 레코드 스타일러스 및 카트 리지가 손상되거나 오작동 할 수 있습니다 o o 장치에 공급되는 전압은 후면 패널에 인쇄 된 전압과 일치해야합니다 이 문제와 관련하여 의심스러운 점이 있으면 전기 기술자에게 문의하십시오 유지 장치 표면이 더러워지면 부드러운 천으로 닦거나 희석 된 약한 액체 비누를 사용하십시오 사용하기 전에 장치 의 표면을 완전히 말리십시오 o o 화학 물질 청소용 천 신나 또는 이와 유사한 물 질을 사용하지 마십시오 표면에 손상을 줄 수 있 습니다 V V 주의 안전을 위해 청소하기 전에 소켓에서 전원 코드를 분리하 십시오 TEAC 인터내셔널 ...

Страница 12: ... 카운터 웨이트를 톤 암의 끝 부분에 놓고 부드럽게 눌러 오른쪽으로 돌려 부착하십시오 o o 카운터 웨이트를 베어링 방향으로 움직일 수 있으면 설치가 완료된 것입니다 A N T I S K A T I N G 3 0 A N T I S K A T I N G 3 0 카운터 웨이트 베어링 8 헤드쉘을 설치하십시오 헤 드 쉘 을 톤 암 끝 에 넣 고 너 트 를 돌 려 제 자 리 에 고정시킵니다 헤드쉘 너트 톤암 균형과 트래킹 포스 조정하기 A N T I S K A T I N G 3 0 A N T I S K A T I N G 3 0 안티 스케이팅 다이얼 암 리프터 레버 카운터 웨이트 트래킹 포스 조정 링 중심선 1 안티 스케이팅 다이얼을 0 으로 설정하세요 레코드 플레이어 준비하기 2 톤 암 걸쇠를 오른쪽으로 움직여 톤...

Страница 13: ...에 맞는 플러그로 교체하여 사용하십시오 V V 올바른 전압을 공급하는 AC 콘센트에 전원 코드를 연결하십시오 잘못된 전 압을 공급하는 콘센트에 연결하면 화 재나 감전을 초래할 수 있습니다 V V 콘센트에 꽂거나 플러그를 뽑을 때는 전원 플러그를 잡으십시오 전선을 잡아 당기지 마십시오 V V 장시간 장치를 사용하지 않을 때는 콘센트에서 전원 코드를 뽑으십시오 E STANDBY ON 버튼 STANDBY ON 버튼을 눌러 기기를 켜거나 대기 모드로 전환하십시오 C D A B E L R 앰프 등의 라인 입력 커넥터에 연결하십시오 PHONO EQ 스위치를 ON으로 설정하십시오 앰프 등의 포노 입력 단자에 연결합니다 PHONOEQ스위치를THRU로설정하십시오 기본 AC 어댑터 V V 연결시 주의사항 o o 모든 연결을 ...

Страница 14: ... 더스트 커버를 열거 나 닫을 때와 같이 손가락이 끼지 않도록주의하십시오 기본 동작 레코드 재생하기 o o 턴테이블을 사용하기 전에 카트리지 스타일러스 에서 보호 캡을 제거하십시오 1 기기의 뒷면에있는 STANDBY ON 버튼 을 눌러서 켜십시오 2 더스트 커버를 천천히 엽니다 V V 더스트 커버를 열거나 닫을 때 손이 끼지 않도록 주의하십시오 3 턴테이블 플래터 에 레코드를 놓습니다 45 RPM 라지홀 싱글 레코드를 재생할 때는 동봉 된 어댑터를 사용하십시오 부품의 명칭과 기능 A N T I S K A T I N G 3 0 A N T I S K A T I N G 3 0 a a d e f i h g c b a 턴테이블 플래터 턴테이블 플래터 의 중심에 레코드를 놓습니다 b 카운터 웨이트 c 트래킹 포스 조절...

Страница 15: ...오 o o 손이나 장비에 상처를 입지 않도록 조심하십시오 o o 어 린 이 들 이 실 수 로 스 타 일 러 스 를 삼 키 지 않 도 록 주의하십시오 o o 고객 부주의 또는 외부 원인으로 인한 구부러진 스타 일러스는 보증 대상이 아닙니다 4 레코드에 표시된 회전 속도를 선택하십 시오 회전 속도는 33 1 3 또는 45 RPM 으로 설정할 수 있습니다 5 톤 암 걸쇠를 오른쪽으로 움직여 톤 암을 분리하십시오 걸쇠 A N T I S K A T I N G 3 0 A N T I S K A T I N G 3 0 6 암 리프터 레버를 올립니다 암 리프터를 통해 톤암을 들어 올리므로 톤 암이 위 로 움직여도 스타일러스가 레코드에 접촉하지 않습 니다 톤 암 암 리프터 레버 A N T I S K A T I N G 3 0 A...

Страница 16: ...이지 스타일러스 교체의 필요성은 사용 조건 에 따라 다르지만 약 300 시간 사용후 교체를 권장합니다 e e 전자기파를 방출하는 TV 전자 레인지 및 기타 장치에서 가능하면 멀리 두십시오 e e AC 어댑터를 다른 콘센트에 연결하십시오 레코드가 재생 중일 때 잡음이 발생합니다 e e 트래킹 포스가 카트리지의 지정된 값보다 높으면 잡음 이 발생할 수 있습니다 트래킹 포스가 지정된 값이 되 도록 재조정하십시오 12 페이지 소리가 건너 뜁니다 e e 진동으로 인해 발생할 수 있습니다 본 기기를 안정된 장소에 두십시오 e e 레코드를 청소합니다 e e 긁힌 레코드는 사용하지 마십시오 e e 톤암을 조절하고 트랙킹 포스를을 재조정하십 시오 12 페이지 트랙 포스가 카트리지의 지 정된 값보다 낮으면 스타일러스와 사운드...

Страница 17: ...2 mm 더스트 커버를 제거하면 420 102 356 mm o o 성능 데이터는 20 도씨에서 규정됩니다 턴테이블 플래터 드라이브 시스템 벨트 드라이브 모터 DC 모터 회전 속도 33 1 3 rpm 45 rpm 와우 플러터 0 1 이하 SN 비 67dB 이상 A weighted 20kHz LPF 턴테이블 플래터 알루미늄 다이 캐스트 직경 30cm 톤 암 암유형 스태틱 밸런스드 S 형 톤암 유효 암 길이 223 mm 트래킹 포스 변화 범위 0 5 g 수용 가능한 카트리지 무게 3 0 12 g 14 23 g 헤드휄 포함 카트리지 타입 VM MM 과 동일 출력 전압 4 0 mV 1 kHz 5 cm s 트래킹 포스 1 8 2 2 g 2 0 g 권장 카트리지 무게 6 1 g 헤드쉘 무게 포함 11 g 나사 너트 및 ...

Страница 18: ...18 ...

Страница 19: ...19 ...

Страница 20: ... name TN 3B SE Serial number Japan TEAC CORPORATION 1 47 Ochiai Tama shi Tokyo 206 8530 Japan https teac jp int WARRANTY This warranty gives you specific legal rights and you may also have other rights that vary by country state or province If you have a warranty claim or request please contact the dealer where you bought the product ...

Отзывы: