5
10
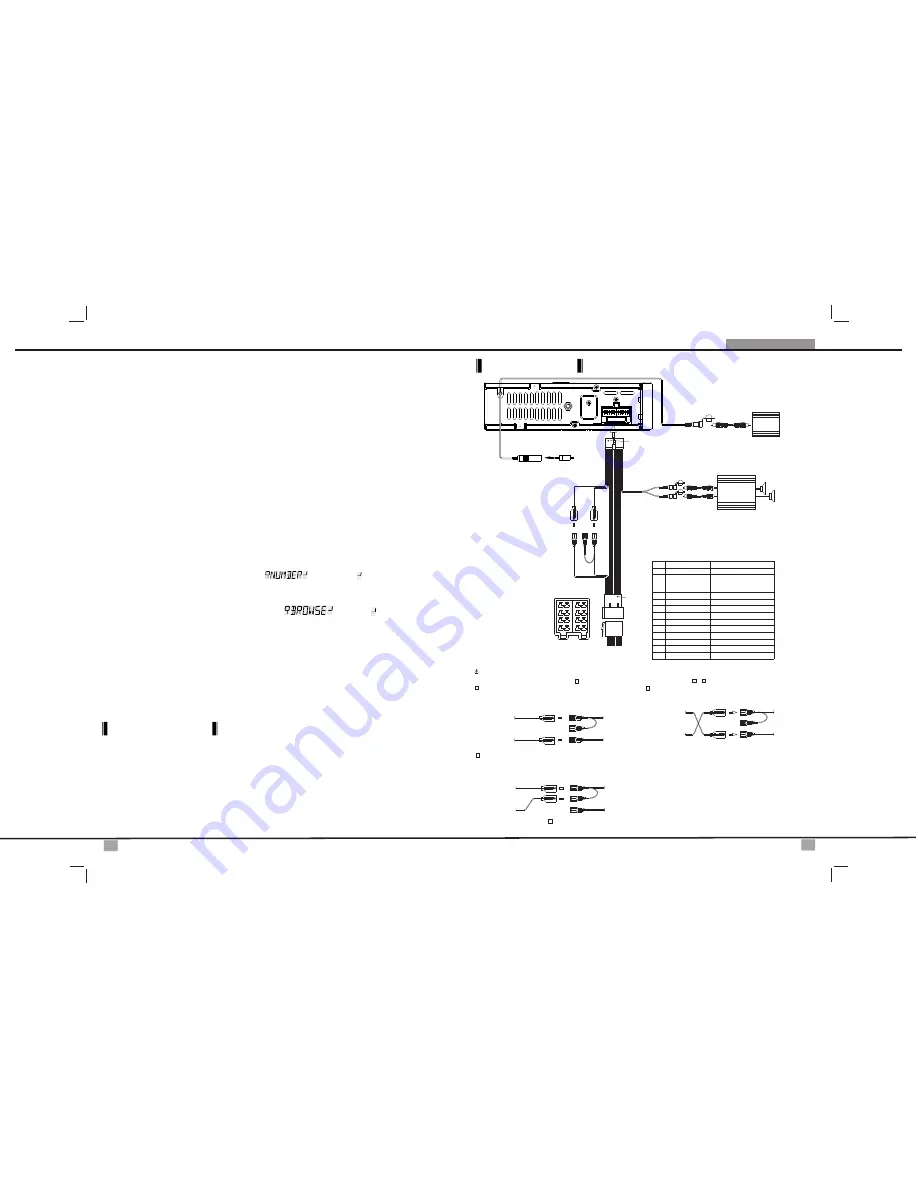
Installation Connection Manual
FEMALE WITH MALE TERMINAL
ISO CONNECTOR 4 PIN+8 PIN
CONNECTOR
ISO
1
1
2
3
7
5
7
5
3
8
6
4
2
4
6
8
(See Figure 1)
Figure 1
C
O
N
N
E
C
T
O
R
B
C
O
N
N
E
C
T
O
R
A
Y
E
L
LO
W
R
E
D
B
a
tt
e
ry
w
ir
e
(Y
E
L
LO
W
)
Ig
n
it
io
n
w
ir
e
(R
E
D
)
HARNESS
AUDIO/POWER
20-PIN
(See Figure 1)
AMP
GREY
R
-C
H
L
-C
H
REAR LINE OUT
WHITE
RED
RCA-TO-RCA CABLES
(not supplied)
Ignition wire
(RED)
Battery wire
(YELLOW)
Battery wire
(YELLOW)
Ignition wire
(RED)
Battery wire
(YELLOW)
Unit
Unit
Ignition wire
(RED)
Unit
1 PIN (RED)
Vehicle
3 PIN(YELLOW)
3 PIN(YELLOW)
1 PIN (RED)
Vehicle
3 PIN(YELLOW)
Vehicle
1 PIN (RED)
WARNING Connecting the ISO Connector
The pin arrangement for the ISO connectors depends on the type of vehicle you drive.Make sure to make the proper connections to prevent damage to the unit.
connection for the wiring harness is described in below. If the ISO connector pins are set as described in or .make the connection as illustrated.
2
3
1
The 1 pin (red) of the vehicle's ISO connector is connected to the constant power
supply, and the 3 pin (yellow) is linked to the ignition.
2
The 3 pin (yellow) of the vehicle's ISO connector is not connected to anything,
while the 1 pin (red) is connected to the constant power supply (or both the 1(red)
and 3(yellow)pins are connected to the constant power supply).
3
(Default setting) The 1 pin (red) of the vehicle's ISO connector is linked with
the ignition,and the 3 pin (yellow) is connected to the constant power supply.
1
When the connection is made as in above,the unit's power will not be linked to the ignition key. For that reason,always make sure to turn off the unit's power when the
ignition is turned off. To link the unit's power to the ignition,connect the ignition cable (ACC...red) to a power source that can be turned on and off with the ignition key.
3
ISO CONNECTOR WIRING CHART
GROUND
B)
IGNITION(ACC)
RIGHT REAR SPEAKER (-)
RIGHT FRONT SPEAKER (-)
LEFT FRONT SPEAKER (+)
RIGHT FRONT SPEAKER (+)
RIGHT REAR SPEAKER (+)
LEFT REAR SPEAKER (+)
LEFT FRONT SPEAKER (-)
FUNCTION/LABEL
B2
B3
B4
B5
B6
B1
B7
GREY
WHITE
VIOLET
GREEN
GREY/BLACK
WHITE/BLACK
VIOLET/BLACK
A7
A8
PIN
A4
A5
BLUE
RED
BLACK
YELLOW
WIRE COLOR
LEFT REAR SPEAKER (-)
B8
GREEN/BLACK
CONNECT TO SYSTEM CONTROL
TERMINAL OF THE POWER AMP OR
AUTO ANTENNA RELAY CONTROL
TERMINAL (max 150mA 12VDC)
FUSE
BLUE
SUBWOOFER
RCA-TO-RCA CABLES
(not supplied)
SUB
WOOFER
ANTENNA JACK
BLACK
ANTENNA
EXTENDER
CABLE
The default
Wiring Diagram
Writing Files into a Media
When a media containing MP3/WMA data is loaded, the unit checks all data. If the media contains many folders
or non-MP3/WMA files, MP3/WMA play will be delayed, it may take time for the unit to move to the next file, and
searches may not be performed smoothly. Loading such a media may produce loud noise and cause damage
to the speakers. Do not attempt to play a media containing a non-MP3/WMA file with the MP3/WMA
extension or a media containing non MP3/WMA files.
Bit Rates
The unit supports bit rates from 32 - 320 kbps.
When using a CD writer to record MP3/WMA up to the maximum disc capacity, disable additional writing. For
recording on an empty disc up to the maximum capacity at once, check disc at once.
Entering ID3 Tag
This unit supports ID3 tag versions 1.0 and 1.1.
Entering File and Folder Names
Names using the code list characters are the only file names and folder names that can be entered and
displayed. Using any other character will cause the file and folder names to be displayed incorrectly. The unit
recognizes and plays only files with the MP3/WMA extension.
Note: A file name entered with characters not on the code list may not play correctly.
Direct File Number Searching
MP3/WMA File or Folder Search
ID3 information display
Files playing order
Press BROWSE/BAND button. The LCD will display , and the will blink. Rotate the Encoder
Volume Knob to select the desired track number, then press ENTER confirm and play the selected file.
Press BROWSE/BAND button twice. The LCD will display , and the will blink. Rotate the
Encoder Volume Knob to navigate through all folders and sub-folders on the disc. The folder names will be
displayed on the LCD. Press ENTER to play the first file in the folder. Press the ENTER to access the sub-folders
or files. Rotate the Encoder Volume Knob to navigate, then press ENTER to confirm and begin file play. During
navigation search, rotate the Encoder Volume Knob counterclockwise to move back to the last upper level of a
folder.
If any MP3/WMA file recording with ID3 Tag information. The ID3 information such like Album title, Track title,
Artist Title will be displayed and automatic scrolling through the LCD while the file is playing. User also allows
pressing the INFO button repeatedly to view the ID3 tag information manually.
Folder / Files Navigate Searching
When selected for play, Folder Search, File Search or Folder Select, files and folders are accessed in the order in
which they were written by the PC writer. Because of this, the order in which they are expected to be played may not
match the order in which they are actually played. For example, a media with the following folder/file hierarchy is
subject to Folder Search, File Search or Folder Select as shown below.
An outline of a Media with MP3/WMA is shown below. Subfolders are shown as folders in the folder currently
selected.
■
■
■
■
■
■
■
■
■


