background image

SKIP (

.

/

/

) / TUNING 

In CD mode, momentarily press this button to skip tracks.
Hold down this button to search for a part of a track.
In TUNER mode, momentarily press this button to tune in
stations.
In Standby mode, these buttons are used to set or adjust the
clock and the timer.

CD door 

Display 

STOP (

H

Use this button to stop playback of CD/MP3. 

REPEAT/PTY 

In CD mode, use this button for repeat playback.
In FM TUNER mode, use this button to start PTY search.

TIMER 

Use this button together with the SKIP buttons to set the 
timer. 

BASS 

Use these buttons to adjust the bass sound up or down. 

P

TREBLE 

Use these buttons to adjust the treble sounds up and down. 

MP3 FOLDER/PRESET 

In TUNER mode, use these buttons to select preset stations. 
During playback of a MP3 disc, use these buttons to select a 
folder in the disc. 

SLEEP 

Use this button to set sleep timer. 

SHUFFLE/RDS 

Use this button for shuffle playback.
In FM TUNER mode, use this button to select an RDS mode.

MUTING 

Use this button to mute the sound. 

Note: 

To simplify explanations, instructions in this manual refer to 
the names of the buttons and controls on the front panel 
only. Associated controls on the remote control will also 
operate similarly. 

Remote Control Unit 

The provided Remote Control Unit allows the unit to be operated
from a distance.
When operating the remote control unit, point it towards the
remote sensor on the front panel of the unit.

<


Even if the remote control unit is operated within the effective 
range, remote control operation may be impossible if there 
are any obstacles between the unit and the remote control. 

<


If the remote control unit is operated near other products 
which generate infrared rays, or if other remote control 
devices using infrared rays are used near the unit, it may 
operate incorrectly. Conversely, the other products may also 
operate incorrectly. 

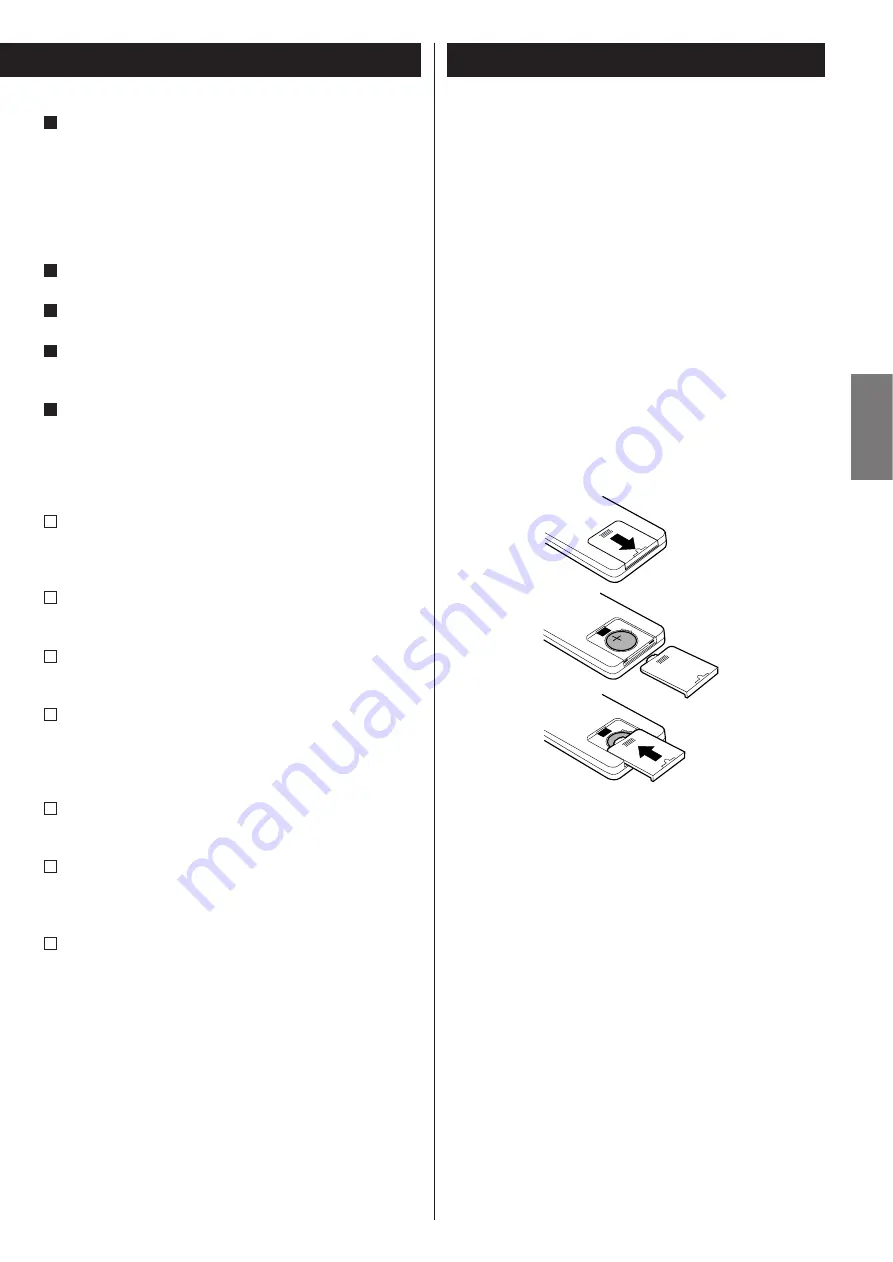
Battery Installation 

1.  Remove the battery compartment cover. 

2.  Put in the lithium battery (CR2032, 3V). 

3.  Close the cover. 

Battery Replacement 

If the distance required between the remote control unit and 
main unit decreases, the battery is exhausted. In this case, 
replace the battery with a new one. 

Precautions concerning batteries 

Do not heat or disassemble batteries and never dispose of old 
batteries by throwing them in a fire. 

ENGLISH 

7

Содержание MC-DX30

Страница 1: ...9A10508900 Z MC DX30 Micro Hi Fi System OWNER S MANUAL MANUEL DU PROPRIÉTAIRE MANUAL DEL USUARIO ENGLISH FRANÇAIS ESPAÑOL ...

Страница 2: ...of time 14 Refer all servicing to qualified service personnel Servicing is required when the apparatus has been damaged in any way such as power supply cord or plug is damaged liquid has been spilled or objects have fallen into the apparatus the apparatus has been exposed to rain or moisture does not operate normally or has been dropped Do not expose this apparatus to drips or splashes Do not plac...

Страница 3: ...on location of your unit carefully Avoid placing it in direct sunlight or close to a source of heat Avoid locations subject to vibrations and excessive dust heat cold or moisture Do not place the unit on any other electronic components Do not open the cabinet as this might result in damage to the circuitry or electrical shock If a foreign object should fall into the unit contact your dealer or ser...

Страница 4: ...antenna on a wall as shown below B FM antenna While in FM mode tune in an FM station and extend the lead to find the best position for reception This antenna may need to be repositioned if you move your unit to a new location FM Outdoor Antenna In an area where FM signals are weak it will be necessary to use a 75 ohm unbalanced type outdoor FM antenna using an optional not supplied matching transf...

Страница 5: ... jack of your mini player you must adjust the volume of the mini player or you may hear no sound from your MC DX30 Wall Mounting You can mount the main unit and or the left and right speakers on a wall Precautions Be aware that the length of the cables are approximately 3 m Do not attempt to mount the main unit and the speakers too far from the subwoofer Drill holes into solid wall support such as...

Страница 6: ...ack name During playback of CD use this button to switch the ESP function on or off E FM AM Use this button to select FM or AM MW FUNCTION Use this button to select a source CD AUX or TUNER F G STANDBY ON Press this switch to turn the unit on or off standby The main unit is powered via the subwoofer You need to first turn on the subwoofer When the main unit is in the standby mode the power indicat...

Страница 7: ...ctions in this manual refer to the names of the buttons and controls on the front panel only Associated controls on the remote control will also operate similarly Remote Control Unit The provided Remote Control Unit allows the unit to be operated from a distance When operating the remote control unit point it towards the remote sensor on the front panel of the unit Even if the remote control unit ...

Страница 8: ...arp the disc Do not play any disc that is warped scratched deformed or damaged Playing such discs may cause irreparable harm to the playback mechanism CD R and CD RW discs are more sensitive to the effects of heat and ultraviolet rays than ordinary CDs It is important that they are not stored in a location with direct sunlight and keep your discs away from sources of heat such as radiators or heat...

Страница 9: ...vel to minimum Then insert the plug from your headphones into the PHONES jack and adjust the volume using the VOLUME buttons The sound from the speakers is cut off while the headphone jack is inserted CAUTION Always lower the volume level prior to plugging in your headphones TO AVOID DAMAGING YOUR HEARING Do not place your headphones on your head until after you have plugged them in Sleep Timer Re...

Страница 10: ...t takes a few seconds for the unit to load the disc No buttons will work during loading Wait until the total number of the tracks and the total play time of the disc are displayed When no disc is loaded in the CD player NO DISC is displayed When a CD is loaded total tracks total playing time When a MP3 disc is loaded total tracks total number of folders 5 Press the Play Pause button y J to start p...

Страница 11: ...a track During playback hold down the skip button or and release it when the part you want to listen to is found ESP Electronic Shock Protection The ESP stores the music in the buffer to prevent sound from skipping During playback of a CD press the MP3 button to turn the ESP on or off When you turn the ESP on 40 SEC 40 seconds briefly appears and the ESP indicator lights on the display The ESP ind...

Страница 12: ...rt playback Repeat all the tracks All the tracks will be played repeatedly Press the REPEAT button twice REPEAT ALL lights During programmed playback programmed tracks will be played repeatedly Repeat all the tracks in the folder MP3 All the tracks in the folder will be played repeatedly Press the REPEAT button three times REPEAT ALBUM lights Shuffle Playback The tracks can be played randomly Pres...

Страница 13: ...t has same initial letter by pressing the SKIP button or 4 Press the PLAY PAUSE button G J Playback starts from the selected track Search for a track in a folder 1 Press the MP3 button twice The name of folder is displayed 2 Press the SKIP button or to find the folder that the track you want to listen to is included 3 Press and hold the SKIP button or Then you can select the track in the folder by...

Страница 14: ...ress the MEMORY button The track is programmed and P 02 is displayed Repeat steps 3 and 4 to program more tracks You can program up to 64 tracks 5 When the selection of track numbers is completed press the Play Pause button G J to start program playback When the playback of all the programmed tracks has finished or if one of the following buttons is pressed the MEMORY indicator will go off and the...

Страница 15: ...p button or and then press the MEMORY button To clear program To clear the programmed contents press the MEMORY and the STOP button H in the stop mode If the OPEN CLOSE button is pressed the programmed contents will also be cleared If the unit is disconnected from the power supply the programmed contents will be cleared Listening to an External Source 1 Connect the PHONES jack audio output jack of...

Страница 16: ...button repeatedly until the station you want to listen to is found STEREO MONO button Pressing this button alternates between STEREO mode and MONO mode STEREO FM stereo broadcasts are received in stereo and the STEREO indicator lights in the display If the sound is distorted and the STEREO indicator flashes the signal is not strong enough for good stereo reception In this case change to MONO mode ...

Страница 17: ... 3 of page 16 2 Press the MEMORY button 3 Within 5 seconds select a preset channel to store the station using the PRESET buttons of the remote control unit preset channel 4 Within 5 seconds press the MEMORY button The station is stored and the MEMORY indicator goes off To store more stations repeat steps 1 to 4 How to select preset stations 1 Press the FM AM button to select a band 2 Press the PRE...

Страница 18: ...PTY button PTY Programme Type N AFFAIRS INFO SPORT EDUCATE DRAMA CULTURE SCIENCE VARIED POP ROCK EW M S M educational and cultural information programs on natural science and technology sports related programs all kinds of radio concert and serial drama a program on commercial practical and popular songs and brief announcements events public opinion reports daily information or reference such as w...

Страница 19: ...d down the CLOCK SET button 12 HOUR or 24 HOUR blinks If you want to change the hour mode press the or button If no button is pressed for 10 seconds the time setting mode will be cancelled 3 Press the CLOCK SET button once more The hour value blinks 4 Press the SKIP button to set the current hour 5 Press the CLOCK SET button The minute value blinks 6 Press the SKIP button to set the current minute...

Страница 20: ...ode will be cancelled 2 Press the SKIP button to set the start time hour and then press the TIMER button The minutes value starts flashing 3 Press the SKIP button to set the start time minute and then press the TIMER button TIMER and OFF indiactors appear on the display and the hour value starts flashing 4 Press the SKIP button to set the stop time hour and then press the TIMER button The minutes ...

Страница 21: ...ton to turn the unit off standby The clock and the TIMER indicator are displayed The unit will turn on and off at the specified time every day Don t forget to turn the unit off standby or the timer won t work If the power switch of the subwoofer turned off the settings kept in memory clock preset stations timer setting will be erased To turn on or off the timer When you don t use the timer press t...

Страница 22: ...k CD R RW discs Try again with another disc e You cannot play back unfinalized CD R RW discs Finalize such a disc in a CD recorder and try again Sound skips e Place the unit on a stable place to avoid vibration and shock e If the disc is dirty clean the surface of the disc e Don t use scratched damaged or warped discs Tuner Cannot listen to any station or signal is too weak e Tune in the station p...

Страница 23: ...V AC 50 Hz Power Consumption 80 W in standby mode less than 1 4 W Dimension W x H x D Main Unit 160 x 226 x 86 mm L R Speakers 142 x 226 x 70 mm Subwoofer 160 x 245 x 335 mm Weight Main Unit 1 kg L R Speakers 0 6 kg each Subwoofer 5 3 kg Standard Accessories Remote Control Unit RC 970 x 1 Battery for Remote Control Unit x 1 Subwoofer Cable x 1 Speaker Cable x 2 FM Antenna x 1 AM Antenna x 1 Stereo...

Страница 24: ... au soleil ou de le placer près d une source de chaleur Evitez les lieux soumis à des vibrations et à la poussière à la chaleur au froid et à l humidité de façon excessive Ne placez l appareil sur aucun autre composant électronique N ouvrez pas l appareil car cela pourrait entraîner des dommages pour le circuit ou une électrocution Si un objet étranger venait à pénétrer dans l appareil contactez d...

Страница 25: ...au rebut de votre ancien appareil veuillez contacter votre mairie le service de traitement des ordures ou le magasin dans lequel vous avez acheté le produit NXT est une marque commerciale de New Transducers Ltd Montage mural Vous pouvez monter l unité centrale et ou les enceintes gauche et droite au mur Précautions Sachez que la longueur des câbles est d environ 3 m N essayez pas de monter l unité...

Страница 26: ...ment que vous envisagez d utiliser avec cet appareil Veillez à bien enfoncer chaque fiche de connexion Pour éviter les bruits et les ronflements ne regroupez pas les câbles de modulation pour le signal et le cordon d alimentation Enceinte D Enceinte G B E D C A F Face latérale de l unité centrale Caisson de graves 26 ...

Страница 27: ...es fournies vérifiez que celles que vous emploierez ont une impédance d au moins 4 Ω Ne connectez rien d autre à ces prises que des enceintes E Cordon d alimentation secteur Veillez à brancher le cordon d alimentation électrique dans une prise secteur délivrant une tension correcte Saisissez la fiche du cordon pour le brancher ou le débrancher Ne tirez jamais sur le cordon F Interrupteur d aliment...

Страница 28: ...ouche pour activer désactiver la fonction ESP E FM AM Utilisez cette touche pour choisir entre FM et AM MW F FUNCTION Utilisez cette touche pour sélectionner une source CD AUX ou TUNER G STANDBY ON Appuyez sur ce commutateur pour mettre l appareil en service ou en veille standby L unité centrale est alimentée via le caisson de graves Vous devez d abord allumer le caisson de graves Quand l unité ce...

Страница 29: ...ilisez cette touche pour sélectionner un mode RDS U MUTING Utilisez cette touche pour couper le son Note Pour simplifier les explications les instructions de ce manuel se réfèrent exclusivement aux noms des touches et commandes de la face avant Les commandes qui y sont associées sur la télécommande fonctionneront de façon similaire Télécommande La télécommande fournie permet de contrôler l apparei...

Страница 30: ...températures fera se gondoler le disque Ne faites pas reproduire un disque gondolé déformé ou endommagé Faire reproduire de tels disques peut causer des dommages irréparables aux mécanismes de lecture Les CD R et CD RW sont plus sensibles aux effets de la chaleur et des rayons ultraviolets que les CD ordinaires Il est important de ne pas les conserver dans un lieu soumis directement aux rayons du ...

Страница 31: ... en privé réduisez d abord le niveau de volume au minimum Puis insérez la fiche de votre casque dans la prise PHONES et réglez le volume à l aide des touches VOLUME Le son des enceintes est coupé tant que la fiche casque est insérée ATTENTION Baissez toujours le niveau de volume avant de brancher votre casque POUR EVITER D ENDOMMAGER VOTRE AUDITION Ne placez pas le casque sur votre tête avant de l...

Страница 32: ... l unité pour charger le disque Aucune touche ne fonctionnera durant cette période de chargement Attendez que le nombre total de plages et la durée totale de lecture du disque soient affichés Quand aucun disque n est chargé dans le lecteur de CD NO DISC s affiche Quand un CD est chargé nombre total de plages durée totale de lecture Quand un disque de MP3 est chargé nombre total de morceaux nombre ...

Страница 33: ...he Skip ou et relâchez la quand vous avez rejoint la partie que vous voulez écouter ESP Electronic Shock Protection Le système de protection antichoc ESP conserve la musique dans une mémoire tampon pour éviter les sauts et interruptions de musique Durant la lecture d un CD appuyez sur la touche MP3 pour activer désactiver l ESP Quand vous l activez 40 SEC 40 secondes apparaît brièvement et le témo...

Страница 34: ...lages Repeat all Toutes les plages seront lues répétitivement en boucle Appuyez deux fois sur la touche REPEAT REPEAT ALL s allume Durant la lecture programmée les plages programmées seront lues en boucle Répétition de toutes les plages d un dossier MP3 Repeat Album Tous les morceaux du dossier seront lus répétitivement en boucle Appuyez trois fois sur la touche REPEAT REPEAT ALBUM s allume Lectur...

Страница 35: ...le en appuyant sur la touche SKIP ou 4 Appuyez sur la touche PLAY PAUSE G J La lecture démarre depuis le morceau sélectionné Recherche d un morceau dans un dossier 1 Appuyez deux fois sur la touche MP3 Le nom de dossier est affiché 2 Appuyez sur la touche SKIP ou pour trouver le dossier où se trouve le morceau que vous voulez écouter 3 Appuyez sur la touche SKIP ou et maintenez la Vous pouvez alor...

Страница 36: ...r sélectionner une plage puis appuyez sur la touche MEMORY La plage est programmée et Répétez les étapes Vous pouvez programmer jusqu à 64 plages et pour programmer d autres plages P 02 est affiché 3 4 5 Une fois la sélection des numéros de plage terminée appuyez sur la touche Play Pause G J pour lancer la lecture du programme Quand la lecture de toutes les plages programmée est terminée ou si vou...

Страница 37: ...touche Skip ou puis appuyez sur la touche MEMORY Pour effacer le programme Pour effacer le contenu programmé appuyez à l arrêt sur les touches MEMORY et STOP H Si vous appuyez sur la touche OPEN CLOSE le contenu programmé sera aussi effacé Si l alimentation de l appareil est coupée le contenu programmé sera effacé Ecoute d une source externe 1 Branchez la prise PHONES prise de sortie audio d un le...

Страница 38: ...ur fixe Appuyez répétitivement sur la touche Haut ou Bas jusqu à ce que la station que vous voulez écouter soit trouvée Touche STEREO MONO Appuyer sur cette touche fait alterner entre les modes STEREO et MONO STEREO Les émissions FM stéréo sont reçues en stéréo et le témoin STEREO s allume à l écran Si le son souffre de distorsion et si le témoin STEREO clignote c est que le signal n est pas assez...

Страница 39: ... 3 en page 38 2 Appuyez sur la touche MEMORY 3 Dans les 5 secondes sélectionnez à l aide des touches PRESET de la télécommande une mémoire preset où conserver la station mémoire preset 4 Dans les 5 secondes appuyez sur la touche MEMORY La station est mémorisée et le témoin MEMORY s éteint Pour mémoriser plus de stations répétez les étapes 1 à 4 Comment rappeler les stations préréglées presets 1 Ap...

Страница 40: ...êter la recherche appuyez sur la touche PTY PTY Type de programme NEWS AFFAIRS INFO SPORT EDUCATE DRAMA CULTURE SCIENCE VARIED POP M ROCK M informations éducatives et culturelles programmes techniques et scientifiques tous les aspects de la culture nationale ou locale dont les programmes populaires tels que des jeux divertissements programme relatif aux sports tous types de concerts et fictions ra...

Страница 41: ... sur la touche CLOCK SET et maintenez la 12 HOUR ou 24 HOUR clignote Pour changer de mode horaire 12 24 h appuyez sur la touche ou Si aucune touche n est pressée durant 10 secondes le mode de réglage d horloge est annulé 3 Appuyez une fois encore sur la touche CLOCK SET La valeur des heures clignote 4 Appuyez sur la touche SKIP pour régler l heure 5 Appuyez sur la touche CLOCK SET La valeur des mi...

Страница 42: ...sur la touche SKIP pour régler l heure de démarrage unité heures puis appuyez sur la touche TIMER La valeur des minutes commencera à clignoter 3 Appuyez sur la touche SKIP pour régler l heure de démarrage unité minutes puis appuyez sur la touche TIMER Les témoins TIMER et OFF apparaissent à l écran et la valeur des heures commence à clignoter 4 Appuyez sur la touche SKIP pour régler l heure d arrê...

Страница 43: ...pareil en veille standby L horloge et le témoin TIMER sont affichés L appareil s allumera et s éteindra chaque jour aux heures spécifiées N oubliez pas de mettre l appareil en veille standby ou la minuterie ne fonctionnera pas Si l interrupteur d alimentation du caisson de graves est coupé les réglages conservés en mémoire réglages d horloge des stations préréglées ou presets de la minuterie seron...

Страница 44: ... RW Réessayez avec un autre disque e Vous ne pouvez pas reproduire de CD R RW non finalisé Finalisez un tel disque dans un enregistreur de CD et réessayez Le son saute e Placez l appareil sur une surface stable pour éviter les vibrations et les chocs e Si le disque est sale nettoyez sa surface e N employez pas de disques rayés endommagés ou gondolés Syntoniseur Tuner Aucune station ne peut être en...

Страница 45: ...lectrique 80 W en veille moins de 1 4 W Dimensions L x H x P Unité centrale 160 x 226 x 86 mm Enceintes G D 142 x 226 x 70 mm Caisson de graves 160 x 245 x 335 mm Poids Unité centrale 1 kg Enceintes G D 0 6 kg chacune Caisson de graves 5 3 kg Pays d origine Chine Accessoires en standard Télécommande RC 970 x 1 Pile pour télécommande x 1 Câble de caisson de graves x 1 Câble d enceinte x 2 Antenne F...

Страница 46: ...to de la unidad No coloque la unidad a la luz solar directa ni cerca de fuentes de calor Evite los lugares expuestos a vibraciones o a un exceso de suciedad frío calor o humedad No coloque la unidad encima de otros componentes electrónicos No abra la carcasa de la unidad ya que podrían dañarse los circuitos o producirse descargas eléctricas Si entra algún cuerpo extraño en la unidad póngase en con...

Страница 47: ...ción más detallada sobre el reciclaje de su producto viejo contacte por favor con su ayuntamiento servicio de basuras o la tienda en donde usted compró el producto NXT es una marca comercial de New Transducers Ltd Montaje mural La unidad principal y los altavoces derecho e izquierdo se pueden montar en la pared Precauciones Procure que la longitud de los cables sea aproximadamente de 3 m No intent...

Страница 48: ...a uno de los componentes que tiene intención de usar con esta unidad Inserte correctamente los conectores Para evitar zumbidos y ruidos no tienda los cables de conexión en el mismo mazo del cable de alimentación Altavoz derecho R Altavoz derecho L B E D C A F Panel lateral de la unidad principal Subwoofer 48 ...

Страница 49: ... unos altavoces distintos de los incluidos asegúrese de que su impedancia es como mínimo de 4 Ω Estos terminales sólo están preparados para conectar altavoces E Cable de alimentación Asegúrese de conectar el cable de alimentación a una toma de red que suministre la tensión adecuada Sostenga siempre el cable de alimentación por el conector No tire nunca del propio cable de corriente F Interruptor d...

Страница 50: ...cción de CD use este botón para activar o desactivar la función ESP E FM AM Use este botón para seleccionar FM o AM MW F FUNCTION función Use este botón para seleccionar la fuente de sonido CD AUX o TUNER G STANDBY ON encendido apagado Pulse este interruptor para encender o apagar la unidad La unidad principal se alimenta a través del subwoofer por lo que deberá encender antes la unidad de subgrav...

Страница 51: ... En el modo FM TUNER use este botón para seleccionar un modo RDS U MUTING silenciamiento Use este botón para silenciar el sonido Observación Para simplificar las explicaciones las instrucciones del manual se refieren únicamente a los nombres de los botones y controles del panel frontal Los botones y controles correspondientes del mando a distancia funcionan de la misma manera Mando a distancia El ...

Страница 52: ...os prolongados La exposición prolongada a temperaturas elevadas deformará el disco No reproduzca ningún disco que esté curvado deformado o dañado La reproducción de estos discos puede causar daños irreparables en los mecanismos de lectura Los discos CD R y CD RW son más sensibles al calor y a los rayos ultravioleta que los CD normales Convendrá guardarlos en un lugar donde no incida la luz solar d...

Страница 53: ...ucha en privado primero reduzca el volumen al nivel mínimo A continuación conecte los auriculares a la toma PHONES y regule el volumen con los botones VOLUME El sonido de los altavoces se suspende mientras están conectados los auriculares es PRECAUCIÓN Reduzca siempre el nivel de volumen antes de conectar los auriculares PARA EVITAR DAÑOS EN EL SISTEMA AUDITIVO no se coloque los auriculares antes ...

Страница 54: ...cargar el disco Durante la operación de carga no funcionará ningún botón Espere a que aparezcan en la pantalla el número total de pistas y el tiempo total de reproducción del disco Si no hay un disco cargado en el reproductor la pantalla indicará NO DISC Si el disco es un CD total pistas duración total Si el disco es MP3 total pistas número total de carpetas 5 Pulse el botón PLAY PAUSE y J para da...

Страница 55: ...tón de salto o y libérelo cuando localice la parte que desea oír ESP protección electrónica frente a impactos La función ESP almacena música en el búfer para evitar saltos en el sonido Durante la reproducción de un CD pulse el botón MP3 para activar o desactivar la función ESP Cuando active la función ESP en la pantalla aparecerá brevemente 40 SEC 40 segundos y se iluminará el indicador ESP El ind...

Страница 56: ... se reproducirán de forma repetida Pulse dos veces el botón REPEAT REPEAT ALL se ilumina Durante la reproducción programada las pistas incluidas en el programa se reproducirán de forma continua Repetición de todas las pistas de una carpeta MP3 Todas las pistas de la carpeta se reproducirán ininterrumpidamente Pulse tres veces el botón REPEAT REPEAT ALBUM se ilumina Reproducción al azar Las pistas ...

Страница 57: ...sta que empiece por esa letra pulsando el botón de salto o 4 Pulse el botón G J La reproducción comenzará desde la pista seleccionada Búsqueda de pista en una carpeta 1 Pulse dos veces el botón MP3 Se visualizará el nombre de la carpeta 2 Pulse el botón de salto o para comprobar que la pista que quiere oír se encuentra en la carpeta 3 Mantenga pulsado el botón de salto o A continuación podrá selec...

Страница 58: ...onar una pista y después pulse MEMORY La pista queda incluida en el programa y P 02 se visualiza en la pantalla Repita los pasos 3 y 4 para programar otras pistas Se pueden programar un total de 64 pistas 5 Una vez completada la selección de los números de pista pulse el botón G J para dar comienzo a la reproducción programada Cuando finalice la reproducción de todas las pistas programadas o si se...

Страница 59: ...ero de pista con los botones de salto o y después pulse MEMORY Para borrar un programa Para borrar el contenido del programa pulse MEMORY y H desde la posición de parada Si pulsa el botón de apertura cierre el contenido del programa también se borrará Si la unidad se desconecta de la toma de alimentación el contenido del programa se borrará Audición de una fuente externa 1 Conecte el jack PHONES s...

Страница 60: ... repetidas veces hasta localizar la emisora deseada Botón STEREO MONO Pulse este botón para conmutar entre los modos estéreo y monofónico STEREO estéreo Las emisiones de FM estéreo se reciben en estéreo y el indicador STEREO se ilumina en la pantalla Si el sonido se recibe distorsionado y el indicador STEREO luce intermitente significa que la señal no tiene suficiente intensidad para una correcta ...

Страница 61: ...RY 3 Antes de 5 segundos seleccione con los botones PRESET del mando a distancia un número de presintonía para asignarle la emisora presintonía 4 Antes de 5 segundos pulse el botón MEMORY La emisora queda memorizada y el indicador MEMORY se apaga Para almacenar otras emisoras repita los pasos 1 a 4 Cómo seleccionar presintonías 1 Pulse el botón FM AM para seleccionar una banda 2 Pulse el botón PRE...

Страница 62: ...úsqueda PTY se detendrá en la frecuencia inicial Si quiere detener la búsqueda pulse el botón PTY PTY tipo de programa NEWS AFFAIRS INFO SPORT EDUCATE DRAMA CULTURE SCIENCE VARIED POP M ROCK M M O R M información educativa y cultural ciencias naturales tecnología etc programas relacionados con el mundo del deporte series dramáticas conciertos etc noticias convocatorias opinión pública informes ofe...

Страница 63: ...e el sistema de 12 horas 12 HOUR o de 24 horas 24 HOUR Si desea cambiarlo utilice los botones o Si no pulsa ningún botón en 10 segundos el modo de puesta en hora quedará cancelado 3 Pulse una vez el botón CLOCK SET Parpadeará la cifra de las horas 4 Utilice los botones de salto para ajustar la cifra de las horas 5 Pulse el botón CLOCK SET Parpadeará la cifra de los minutos 6 Utilice los botones de...

Страница 64: ...ado 2 Utilice los botones de salto para ajustar la hora de inicio cifra de las horas y después pulse TIMER La cifra de los minutos comenzará a parpadear 3 Utilice los botones de salto para ajustar la hora de inicio cifra de los minutos y después pulse TIMER En la pantalla aparecen los indicadores TIMER y OFF y la cifra de las horas intermitente 4 Utilice los botones de salto para ajustar la hora d...

Страница 65: ...idad En la pantalla se visualizarán el reloj y el indicador TIMER La unidad se encenderá y apagará todos los días a las horas especificadas No olvide apagar la unidad standby porque de lo contrario el temporizador no funcionaría Si se apaga el interruptor del subwoofer se borrarán los ajustes guardados en la memoria reloj presintonías temporizador Para activar o desactivar el temporizador Si no de...

Страница 66: ...ío Pruebe con uno pregrabado e Dependiendo del formato etc quizá no sea posible reproducir discos CD R RW Vuelva a intentarlo con otro disco e No se pueden reproducir discos CD R CD RW que no tengan la sesión cerrada Cierre la sesión del disco en una grabadora de CD e inténtelo de nuevo Intermitencias en el sonido e Coloque la unidad sobre una superficie estable sin riesgos de vibraciones o impact...

Страница 67: ... c a 50 Hz Consumo 80 W apagado menos de 1 4 W Dimensiones anch x alt x prof Unidad principal 160 x 226 x 86 mm Altavoces I y D 142 x 226 x 70 mm Subwoofer 160 x 245 x 335 mm Peso Unidad principal 1 kg Altavoces I y D 0 6 kg cada uno Subwoofer 5 3 kg Accesorios estándar Mando a distancia RC 970 x 1 Batería del mando a distancia x 1 Cable de subwoofer x 1 Cable de altavoz x 2 Antena de FM x 1 Anten...

Страница 68: ...palapa CP 09810 México DF Phone 525 581 5500 TEAC UK LIMITED Unit 19 20 The Courtyards Hatters Lane Watford Hertfordshire WD18 8TE U K Phone 0845 130 2511 TEAC EUROPE GmbH Bahnstrasse 12 65205 Wiesbaden Erbenheim Germany Phone 0611 71580 TEAC AUSTRALIA PTY LTD 30 Tullamarine Park Road Tullamarine VIC 3043 Australia Phone 03 8336 6500 A B N 11 113 998 048 This appliance has a serial number located ...

Отзывы: