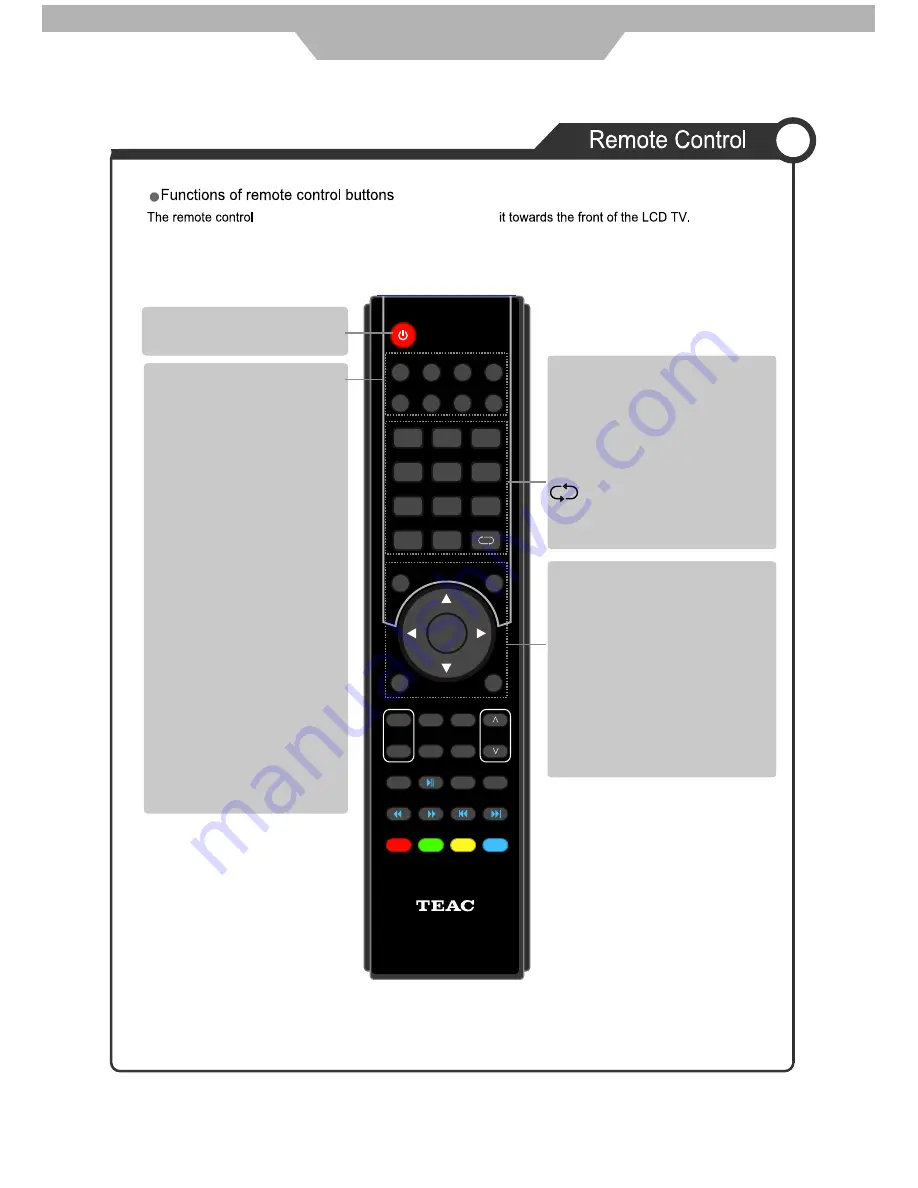
Teac LE1978HD Скачать руководство пользователя страница 15

MENU

Press to display the OSD menu.

INPUT

Display the input source menu.

DTV

Switch to DTV source.

USB

NICAM/A2

Switch to USB source.

EXIT

Press to exit the OSD menu.

NUMBER BUTTONS

Choose channel directly.
Press number buttons and press
OK button to play the channel.

Return to the previous channel 
viewed.

REVEAL

INPUT

POWER

TV/TXT

CANCEL

HOLD

SIZE

INDEX

SUBPAGE

1

2

3

4

5

6

7

8

9

0

OK

FAV

MENU

NICAM/A2

TV/RADIO

EXIT

CH

INFO

PICTURE

SOUND

SLEEP

SUBTITLE

DTV

CH/LIST

STOP

VOL

REP

EPG

USB

ASPECT

+

-

MUTE

118020260

POWER

Turn the TV on/standby.

Select different audio languages,

MUTE

Press to mute the sound.

Press again or press VOL+ to

unmute.

TV/RADIO

Press to toggle between 

TV and Radio

ASPECT

Cycles among screen display 

modes.

SUBTITLE

Press to view a list of available 
subtitles.

SLEEP

Repeatedly press to scroll to 
preferred off time.

FAV

Display the favorite program list.

INFO

Press to view information on the
program you are watching. Also 
provides information for future 
programs in EPG mode.

General Description

uses an Infra-Red (IR) signal. Please point

subject to availability from 

broadcaster.

 10

Содержание LE1978HD

Страница 1: ...ANT LE1978HD LE2278FHD LE2478FHD LED LCD TV Trademark of TEAC Corporation JAPAN For Optimum picture and sound quality please use TEAC Audio Video cables TEAC High Performance Audio Video cables and co...

Страница 2: ...roduct to a TEAC Authorised Service Centre Where In Home service Pick up is not available the purchaser is required to send the product to the nearest TEAC Authorised Service Centre for repair In this...

Страница 3: ...le of any equipment other than as stated in this warranty and outlined above 11 In no event will TEAC be responsible or liable for indirect or consequential damages from interrupted operations or othe...

Страница 4: ...d Service Centre 3 Please have your purchase receipt as your proof of purchase and the following details completed for a valid Warranty 2ZQHU V 1DPH 2ZQHU V GGUHVV Postcode Model Name No Serial No HDO...

Страница 5: ...H s n o i t u a c e r P Application 3 1 e c r u o s t u p n i g n i t c e l e S V T D C L e h t g n i r e w o P Operating the Menu 14 15 Customising the PICTURE Settings Customising the TIME Settings...

Страница 6: ...It is the responsibility of the user to make sure all precautions and warnings are heeded and followed 1...

Страница 7: ...Disconnect device plug coupler or all pole mains switch location 2...

Страница 8: ...f light emission on the screen Playing a DVD or a game console may cause a similar effect to the screen Damages caused by the above effect are not covered by the Warranty Displaying still images from...

Страница 9: ...4...

Страница 10: ...The manufacturer will not be held responsible for the damage caused by any substitutions and modification of the product without authorisation from the manufacturer s or authorised service agent 5...

Страница 11: ...e install the stand place the unit face down on a soft blanket and reverse instructions as above 1 After detaching the stand fasten 4 mounting screws thread size M4X10 not supplied Please 2 Fasten wal...

Страница 12: ...nput Source Select Button 1 MENU button OSD Menu Display Button 2 CH button Channel Program Button 3 VOL button Volume Button 7 POWER button 5 LED Indicator 6 Remote Control Window 1 2 3 4 5 6 7 Gener...

Страница 13: ...ower Connecting 1 Connect the small round plug on the power adaptor cable to the power input socket at the rear of the set 2 Connect the mains cable between the power adaptor and the mains supply Powe...

Страница 14: ...ton on the remote control to display the input source menu press button to select TV then press button to confirm Then you can receive the signal L in AV 1 R in Component General Description Connectin...

Страница 15: ...ITLE DTV CH LIST STOP VOL REP EPG USB ASPECT MUTE 118020260 POWER Turn the TV on standby Select different audio languages MUTE Press to mute the sound Press again or press VOL to unmute TV RADIO Press...

Страница 16: ...subpage SIZE Press to see top half of page double size Press again to see the bottom half of page double size Press again for normal size SUBPAGE Press to subpage again to cancel INDEX Go to index Col...

Страница 17: ...General Description Check with local authorities when disposing of batteries Keep the path between the remote and TV free of obstructions 12...

Страница 18: ...DTV ATV AV 1 AV 2 YPbPr VGA HDMI USB INPUT equipment 13 General Description...

Страница 19: ...set up a variety of channel options Allows you to customise the sound options and effects Use the and buttons to select your main menu option DQG XVH 2 RU WR FRQILUP EXIT MENU 4 5 14 Tint t i u Q k c...

Страница 20: ...l preset and not adjustable Only available to adjust for NTSC signal picture noise to your preferred settings can 15 Auto adjust Enter sub menu to enable automatic adjustment of the image settings suc...

Страница 21: ...k Select NOTE Treble and Bass settings are only available when Sound Mode is set to User Standard Music Movie and Sports are all preset and not adjustable Adjust the balance of sound to the left or ri...

Страница 22: ...signal You can also select your preferred volume input DTV ATV or Radio and channel Quit Back Select in DTV mode as the time setting is determined by the broadcast signal can can to one of the followi...

Страница 23: ...sing the OPTION Settings OPTION Can also be adjusted using SUBTITLE button on Remote Control a confirmation message will be displayed NOTE Please use with caution as all settings and channel memories...

Страница 24: ...Change Password Block Program Parental Guidance Off No Block LOCK Use the and buttons to select the LOCK menu as the picture above press button to enter the menu Note A password is required to access...

Страница 25: ...n Scan Scan Scan Scan Quit Back Select System 3UHVV DQG EXWWRQV WR VHOHFW WKH V VWHP RX QHHG 6HOHFW WKH FKDQQHO RX ZDQW WR WXQH 3OHDVH VHOHFW FKDQQHO WKHQ 3UHVV 2 WR VHDUFK 20 Customising the CHANNEL...

Страница 26: ...Press menu to exit and it will automatically save the current settings Only available in ATV mode Skip Select a program and press the BLUE button The channel will be signed with a SKIP logo The channe...

Страница 27: ...to enter Use NH V WR KLJKOLJKW GHVLUHG ILOH RU IROGHU 3UHVV 2 WR SOD ILOH Basic operations during playback include Play Pause Stop Fast Forward Reverse Skip and Repeat Please see pg 11 for Multimedia...

Страница 28: ...memory device ce can not support multi media devisuch as mobil phone camera Can support hard disc with max 400G NTFS or FAT 32 format 2 The max depth of USB folder is 308 3 The max number of files tha...

Страница 29: ...external equipment Screen appears but there is no sound 1 Check if the MUTE function has been activated 2 Increase the sound level by pressing volume adjustment button 3 Check if sound terminal of ex...

Страница 30: ...media Player formats Dimensions Without stand With stand Weight Wall mounting dimensions Operating temperature range Power Consumption 19 21 6 23 6 1440 x 900 2 1 2 1 1 1 1 1 2 1 2 1 1 1 1 1 2 1 2 1 1...

Страница 31: ...rting Format The max bit rate is 6Mbps The max resolution is 720 576P MOVIE AVI Supported mono color 16color 256color 16bit 24bit 32bit The max resolution is 3000 3000 the min resolution is 100 100 PH...

Страница 32: ...TEAC CUSTOMER CARE CENTRE TCCC Free call 1800 656 700 Between Monday to Friday EST 9AM to 5PM...

Отзывы: