background image

5


Use

r G
uid

anc

e

 I

n

for
mat

ion


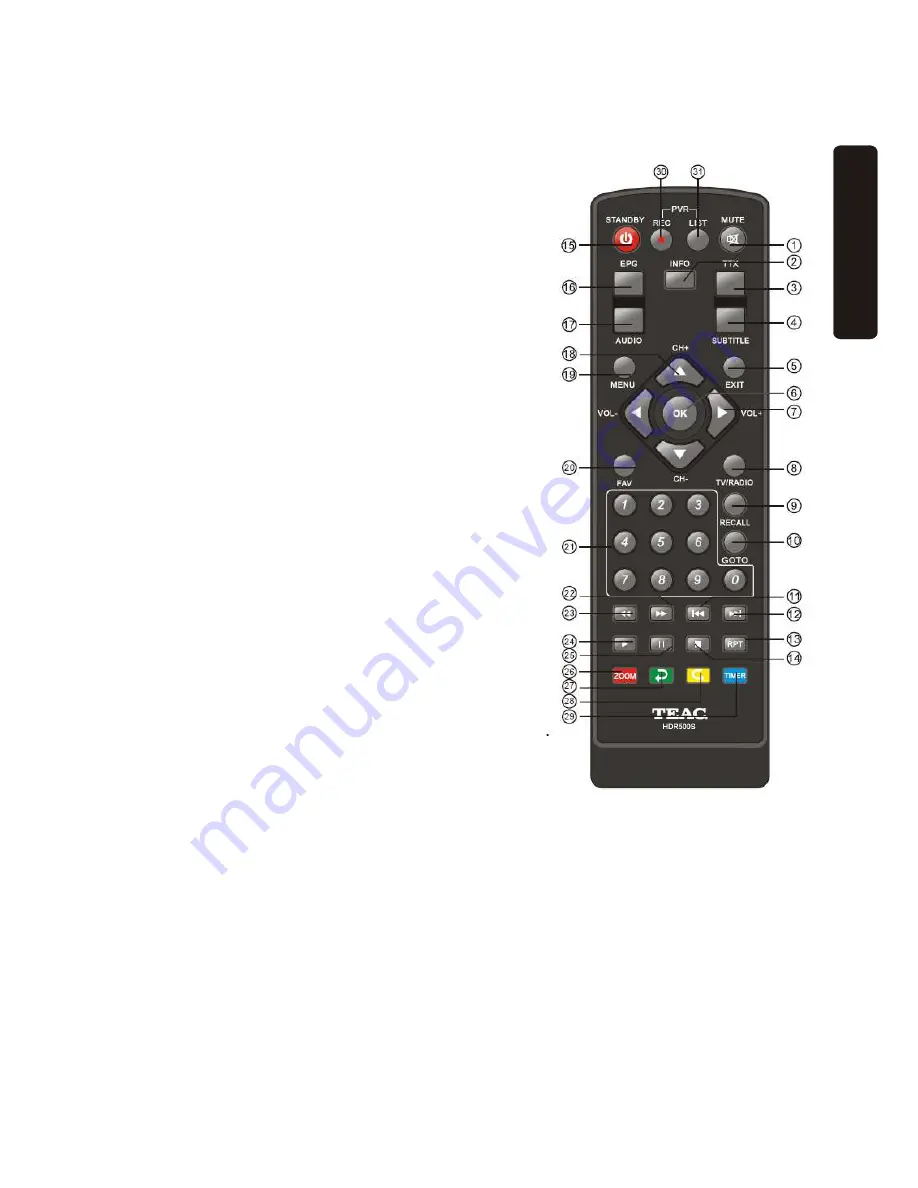
2.3


Remote


Control


Unit


(RCU)


1.


MUTE:


Mutes


or


restores


audio


output.


2.


INFO:


Displays


additional


channel


information,


also


reveals


information


banner


during


Time


Shift


and


Recording.


3.


TTX:


Displays


Teletex


Information.


4.


SUBTITLE:


Displays


subtitle


language


options.


5.


EXIT:


Exits


the


current


Menu


or


returns


to


the


previous


Menu


6.


OK:


Confirms


an


entry


or


selection.


Displays


the


list


of


channels.


7.


RIGHT/LEFT:


Navigates


through


the


program


menu,


increases


or


decreases


volume.


8.


TV/RADIO:


Switches


from


TV


function


to


Radio,


and


from


Radio


to


TV.


9.


RECALL:


In


DTV


mode,


switch


to


the


most


recent


channl.


During


USB


file


navigation,


return


to


the


orevious


folder.


10.


GOTO:


Enter


a


specific


time


to


skip


during


playback.


11.


PREV:


Skips


to


the


previous


track


during


media


playback.


12.


NEXT:


Skips


to


the


next


track


during


media


playback.


13.


REPEAT:


Selects


Repeat


or


turn


off


Repeat


mode.


14.


STOP:


Stops


media


play.


15.


STANDBY:


Switches


the


unit


in


and


out


of


Standby


mode.


16.


EPG:


(Electronic


Program


Guide)


Displays


the


EPG.


17.


AUDIO:


Shows


options


for


selecting


an


Audio


Language


or


Audio


Mode.


18.


UP


/


DOWN:


Navigates


through


the


Menus.


Selects


the


next


or


previous


Channel.


19.


MENU:


Turns


on


Main


Menu.


20.


FAVOURITE:


Turns


on


Favourite


Menu.


21.


0

9


(Numeric


Buttons):


Selects


a


channel


or


setting

.


22.


FWD:


Fast


forwards


during


media


play.


Press


repeatedly


for


different


speeds.


23.


REV:


rewind


during


media


play.


Press


repeatedly


for


different


speeds.


24.


PLAY:


Starts


or


resumes


media


play.


25.


PAUSE:


Pauses


media


play.


26.


Red


button:


In


picture


viewing


mode,


press


to


zoom


in


picture.


In


Teletext


mode,


it


is


the


teletext


colour


button.


27.


Green


button:


In


DTV


mode,


press


to


toggle


through


different


Resolution


options.


In


Music


playback


mode,


press


to


toggle


through


different


repeat


settings.


In


Teletext


mode,


it


is


the


teletext


colour


button.


28.


Yellow


button:


In


DTV


mode,


press


to


change


to


different


Aspect


Ratios.


Teletext


mode,


it


is


the


teletext


colour


button.


29.


Blue


button:


In


normal


viewing


mode,


press


to


see


record


list.


In


Teletext


mode,


it


is


the


teletext


colour


button.


30.


REC:


Press


to


record


the


program


on


demand.


31.


LIST:


Press


to


show


the


Recorded


File


List.


Содержание HDR500S

Страница 1: ...HDR500S High Definition Video Recorder...

Страница 2: ......

Страница 3: ...your own records Owner s Name Owner s Address Postcode Model Name No Serial No Dealer s Name Dealer s Address Postcode Authorised Service Centres in Major Australian Cities NSW 151 Arthur Street Homeb...

Страница 4: ...ill be available for collection by or return to the purchaser at a fee upon request TEAC in home service can be made available at a fee upon request Carry in Service 6 A 12 month replacement warranty...

Страница 5: ...er LCN 13 4 3 Picture Setting 13 4 4 Channel Search 14 4 5 Time Setting 15 4 6 Options 16 4 7 System Settings 16 5 USB Multimedia Playback 5 1 Multimedia File Playback 17 5 2 USB and Multimedia Settin...

Страница 6: ...receptacles and the point where they exit from the device 9 Only use attachments accessories specified by the manufacturer 10 Unplug this device during lightning storms or when unused for long periods...

Страница 7: ...2 Safety Precautions...

Страница 8: ...ntrol 4 INDICATOR Used to indicate power state of Set Top Box the LED will turn red when the Set Top Box is in standby mode A blinking green LED display indicates recording status 8 STANDBY Used to sw...

Страница 9: ...elevision 5 COMPONENT VIDEO OUT Connect to your TV component input terminals 6 AUDIO L R These sockets output Analog Audio Left Right signals 7 HDMI High definition audio and video output used to conn...

Страница 10: ...de 16 EPG Electronic Program Guide Displays the EPG 17 AUDIO Shows options for selecting an Audio Language or Audio Mode 18 UP DOWN Navigates through the Menus Selects the next or previous Channel 19...

Страница 11: ...an environmentally sound manner Find out about the legal regulations regarding this matter which apply in your area Using the Remote Control To use the Remote Control point it towards the front of th...

Страница 12: ...our system If you have any problems with setting up please contact your dealer for assistance 3 1Connecting to a television To connect the Set Top Box unit to your television please use any one of the...

Страница 13: ...on your audio system as shown by the schematic diagram below This feature is only available for amplifiers equipped with coaxial digital audio input connectors IN R F LOOP R F THROUGH COMPONENT VIDEO...

Страница 14: ...s Use the AV cables to connect the external DVD recorder or VCR to the AV output jacks on the rear panel of the unit Connect a coaxial cable to the unit to allow recording for various channels as show...

Страница 15: ...key to begin an automated channel search Once the channel tuning is complete you can start viewing broadcasted television programs If the channel search has failed please check that your Antenna has b...

Страница 16: ...elect actions for the currently highlighted channel on the list The following can be done when in the Program Edit Menu Set Favourite Channels You can create a shortlist of favourite programs that you...

Страница 17: ...eferred channel to move then press the RED button A move symbol will appear on the channel 2 Press UP DOWN to move the channel to your preferred location in the channel sequence 3 Press OK to confirm...

Страница 18: ...r By Service ID Sort the channels according to the station By ONID Sort the channels according to ONID D LCN Local Channel Number Set the Local Channel Number to ON or OFF 4 3 Picture Setting To acces...

Страница 19: ...e Search Channel settings Press UP DOWN to select an option and press RIGHT LEFT to adjust the settings Press EXIT to exit the Menu A Auto Search This option will automatically search for channels and...

Страница 20: ...FT keys The Menu provides options to adjust the time settings Press UP DOWN to select an option and press RIGHT LEFT to adjust the settings Press EXIT to exit the menu A Time offset Select auto or man...

Страница 21: ...the preferred subtitle language This feature may be applicable depending on the local broadcaster C Audio Language Select the preferred audio language to accompany your channel viewing If the language...

Страница 22: ...master unlock password is 888888 C Information View model hardware and software information D Software Update If the status is set to ON it will scan for new software from the broadcasters according...

Страница 23: ...epeat all Repeat all random Repeat off Note To play music and a picture slide show simultaneously start the music playback first Press RECALL and navigate to the image files per the instructions below...

Страница 24: ...rent speeds Press PLAY to resume playing Previous Next track Press for previous track and for next track GOTO Press the GOTO button and enter a specific time to jump to in the current track in HH MM S...

Страница 25: ...onfigure Subtitle Font Choose the preferred size of the movie subtitle Available options are Small Normal Big Subtitle Background Choose the background for the movie subtitle Available options are Whi...

Страница 26: ...tems only Storage devices need to be formatted before first use Formatting will erase all data on the device please back up all valuable data before formatting NOTE o TEAC cannot guarantee compatibili...

Страница 27: ...for TV or Radio Channel Number Specify the channel by number Name This displays the name of the channel selected above can only be changed by selecting another channel number Start Date select the st...

Страница 28: ...to switch on the TV midway recording and proceed to view the program that is being recorded Record View schedules cannot clash as this unit uses a single tuner tuning into one stationat a time 6 4 Tim...

Страница 29: ...screen press the OK key The YELLOW key will delete the highlighted file a message will appear on the screen asking you to confirm or exit Press the GREEN key to rename the highlighted file a window d...

Страница 30: ...correctly Sound on mute Turn off the mute function Only sound no image on the screen No or incorrect connection with AV cable Make sure cables are connected correctly The program is a radio program Pr...

Страница 31: ...0Hz Maximum Power Consumption 8W Item Sub Item Parameter Tuner Input Frequency 170 230MHz 470 860MHz RF Input level 25 78dBm IF Bandwidth 7MHz and 8MHz Modulation QPSK 16QAM 64QAM Standby Power Consum...

Страница 32: ...TEAC CUSTOMER SUPPORT HOTLINE TCS 1300 553 315 Between Monday to Friday EST 9AM to 6PM...

Отзывы: