background image

3

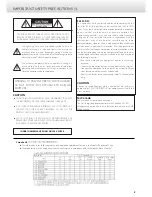
CAUTION

DO NOT REMOVE THE EXTERNAL CASES OR CABINETS TO EXPOSE 


o

THE ELECTRONICS. NO USER SERVICEABLE PARTS ARE INSIDE.

IF  YOU  ARE  EXPERIENCING  PROBLEMS  WITH  THIS  PRODUCT, 


o

CONTACT  TEAC  FOR  A  SERVICE  REFERRAL.  DO  NOT  USE  THE 
PRODUCT UNTIL IT HAS BEEN REPAIRED.

USE  OF  CONTROLS  OR  ADJUSTMENTS  OR  PERFORMANCE  OF 


o

PROCEDURES OTHER THAN THOSE SPECIFIED HEREIN MAY RESULT 
IN HAZARDOUS RADIATION EXPOSURE.

WARNING: TO PREVENT FIRE OR SHOCK HAZARD, 

DO  NOT  EXPOSE THIS  APPLIANCE TO  RAIN  OR 

MOISTURE.

IN NORTH AMERICA USE ONLY ON 120 V SUPPLY.

CAUTION: TO REDUCE THE RISK OF ELECTRIC SHOCK, DO NOT 
REMOVE  COVER  (OR  BACK).  NO  USER-SERVICEABLE  PARTS 
INSIDE. REFER SERVICING TO QUALIFIED SERVICE PERSONNEL.

The  lightning  flash  with  arrowhead  symbol,  within  an 
equilateral  triangle,  is  intended  to  alert  the  user  to  the 
presence  of  uninsulated “dangerous  voltage”  within  the 
product’s enclosure that may be of sufficient magnitude to 
constitute a risk of electric shock to persons.

The  exclamation  point  within  an  equilateral  triangle  is 
intended  to  alert  the  user  to  the  presence  of  important 
operating and maintenance (servicing) instructions in the 
literature accompanying the appliance.

For Canada

Industry Canada’s Compliance Statement:
This Class B digital apparatus complies with Canadian ICES-003.
Cet appareil numérique de la classe B est conforme à la norme NMB-
003 du Canada.

For U.S.A.

This  equipment  has  been  tested  and  found  to  comply  with  the 
limits for a Class B digital device, pursuant to Part 15 of the FCC 
Rules. These limits are designed to provide reasonable protection 
against  harmful  interference  in  a  residential  installation.  This 
equipment  generates,  uses,  and  can  radiate  radio  frequency 
energy  and,  if  not  installed  and  used  in  accordance  with  the 
instructions,  may  cause  harmful  interference  to  radio 
communications. However, there is no guarantee that interference 
will  not  occur  in  a  particular  installation.  If  this  equipment  does 
cause harmful interference to radio or television reception, which 
can be determined by turning the equipment off and on, the user 
is encouraged to try to correct the interference by one or more of 
the following measures:

•  Reorient  or  relocate  the  equipment  and/or  the  receiving 

antenna.

• Increase the separation between the equipment and receiver.
•  Connect the equipment into an outlet on a circuit different 

from that to which the receiver is connected.

•  Consult the dealer or an experienced radio/TV technician for 

help.

CAUTION

Changes  or  modifications  to  this  equipment  not  expressly 
approved  by  TEAC  CORPORATION  for  compliance  will  void  the 
user’s warranty.

China RoHS 

The information in the following table is only applicable to products for sale in the People’s Republic of China.


o

The products sold in the European area are manufactured in accordance with the European RoHS Directive.


o

.

IMPORTANT SAFETY PRECAUTIONS (1)

Содержание Esoteric K-07

Страница 1: ...D01163921B K 07 Super Audio CD CD Player OWNER S MANUAL 5 MODE D EMPLOI 35 MANUAL DEL USUARIO 65...

Страница 2: ......

Страница 3: ...onforme la norme NMB 003 du Canada For U S A This equipment has been tested and found to comply with the limits for a Class B digital device pursuant to Part 15 of the FCC Rules These limits are desig...

Страница 4: ...g walked on or pinched particularly at plugs convenience receptacles and the point where they exit from the apparatus 11 Only use attachments accessories specified by the manufacturer 12 Use only with...

Страница 5: ...where you purchased the equipment Disposal of batteries and or accumulators a Waste batteries and or accumulators should be disposed of separately from the municipal waste stream via collection facil...

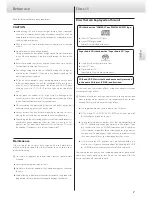
Страница 6: ...Keep this manual in a safe place for future reference o o Warranty card x 1 What s in the box 6 Before use 7 Discs 7 Remote control unit 9 Making connections 10 Names and functions of parts main unit...

Страница 7: ...or use diluted mild liquid soap Allow the surface of the unit to dry com pletely before using Q For safety disconnect the power cord from the socket before cleaning Never spray liquid directly on this...

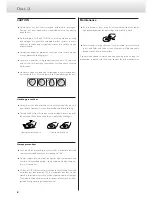
Страница 8: ...nd lift the disc out holding it carefully by the edges How to remove the disc How to hold the disc Storage precautions Discs should be returned to their cases after use to avoid dust and o o scratches...

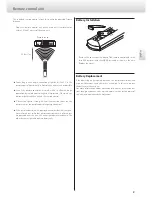
Страница 9: ...remote sensor the remote control might not function If the remote control unit is operated near other devices that gen o o erate infrared rays or if other remote controls that use infrared rays are o...

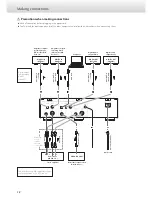
Страница 10: ...k etc DIGITAL IN COAXIAL DIGITAL IN OPTICAL Optical digital cable RCA coaxial digital cable RCA coaxial digital cable USB cable Optical digital cable Digital audio output device Computer Digital audio...

Страница 11: ...its L connector to the L connector of the amplifier o o Analog audio output can be set to either the RCA or XLR connectors the XLR polarity can be set for pin 2 or 3 HOT or OFF see p 27 When the XLR c...

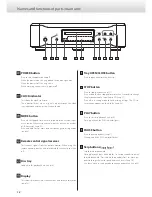
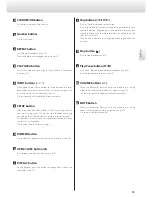
Страница 12: ...y Load a disc for playback here see p 16 F Display This shows playback time track number and other information see p 13 C D E J K F G B H I A G Tray OPEN CLOSE button Press to open and close the disc...

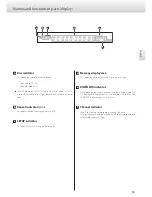
Страница 13: ...t playback see p 19 c SETUP indicator This appears when in setting mode see p 24 a b c d e f d Message display area This shows the playback time and a variety of messages e DOWN MIX indicator When pla...

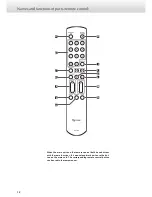
Страница 14: ...l A C F D H I J L M N K G B E When the main unit and the remote control both have buttons with the same functions this manual explains how to use the but ton on the main unit The corresponding remote...

Страница 15: ...button is not used with this unit B Number buttons Use to select tracks C REPEAT button Use with repeat playback see p 19 Press and hold to enter program mode see p 19 D PLAY AREA button Press when st...

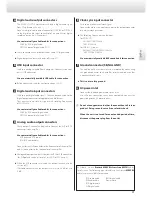
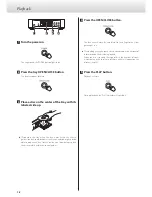
Страница 16: ...display see p 13 5 Press the PLAY button Playback will start During playback the PLAY indicator will light blue 1 3 5 4 2 1 Turn the power on The ring around the POWER button lights blue 2 Press the...

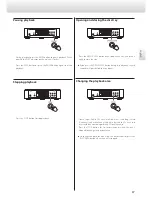
Страница 17: ...ray and press it again to close the tray If you press the OPEN CLOSE button during disc playback several o o seconds will pass before the tray opens Changing the playback area Some Super Audio CDs hav...

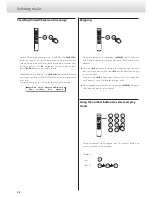
Страница 18: ...the number buttons to select and play tracks During playback or when stopped press the number buttons to select a track and start its playback Examples Track 7 Track 23 Searching forward backward sca...

Страница 19: ...ntly playing disc Stopping playback disables repeat playback o o You can program up to 30 tracks in the order that you want to listen to them 1 When stopped or during playback press and hold the REPEA...

Страница 20: ...k use the number buttons to select the number of the track that you want to add Clearing the contents of the program and return ing to ordinary playback When stopped or during playback press the REPEA...

Страница 21: ...COAX in OPT in USB in To do this using the remote control press an INPUT button when stopped COAX in Coaxial digital input OPT in Optical digital input CD SACD USB in USB input for use with a compute...

Страница 22: ...time that you connect this unit with a computer the o o computer will automatically detect this unit s USB port and install the driver Follow the instructions from the operating system After completi...

Страница 23: ...e computer cannot control this unit nor can this unit control o o the computer This unit cannot send audio files to the computer by USB o o Do not do any of the following when playing back an audio fi...

Страница 24: ...DF Z CLK o o Depending on the operation status some items might not appear Setting mode will end automatically if nothing is done for 10 sec o o onds and the CD status message will reappear When the...

Страница 25: ...digital filter is used by the D A converter Using this setting high frequency harmonic components will be o o output If noise occurs because of cross modulation from high frequency harmonic components...

Страница 26: ...T PLL1 The built in PLL circuit follows the input digital audio signal and generates master clock Operation in response to a wide range of input clock frequencies is possible PLL2 The PLL circuit foll...

Страница 27: ...et to HS_2 set o o the unit to HS_1 instead Analog output setting Display A_OUT RCA Analog audio signals are output through the RCA jacks XLR2 Analog audio signals are output through the XLR connector...

Страница 28: ...nverter mode after input has been locked for at least 60minutes the display automatically turns off OFF The display never turns off automatically If the display is left ON with the same indication for...

Страница 29: ...in 1 dB steps 99 dB to 0 dB Press the remote control MUTE button to temporarily mute the sound Press again to restore the previous volume setting This can only be used when the attenuator function is...

Страница 30: ...e the unit as far away as possible from televisions and other devices with strong magnetism No sound from speakers or sound is distorted e Check the amplifier and speaker connections see p 10 e Adjust...

Страница 31: ...a computer via a USB hub for example noise might be heard If this occurs connect the unit directly to the computer Audio files cannot be played back e Connect the computer with this unit and switch t...

Страница 32: ...10 22 5792 MHz USB HS_2 input 44 1 48 88 2 96 100 176 4 192 kHz 10 22 5792 24 576 MHz 15 ppm Input impedance 75 Input level Rectangle wave equivalent to TTL levels Sine wave 0 5 to 1 0 Vrms 50 to 75...

Страница 33: ...33 English Rear panel...

Страница 34: ...34...

Страница 35: ...t des batteries et ou accumulateurs veuillez contacter votre mairie le service d ordures m nag res ou le magasin dans lequel vous les avez achet s Pb Hg Cd INSTRUCTIONS DE S CURIT IMPORTANTES N expose...

Страница 36: ...r pour o o r f rence ult rieure Carte de garantie x 1 Contenu de l emballage 36 Avant l utilisation 37 Disques 37 Bo tier de t l commande 39 Faire les branchements 40 Nomenclature et fonctions des par...

Страница 37: ...dilu Laissez la surface de l unit s cher compl tement avant utilisation Q Par s curit d branchez le cordon d alimentation de la prise secteur avant tout nettoyage Ne vaporisez jamais du liquide direc...

Страница 38: ...tier et soulevez le disque en le tenant soigneusement par la tranche Comment sortir le disque Comment tenir le disque Pr cautions de rangement Les disques doivent tre rang s dans leurs bo tiers apr s...

Страница 39: ...fonctionner Si le bo tier de t l commande est employ proximit d autres o o appareils g n rant des rayons infrarouges ou si d autres t l commandes utilisant des rayons infrarouges sont utilis es pr s...

Страница 40: ...ique COAXIALE Entr e num rique OPTIQUE C ble num rique optique C ble num rique coaxial RCA C ble num rique coaxial RCA C ble USB C ble num rique optique Appareil sortie audio num rique Ordinateur Appa...

Страница 41: ...o o La sortie audio analogique peut tre r gl e pour utiliser les prises RCA ou XLR la polarit des XLR peut tre r gl e pour que le point chaud soit sur la broche 2 ou sur la broche 3 ou tre d sactiv e...

Страница 42: ...ez ici le disque lire voir p 46 F cran Affiche la dur e de lecture le num ro de piste et d autres informations voir p 43 C D E J K F G B H I A G Touche d ouverture fermeture de tiroir Appuyez pour ouv...

Страница 43: ...ure en boucle voir p 49 c Indicateur SETUP Appara t en mode de r glage voir p 54 a b c d e f d Zone d affichage de message Affiche le temps de lecture et une vari t de messages e Indicateur DOWN MIX Q...

Страница 44: ...L M N K G B E Quand l unit principale et la t l commande ont toutes les deux des touches ayant les m mes fonctions ce mode d emploi explique comment utiliser la touche de l unit principale La touche...

Страница 45: ...TANDBY ON Cette touche ne sert pas avec cette unit B Touches num riques Servent s lectionner les pistes C Touche REPEAT Sert la lecture en boucle voir p 49 Maintenez la press e pour passer en mode pro...

Страница 46: ...l cran voir p 43 5 Appuyez sur la touche PLAY La lecture commencera Durant la lecture le voyant PLAY s allume en bleu 1 3 5 4 2 1 Mettez sous tension Le pourtour de la touche POWER s allume en bleu 2...

Страница 47: ...et r appuyez dessus pour fermer le tiroir Si vous appuyez sur la touche OPEN CLOSE durant la lecture d un o o disque plusieurs secondes s couleront avant que le tiroir ne s ouvre Changement de la zone...

Страница 48: ...riques pour s lectionner et lire des pistes Durant la lecture ou l arr t appuyez sur les touches num riques pour s lectionner une piste et lancer sa lecture Exemples Piste 7 Piste 23 Recherche avant...

Страница 49: ...ure d sactive la lecture en boucle o o Vous pouvez programmer jusqu 30 pistes dans l ordre dans lequel vous voulez les couter 1 l arr t ou durant la lecture maintenez press e la touche REPEAT Si une p...

Страница 50: ...isez les touches num riques pour s lectionner le num ro de la piste que vous voulez ajouter Effacement du programme et retour la lecture ordinaire l arr t ou en lecture appuyez sur la touche REPEAT po...

Страница 51: ...B in Pour le faire depuis la t l commande appuyez l arr t sur une touche INPUT COAX in Entr e num rique coaxiale OPT in Entr e num rique optique CD SACD USB in Entr e USB pour un ordinateur Quand une...

Страница 52: ...standard La premi re fois que vous branchez cette unit un ordinateur o o l ordinateur d tecte automatiquement le port USB de l unit et installe le pilote Suivez les instructions du syst me d exploitat...

Страница 53: ...er cette unit et cette unit ne o o peut pas contr ler l ordinateur o o Cette unit ne peut pas transmettre de fichiers audio l ordinateur par USB N essayez aucune des op rations suivantes pendant la le...

Страница 54: ...t certains param tres peuvent ne pas appara tre Le mode de r glage sera automatiquement abandonn si rien o o n est fait durant 10 secondes et le message de statut de CD reviendra Quand le menu est ouv...

Страница 55: ...moniques de haute o o fr quence seront produites Si du bruit survient pour cause par exemple de modulation crois e des composantes harmoniques de haute fr quence r glez plut t DF sur FIR ou S_DLY FIR1...

Страница 56: ...24 576 MHz Quand l entr e est r gl e sur COAX ou OPT PLL1 Le circuit PLL int gr suit le signal audio num rique entrant et g n re l horloge ma tre Le fonctionnement en r ponse une large plage de fr qu...

Страница 57: ...urviennent avec un r glage o o HS_2 r glez plut t l unit sur HS_1 R glage de sortie analogique Affichage A_OUT RCA Les signaux audio analogiques sortent par les prises RCA XLR2 Les signaux audio analo...

Страница 58: ...N A apr s que l entr e ait t verrouill e durant au moins 60 minutes l cran s teint automatiquement OFF L cran ne s teint jamais automatiquement Si l cran reste allum longtemps sur les m mes indication...

Страница 59: ...99 dB 0 dB Appuyez sur la touche MUTE de la t l commande pour temporairement couper le son Appuyez nouveau pour restaurer le r glage de volume ant rieur Cela ne peut tre employ que si la fonction att...

Страница 60: ...u bruit e loignez autant que possible l unit des t l viseurs et autres appareils fort champ magn tique Aucun son ne sort des enceintes ou il souffre de distorsion e V rifiez les branchements de l ampl...

Страница 61: ...rdinateur via un concentrateur hub USB du bruit peut tre entendu Si cela se produit branchez l unit directement l ordinateur Les fichiers audio ne peuvent pas tre lus e Connectez l ordinateur et cette...

Страница 62: ...SACD 44 1 88 2 100 176 4 kHz 10 22 5792 MHz Entr e USB HS_2 44 1 48 88 2 96 100 176 4 192 kHz 10 22 5792 24 576 MHz 15 ppm Imp dance d entr e 75 Niveau d entr e Onde rectangulaire quivalent aux nivea...

Страница 63: ...63 Fran ais Face arri re...

Страница 64: ...64...

Страница 65: ...rca de la forma de eliminar pilas y o acumuladores gastados p ngase en contacto con su Ayuntamiento con la correspondiente empresa del servicio de recogida de residuos o con el comer cio donde se adqu...

Страница 66: ...ra futuras consultas o o Tarjeta de garant a x 1 Qu hay en la caja 66 Antes de su utilizaci n 67 Discos 67 Mando a distancia 69 Realizar las conexiones 70 Nombres y funciones de las partes unidad prin...

Страница 67: ...un pa o suave o utilice un jab n l quido suave diluido Deje que la superficie de la uni dad se seque completamente antes de usarla Q Por seguridad desconecte el cable de alimentaci n de la corriente a...

Страница 68: ...centro de la caja y o o levante con cuidado el disco sosteni ndolo por los bordes C mo sacar el disco C mo sujetar el disco Precauciones de almacenamiento Los discos deber n guardarse en sus cajas de...

Страница 69: ...uerte luz artificial el mando a distancia podr a no funcionar Si se utiliza el mando a distancia cerca de otros dispositivos que o o generen rayos infrarrojos o si se usan cerca de la unidad otros man...

Страница 70: ...al RCA Cable USB Cable digital ptico Dispositivo de salida de audio digital Ordenador Cable de corriente incluido Toma de electricidad Amplificador est reo Entrada de audio entrada de l nea LINE IN et...

Страница 71: ...dio anal gico se puede configurar para que salga o o por los terminales RCA o por los terminales XLR la polaridad de los conectores XLR se puede configurar con el pin 2 o el pin 3 como VIVO o desactiv...

Страница 72: ...e pista y otra informaci n ver p gina 73 C D E J K F G B H I A G Bot n de apertura cierre de la bandeja OPEN CLOSE P lselo para abrir y cerrar la bandeja de disco H Bot n de parada STOP P lselo para d...

Страница 73: ...configuraci n SETUP Aparece en el modo de configuraci n ver p gina 84 a b c d e f d rea de mensajes Muestra el tiempo de reproducci n y otra serie de mensajes e Indicador de mezcla DOWN MIX Cuando se...

Страница 74: ...I J L M N K G B E Cuando la unidad principal y el mando a distancia tienen ambos botones con las mismas funciones este manual explica c mo uti lizar el bot n de la unidad principal El correspondiente...

Страница 75: ...NDBY ON Este bot n no se utiliza con esta unidad B Botones num ricos Se usan para seleccionar las pistas C Bot n REPEAT Se utiliza con la reproducci n repetida ver p gina 79 P lselo y mant ngalo pulsa...

Страница 76: ...Pulse el bot n PLAY Comenzar la reproducci n Durante la reproducci n el indicador PLAY se iluminar en azul 1 3 5 4 2 1 Encienda la unidad El anillo alrededor del bot n POWER se iluminar en azul 2 Puls...

Страница 77: ...bandeja y vuelva a pulsarlo otra vez para cerrar la bandeja Si pulsa el bot n OPEN CLOSE durante la reproducci n del disco o o pasar n varios segundos antes de que la bandeja se abra Cambiar el rea de...

Страница 78: ...urante la reproducci n o con la reproducci n parada pulse los botones num ricos para seleccionar una pista y comenzar su reproducci n Ejemplos Pista 7 Pista 23 Buscar hacia delante hacia atr s explora...

Страница 79: ...ese momento Deteniendo la reproducci n se desactiva la reproducci n repetida o o Usted puede programar hasta un total de 30 pistas en el orden que desee escucharlas 1 Durante la reproducci n o con ell...

Страница 80: ...um ricos para seleccionar el n mero de pista que desee a adir Borrar el contenido del programa y volver a la reproducci n normal Durante la reproducci n o con la reproducci n parada pulse el bot n REP...

Страница 81: ...ccione una de las entradas digitales externas COAX in OPT in USB in Para hacer esto usando el mando a distancia pulse un bot n INPUT con la reproducci n parada COAX in Entrada digital coaxial OPT in E...

Страница 82: ...l sistema operativo La primera vez que conecte esta unidad a un ordenador el orde o o nador detectar el puerto USB de la unidad e instalar el driver controlador Siga las instrucciones del sistema oper...

Страница 83: ...unidad no puede enviar archivos de audio al ordenador o o mediante USB No lleve a cabo ninguna de las siguientes operaciones cuando se o o est reproduciendo un archivo de audio mediante USB Si lo hace...

Страница 84: ...DF Z CLK Dependiendo del estado operativo algunos apartados podr an o o no aparecer El modo de configuraci n terminar autom ticamente si no se o o hace nada durante 10 segundos y reaparecer el mensaje...

Страница 85: ...ando este ajuste los componentes arm nicos de las altas fre o o cuencias estar n presentes en el sonido Si se produce ruido a causa de la modulaci n cruzada procedente de lo componentes arm nicos de l...

Страница 86: ...92 MHz Fuente de 48kHz 24 576 MHz Cuando la entrada es COAX u OPT PLL1 El circuito PLL interno sigue la se al de audio digital que entra y genera el reloj maestro Es posible el funcionamiento en respu...

Страница 87: ...o o par metro puesto en HS_2 cambie la configuraci n a HS_1 Ajuste de salida anal gica Pantalla A_OUT RCA Las se ales de audio anal gico salen por los terminales RCA XLR2 Las se ales de audio anal gic...

Страница 88: ...idor D A despu s de que la entrada haya sido acoplada durante al menos 60 minutos la pantalla se apagar autom ticamente OFF La pantalla nunca se apaga autom ticamente Si la pantalla se deja encendida...

Страница 89: ...a distancia para silenciar tem poralmente el sonido Vuelva a pulsarlo otra vez para restaurar el ajuste de volumen anterior Esta funci n solamente puede utilizarse cuando la funci n del o o atenuador...

Страница 90: ...je la unidad lo m s posible de televisiones y otros aparatos con fuerte magnetismo No hay sonido procedente de los altavoces o el sonido est distorsionado e Compruebe las conexiones del amplificador y...

Страница 91: ...ores que corran bajo los siguientes sistemas operativos Windows XP 32 bits Windows Vista 32 64 bits Windows 7 32 64 bits Mac OS X 10 6 4 o posterior 32 64 bits No est garantizado el funcionamiento con...

Страница 92: ...B HS_2 44 1 48 88 2 96 100 176 4 192 kHz 10 22 5792 24 576 MHz 15 ppm Impedancia de entrada 75 Nivel de entrada Onda rectangular equivalente a niveles TTL Onda senoidal de 0 5 a 1 0 Vrms de 50 a 75 Ge...

Страница 93: ...93 Espa ol Panel posterior...

Страница 94: ...94...

Страница 95: ......

Страница 96: ...26 0303 e mail esoteric_info teac com TEAC MEXICO S A de C V R o Churubusco 364 Colonia Del Carmen Delegaci n Coyoac n CP 04100 M xico DF M xico Phone 52 55 5010 6000 TEAC AUDIO EUROPE Liegnitzer Stra...

Отзывы: