background image

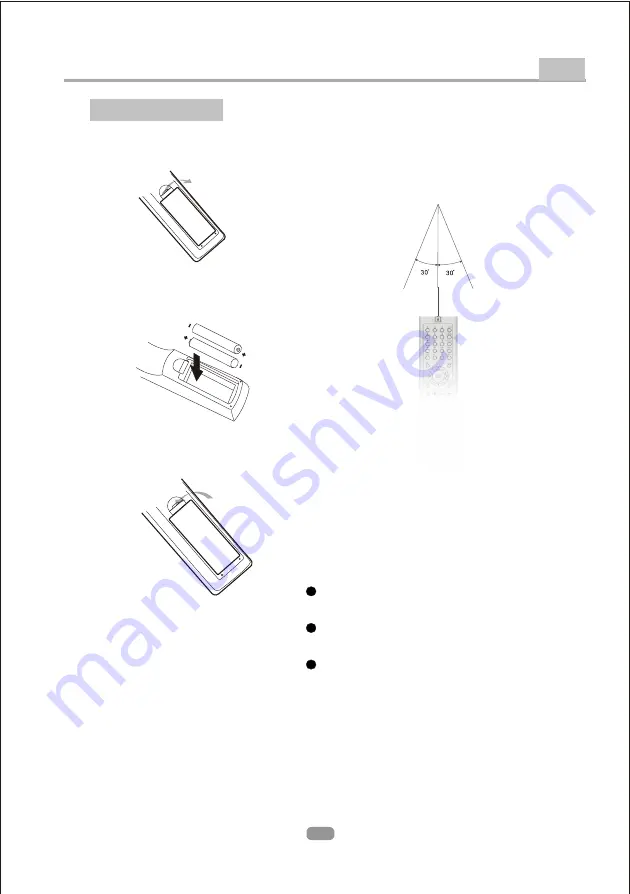
Battery installation

Battery installation

1.Open the cover

1.Open the cover

O

PE

N

2.Install batteries

2.Install batteries

O

PE

N

3.Close the cover

3.Close the cover

Using the remote


Using the remote


 Point the remote control directly at the 

     player's remote sensor.

 Do not leave the remote control in an 

     extremely hot or humid place.

 Do not spill water or put anything wet 

     on the remote control.

 Point the remote control directly at the 

     player's remote sensor.

 Do not leave the remote control in an 

     extremely hot or humid place.

 Do not spill water or put anything wet 

     on the remote control.

Remote Control Preparation

Other

29

Notes:

Point the remote control at the remote sensor. 

(The pictures below are for reference only.)

Содержание DV3121

Страница 1: ...DV3121 DVD Player IMPORTANT USER MANUAL...

Страница 2: ...ised Service Centre Where in home service is not available the purchaser is required to send the product to the nearest TEAC Authorised Service Centre for repair In this event a copy of this warranty...

Страница 3: ...e any obligation on it in connection with the sale of any equipment other than as stated in this warranty and outlined above 11 In no event will TEAC be responsible or liable for indirect or consequen...

Страница 4: ...Service Centre 3 Please have your purchase receipt as your proof of purchase and the following details completed for a valid Warranty Owner s Name Owner s Address Postcode Model Name No Serial No Dea...

Страница 5: ...ustration Remote Control Introduction 2 3 5 6 7 8 TV set Connecting Digital Audio Connecting Connections 9 10 Advanced Features 21 Others Troubleshooting 29 Specifications 11 27 Content Mode and Featu...

Страница 6: ...2 AVIS RISQUE CHOC ELECTRIQUE NE PAS OUVRIR...

Страница 7: ...3...

Страница 8: ...4...

Страница 9: ...5 5...

Страница 10: ...on Corporation and other rights owners Use of this copyright protection technology must be authorized by Macrovision Corporation and is intendedfor home and other limited viewing uses only unless othe...

Страница 11: ...BUTTON STOP BUTTON PREV BUTTON PREV BUTTON NEXT BUTTON NEXT BUTTON 6 100V 240V 50 60Hz 1 2 3 4 5 1 2 3 4 5 2 0 CH Audio output L R 2 0 CH Audio output L R COMPOSITE VIDEO output jack COMPOSITE VIDEO...

Страница 12: ...SVCD dts dts DVD DVD 3 In order to operate any of the remote functions you must first press the Power button on the DVD player STANDBY TITLE SUBTITLE LANGUAGE ANGLE TIME DISPLAY PBC STOP PLAY REV FWD...

Страница 13: ...9 Y Pb Pr...

Страница 14: ...input channels If connected to the AVI TV need to switch to the AVI Please refer to the TV set connecting 3 The Amplifier will output voice after audio receive Coaxial signal It requires the Amplifier...

Страница 15: ...Right arrow button to activate that page For example if you want to setup the video page press Right to highlight the video icon the video page will be displayed on the screen C Press the Down arrow b...

Страница 16: ...CONTRAST HUE SATURATION SHARPNESS EXIT SETUP The SCREEN SAVER function is automatically and always on when the player is in STOP after few minutes in Open or No disc state it will appear a DVD logo mo...

Страница 17: ...ive scan with Y Pb Pr cables According to the setting of the output jack of TV set you can choose INTERLACE YUV P SCAN Y Pb Pr S VIDEO According to the setting of the output jack of TV set you can cho...

Страница 18: ...ge you prefer Press Enter to confirm then the language will be set as OSD language Highlight the OSD LANGUAGE option and press the Arrow buttons to choose the OSD language you prefer Press Enter to co...

Страница 19: ...playing has that Language it will display the menu in the language ENGLISH GERMAN SPANISH FRENCH SLOVAK CZECH POLISH LATIN ENGLISH GERMAN SPANISH FRENCH SLOVAK CZECH POLISH LATIN ENGLISH GERMAN SPANI...

Страница 20: ...the AUDIO OUT option and press the Arrow buttons to choose the audio output mode you prefer Press Enter to confirm There are 3 optional audio output modes SPDIF OFF SPDIF RAW and SPDIF PCM 2 3 1 AUDI...

Страница 21: ...the Up and Down arrow buttons to move the scroll and adjust the contrast Use the Up and Down arrow buttons to move the scroll and adjust the contrast VIDEO SETUP VIDEO SETUP BRIGHTNESS CONTRAST HUE SA...

Страница 22: ...ll and adjus t the sharpness VIDEO SETUP VIDEO SETUP BRIGHTNESS CONTRAST HUE SATURATION SHARPNESS EXIT SETUP 2 4 4 SATURATION 2 4 4 SATURATION Use the Up and Down arrow butt ons to move the scroll and...

Страница 23: ...onnected to a 2 Channel Analog Audio Input A LT RT Choose this setting when the DVD player are connected to a 2 Channel Analog Audio Input B STEREO Choose this setting when the DVD player is connected...

Страница 24: ...O DYNAMIC RANGE DUAL MONO EXIT SETUP DIGITAL SETUP DIGITAL SETUP 2 6 1 DYNAMIC RANGE When LINE OUT is selected choose this setting to adjust the line out ratio for different effects 2 6 1 DYNAMIC RANG...

Страница 25: ...dio and Subtitle message menu During playback press DISPLAY to showthe current time counter position Play time of the current title Play time of the current title Total title Total title Total Chapter...

Страница 26: ...to choose the Play time Total Chapter Total Chapter Total title Total title Total Chapter Total Chapter Enter number to choose the Chapter Enter number to choose the Chapter Current title Current titl...

Страница 27: ...oint B The player will repeat the section from A to B automatically Press A B third time to cancel A B repeat and clear points A and B Press A B third time to cancel A B repeat and clear points A and...

Страница 28: ...e to stop playback completely Press PLAYfrom stop mode to start play Press PLAYfrom stop mode to start play Press PAUSEduring playback to pause playback Press PAUSEduring playback to pause playback Pr...

Страница 29: ...ss ZOOM to magnify the image as follows During DVD playback press ZOOM to magnify the image as follows Press ANGLE to view scenes from different camera angles Press ANGLE to view scenes from different...

Страница 30: ...title number and the chapter number in the desired order Then select Play Program and press ENTER to play the chapters in the order you have set Select Clear All and press ENTER to clear all the numb...

Страница 31: ...Advanced Features Q2 Q3 Q4 Q1 2 Q1 3 Q1 4 QOFF IMAGE ROTATION Press the DIRECTION button to rotation the image as you prefer 27...

Страница 32: ...Make sure the Main unit s POWER button is on enter enter 28...

Страница 33: ...ensor Do not leave the remote control in an extremely hot or humid place Do not spill water or put anything wet on the remote control Point the remote control directly at the player s remote sensor Do...

Страница 34: ...al x 1 Battery x 2 Specifications are subject to change without notice Weight and dimensions are approximate Power requirements AC 100 240 Volt 50 60Hz Power consumption 15W Video standard NTSC PAL AU...

Страница 35: ...50 0152 Electronics 2000 Shop 3 190 Sharp Street COOMA 2630 02 64 52 4179 02 64 52 4179 Lachlan Valley TV 49 Vaux Street COWRA 2794 02 63 42 2189 02 63 42 2189 Greg s TV 2 Bingalong Street DALMENY 25...

Страница 36: ...YMOND TCE 2324 02 49 87 7032 02 49 87 6194 QQ Electronics Pty Ltd Unit 5 14 38 Bellona Avenue REGENTS PARK 2143 1300 883 229 0297 38 1311 Quickfix Repairs Shop 17 West Market Street RICHMOND 2754 02 4...

Страница 37: ...1 Hart Street MACKAY 4740 07 49 57 6498 07 49 51 3737 Sunland TV Service Unit 5 Centre One Norval Court MAROOCHYDORE 4558 07 54 43 6444 07 54 43 6464 Telefix Unit 1 96 Aerodrome Road MAROOCHYDORE 4558...

Страница 38: ...C Phone Fax VIC Border Video TV Service 362 Griffith Road ALBURY 2641 02 60 40 2229 02 60 40 2184 Greene s Television Services 149 Hummfray Street BALLARAT 3350 03 53 32 6256 03 53 32 7597 Ted Rivett...

Страница 39: ...ON 6280 08 97 54 4457 08 97 54 4824 Electronic Plus Unit 3 11 Egan Street CARNARVON 6701 08 99 41 3690 08 99 41 3660 Esperance Communications 33 Norseman Road ESPERANCE 6450 08 90 71 3344 08 90 71 454...

Страница 40: ......

Отзывы: