background image

Notes: Please read the instructions on this page carefully for the sake of safety.

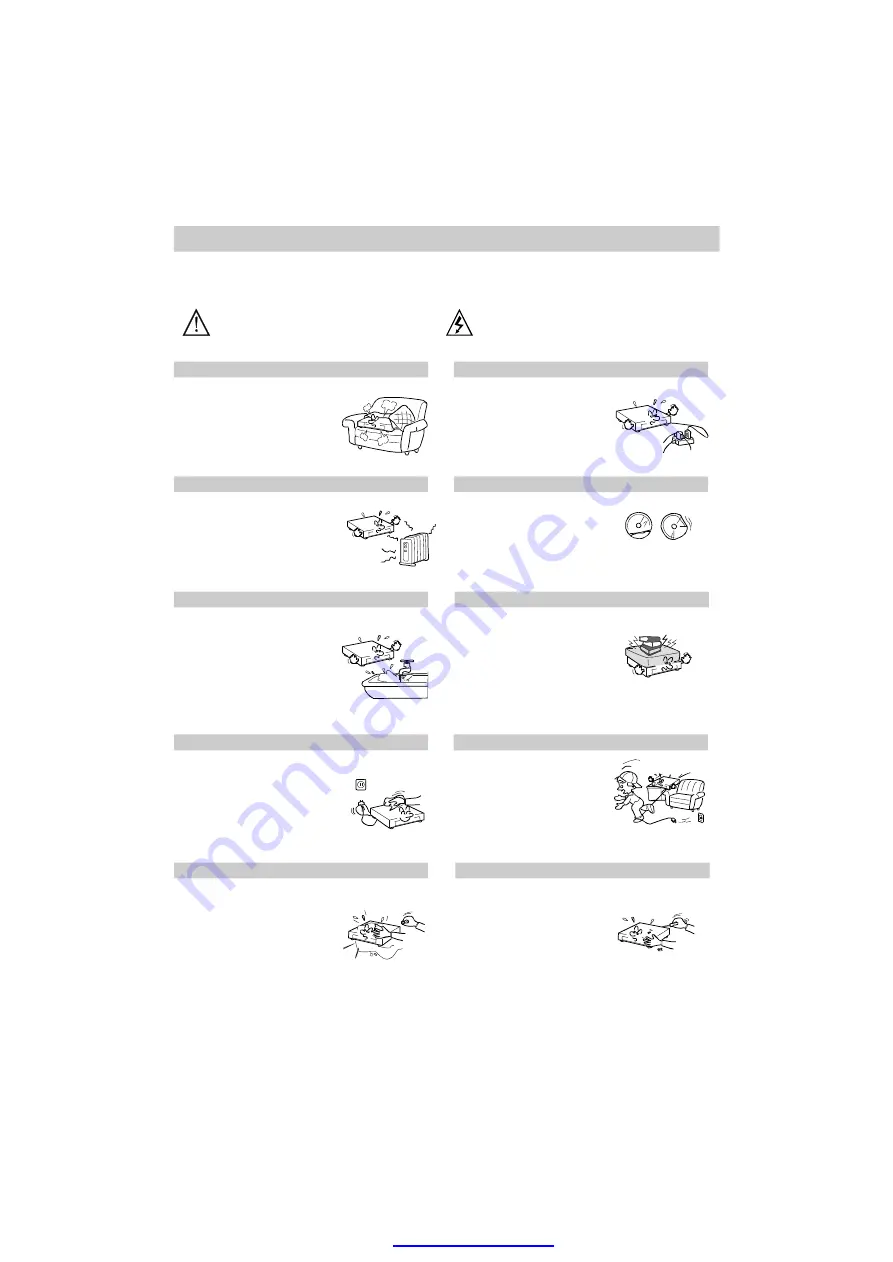
Do not overload the power
supply on socket and be
doubly careful in extending
power wire, integrated socket,
for these may cause an
electric shock or fire.

Do not use broken, distorted
or repaired videodiscs, which
is breakable and may cause
bodily injury or malfunction of
the unit.

Do not placed heavy objects
or trample on the unit, nor
place other objects on the
power wir e,

pay spe cia l

attention to the plug, socket
and power wire.

Do not attempt to repair the
unit by yourself, because the
d a n g e ro u s h ig h

vo lt a g e

electric shock might cause
injure when the enclosure is
open ed. Therefore, all repair
work shall be entrusted to
qualified technicia ns.

The power wire should be
placed out of the reach of feet.
Do not put other articles on
the p ower wire.
Pay special attention to the
plug, socket and power wire.

To guarantee lasting, stable and
reliable opera tion of the unit, do
not place it on bed, sofa, piece
goods or other similar materials
to ensure good ventilation and
heat emission.

Never let foreign matters o r liquid
fall into the unit from any o pening
or gap, for this might get in
contact wit h dangerou s high
voltage or cause short-circuit
among parts inside, which might
cause an electric shock or fire.
Do not splash or sprinkle any
similar liquid into the unit, either.

The unit should be placed away
fro m heat sources, such

as

warming machine, heat regulator,
h e a t i n g

f u rn a c e

o r

o t h e r

exothermic products.

3. Moisture, Oil Smoke

Operate the unit away from a
place with much moisture or oil
smoke, such as bathtub, washing
pool and kitchen, etc. to avoid
reduction in disc reading or error
correct ing ability

caused by

condensation or coherence of oil
smoke o n disc or laser head.

Do not clean until the plug is
disco nnected from the supp ly
socket on the wall, do not use a
liq ui d

det ergen t

or a ero so l

cleanser, use soft clean cloth to
wipe for cleaning.

Important Safety Measures

This sign is to remind users with
important instructions attached with the
unit.

This s ign is to remind

users of

dangerous voltage

with the unit.

1.Ventilation

2. Heat Source

4. Cleaning

5.Intrusion of foreign matters or liquid

6.Overload

7.Videodisc

8. Load

9.Protection of Power Wire

10. Repair

PDF created with pdfFactory Pro trial version 

www.pdffactory.com

Содержание DV-5120HD

Страница 1: ...PDF created with pdfFactory Pro trial version www pdffactory com...

Страница 2: ...PDF created with pdfFactory Pro trial version www pdffactory com...

Страница 3: ...PDF created with pdfFactory Pro trial version www pdffactory com...

Страница 4: ...n SS SL 12cm 8cm 74min 242min SS DL With Directory menu 484min DS DL With Directory menu With Directory menu 266min DS SL N A N A Playtimes refer to 12cm discs only NOTE DivX DVD R DVD RW CD R CD RW D...

Страница 5: ...ture disc playback Fully compatible with regionDIVX MPEG4 DVD VCD MP3 WMA HDCD CD CD R DVD RW etc New wide ranging switch mode powersupply design ranging from 100V 240V Suitable foreverywhere tion dis...

Страница 6: ...speed connections to download feature length movies from the Internet in less than the time it takes to watch them And DivX video technology powers a secure video on demand system thatalready boasts o...

Страница 7: ...meras or scanned from photos using a scanner onto CD R disc because CD R s are a reliable long term storage solution of digital pictures This player can browse all discs recorded with JPEG pictures an...

Страница 8: ...sion Never let foreign matters or liquid fall into the unit from any opening or gap for this might get in contact with dangerous high voltage or cause short circuit among parts inside which might caus...

Страница 9: ...ckward slow motion Frame by frame play Track or chapter skip Repeat System setup menu Details for system setup Language Video Out Audio Misc How to handle protect and clear discs DVD Player Output Cop...

Страница 10: ...out right audio output 8 Mix out left audio output 9 Front left audio output 10 Surround left audio output 11 Center audio output 1 Standby On 2 Disc tray 3 Remote sensor 4 Display screen Display scre...

Страница 11: ...AA Alkaline batteries remote operating the amb please with new Remote Control Remote Control Play mode selection Stand by ON Repeat mode selection Disc playing information Picture zooming Select subt...

Страница 12: ...a video and audio connection to the TV and the HDMI picture definition is better than that of a connection Press key on remote control to switch to HDMI mode directly Before making any connections ens...

Страница 13: ...d channels a centre channel and a bass 0 1 channel 6 When setting the speakers the following is recommended for the optimal surround sound experience Use high performance loudspeakers Ensure menu sett...

Страница 14: ...instructions that accompanied your amplifier in conjunction with this manual 4 Ensure that both the amplifier and the TV are switched off before commencing connection SYSTEM SETUP AUDIO DIGITAL OUTPUT...

Страница 15: ...tomatic recover YES Yes YES No Select and press to confirm The creen will be YES ENTER following s shown Confirm again to use new setting Revert to original setting in 14 seconds YES Yes YES No Here y...

Страница 16: ...playback ENTER Load a VCD e g VCD2 0 upon reading the disc you can play songs with the numeric If you want to select the 8th press e screen shows buttons th 8 To select song beyond the press button f...

Страница 17: ...only applicable to discs recorded with scenes shot atdifferentangles 1 OFF When the picture is zoomed in use the arrow keys to shift and pan to display the part you want to view OSD On Screen Display...

Страница 18: ...rect digit you can press ENTER ENTER NOTE 0 the the ocation or time continuously to clear it l Search Track Time Disc Time DVD VCD CD The DVD player can playback discs including CD R CD RW DVD R DVD R...

Страница 19: ...G Preview Upon loading a disc the screen shows a window as follows The following pictur or reference only e is f Selection and Playing Use or arrows to select and pres s key to start playing PLAY When...

Страница 20: ...ogram files that you had selected before Program View ENTER to lis Press to start Programmed playback PLAY Operating Instructions For Functions 0 45 01 03 04 05 06 07 Filter Repeat Off Mode Normal Jpe...

Страница 21: ...TV screen will show interface as Normal 1 Use arrow ke move the cursor to target opti 2 Press ENTER key enter into your selection or confirm your selection SETUP configure the an shown at right opera...

Страница 22: ...tion when the player is connected to a standard 4 3 aspect ratio TV set The full 16 9 wide screen source pictures will be shown on the screen but with black bars on the top and bottom this option when...

Страница 23: ...ings must be set to Small F Test Tones In tray open or empty state can be used to check 5 1CH output It gives sound from individuals speakers to ensure connectio ns are OK the test tones G H Center Su...

Страница 24: ...lways replace in the box after use Clean the disc by wiping it outwards from the centre gently with a clean soft lint free cloth Do not use alcohol detergent or other chemicals to clean the disc Do no...

Страница 25: ...video input format for receiving the player s output signals Firmly insert the audio cable ends to the related terminals Plug the power cord into the power supply Firmly insert the video cable ends t...

Страница 26: ...PDF created with pdfFactory Pro trial version www pdffactory com...

Отзывы: