background image

5

EN

G

LI

SH

Before use

Read this before operation

<

  Avoid placing the unit in direct sunlight or close to any source of 

heat, such as radiators, heaters, open fireplaces, amplifiers, etc. 
Also avoid locations that are subject to vibrations or exposed to 
excessive dust, cold or moisture.

<

  Place the unit in a stable location near the audio system that you 

will use.

<

  Do not move the unit during playback.

<

  During playback, the disc rotates at high speed. Do not lift or move 

the unit during playback. Doing so may damage the disc or the 
unit.

<

  Be careful to avoid injury when moving the unit due to its weight. 

Get someone to help you if necessary.

<

 The voltage supplied to the unit should match the voltage as 

printed on the rear panel. If you are in any doubt regarding this 
matter, consult an electrician.

<

 As the unit could become warm during operation, always leave 

sufficient space around it for ventilation. When placing this unit, 
position it so that it is at least 30 cm (12

"

) from walls and other 

devices in order to allow good heat dissipation. When installing 
it in a rack, leave at least 30 cm (12

"

) open above and behind the 

unit.

<

 Do not open the cabinet as this might result in damage to the 

circuitry or cause electric shock. If a foreign object should get into 
the unit, contact your dealer or service company.

<

  When removing the power plug from the wall outlet, always pull 

directly on the plug, never yank on the cord.

<

 Always remove the disc before relocating or moving this unit. 

Moving the unit with a disc inside could cause a malfunction.

<

  Depending on the electromagnetic waves of television broadcasts, 

interference might appear on television screens when this unit’s 
power is on. This does not indicate that this unit or the TV is 
malfunctioning. If this occurs, put the unit in standby.

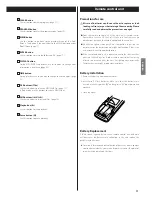
DO NOT MOVE THE UNIT DURING PLAYBACK

During playback, the disc rotates at a high speed. Do NOT lift or move 
the unit during playback. Doing so may damage the disc.

WHEN MOVING THIS UNIT

When changing the place of installation or packing the unit for 
moving, be sure to remove the disc and return the disc table to its 
original position in the player. Then, press the STANDBY/ON button to 
put the unit in standby, and disconnect the power cord. Moving this 
unit with a disc loaded may result in damage to this unit.

Maintenance

If the surface of the unit gets dirty, wipe it with a soft cloth or 
use diluted mild liquid soap. Allow the surface of the unit to dry 
completely before using.

Q

  For safety, disconnect the power cord from the socket before 

cleaning.


p

Never spray liquid directly on this unit.


p

Do not use thinner or alcohol as they could damage the surface of 
the unit.


p

Avoid allowing rubber or plastic materials to touch this product for 
long periods of time, because they could damage the cabinet.

Contents

Thank you for choosing TEAC. Read this manual carefully to 
get the best performance from this unit.

Before use . . . . . . . . . . . . . . . . . . . . . . . . . . . . . . . . . . . . . . . . . . . . . . . . . . . . . . . .5
Discs  . . . . . . . . . . . . . . . . . . . . . . . . . . . . . . . . . . . . . . . . . . . . . . . . . . . . . . . . . . . . .6
MP3 and WMA  . . . . . . . . . . . . . . . . . . . . . . . . . . . . . . . . . . . . . . . . . . . . . . . . . . .7
Using an iPod/iPhone  . . . . . . . . . . . . . . . . . . . . . . . . . . . . . . . . . . . . . . . . . . . .7
USB flash drives   . . . . . . . . . . . . . . . . . . . . . . . . . . . . . . . . . . . . . . . . . . . . . . . . . .7
Connections   . . . . . . . . . . . . . . . . . . . . . . . . . . . . . . . . . . . . . . . . . . . . . . . . . . . . .8
Part names (main unit)  . . . . . . . . . . . . . . . . . . . . . . . . . . . . . . . . . . . . . . . . . . .9
Part names (remote control) . . . . . . . . . . . . . . . . . . . . . . . . . . . . . . . . . . . . 10
Remote control unit  . . . . . . . . . . . . . . . . . . . . . . . . . . . . . . . . . . . . . . . . . . . . 11
About the ErP  . . . . . . . . . . . . . . . . . . . . . . . . . . . . . . . . . . . . . . . . . . . . . . . . . . 12
Basic operation . . . . . . . . . . . . . . . . . . . . . . . . . . . . . . . . . . . . . . . . . . . . . . . . . 13
Listening to a CD  . . . . . . . . . . . . . . . . . . . . . . . . . . . . . . . . . . . . . . . . . . . . . . . 14
Listening to files on a USB flash drive   . . . . . . . . . . . . . . . . . . . . . . . . . . . 15
Listening to an iPod/iPhone  . . . . . . . . . . . . . . . . . . . . . . . . . . . . . . . . . . . . 16
Playback (1)  . . . . . . . . . . . . . . . . . . . . . . . . . . . . . . . . . . . . . . . . . . . . . . . . . . . . 16
Programmed playback (1)  . . . . . . . . . . . . . . . . . . . . . . . . . . . . . . . . . . . . . . 19
Shuffle playback . . . . . . . . . . . . . . . . . . . . . . . . . . . . . . . . . . . . . . . . . . . . . . . . 21
Repeat playback . . . . . . . . . . . . . . . . . . . . . . . . . . . . . . . . . . . . . . . . . . . . . . . . 22
Time  . . . . . . . . . . . . . . . . . . . . . . . . . . . . . . . . . . . . . . . . . . . . . . . . . . . . . . . . . . . 23
Display (1) . . . . . . . . . . . . . . . . . . . . . . . . . . . . . . . . . . . . . . . . . . . . . . . . . . . . . . 23
Before recording  . . . . . . . . . . . . . . . . . . . . . . . . . . . . . . . . . . . . . . . . . . . . . . . 24
Setting the Recoding Mode  . . . . . . . . . . . . . . . . . . . . . . . . . . . . . . . . . . . . 25
Recording to a USB flash drive  . . . . . . . . . . . . . . . . . . . . . . . . . . . . . . . . . . 26
Deleting a file from a USB flash drive . . . . . . . . . . . . . . . . . . . . . . . . . . . . 27
Restoring factory settings . . . . . . . . . . . . . . . . . . . . . . . . . . . . . . . . . . . . . . . 27
Troubleshooting   . . . . . . . . . . . . . . . . . . . . . . . . . . . . . . . . . . . . . . . . . . . . . . . 28
Specifications  . . . . . . . . . . . . . . . . . . . . . . . . . . . . . . . . . . . . . . . . . . . . . . . . . . 29

Содержание CD-H750

Страница 1: ...ENGLISH Z FRAN AIS ESPA OL OWNER S MANUAL MODE D EMPLOI MANUAL DEL USUARIO Compact Disc Player CD H750 CQX1A1710Z...

Страница 2: ...s no guarantee that interference will not occur in a particular installation If this equipment does cause harmful interference to radio or television reception which can be determined by turning the e...

Страница 3: ...om earphones or headphones can cause hearing loss o o Do not expose this apparatus to drips or splashes o o Do not place any objects filled with liquids such as vases on the apparatus o o Do not insta...

Страница 4: ...e you purchased the equipment Disposal of batteries and or accumulators a Waste batteries and or accumulators should be disposed of separately from the municipal waste stream via collection facilities...

Страница 5: ...n this unit s power is on This does not indicate that this unit or the TV is malfunctioning If this occurs put the unit in standby DO NOT MOVE THE UNIT DURING PLAYBACK During playback the disc rotates...

Страница 6: ...lift the disc out holding it carefully by the edges How to remove the disc How to hold the disc CAUTION Do not play any disc that is warped deformed or damaged Playing such discs could cause irreparab...

Страница 7: ...e of 8 kbps to 320 kbps This unit can play WMA files with a sampling frequency of 32 kHz 44 1 kHz or 48 kHz and a bit rate of 48 kbps to 192 kbps WMA stands for Windows Media Audio Audio encoded at 12...

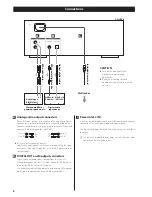
Страница 8: ...plug to the red R jack White L Red R White L Red R Be sure to insert each plug securely To prevent humming and interference avoid bundling the signal interconnection cables together with the AC power...

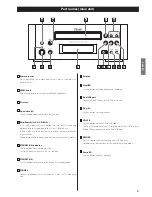
Страница 9: ...the power is on This lights orange when the unit is in standby G STANDBY ON Use this button to turn the unit on or put it in standby mode H PHONES Connect headphones with a standard 3 5 mm 1 8 stereo...

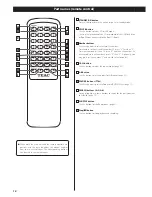
Страница 10: ...these buttons to select a track file number For example to select track file number 25 press 2 first then 5 To select numbers less than 10 press 0 and then the number As an example to select number 5...

Страница 11: ...recautions on page 3 p p Point the remote control unit at the main unit s remote sensor from within 5 meters 16 feet of it Make sure that there are no obstructions between the remote control and the m...

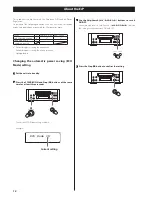
Страница 12: ...ch to standby mode if no operation has occurred for 30 minutes or more Status CD USB flash drive iPod iPhone No disc or connection Stopped paused Recording paused Automatic power saving function activ...

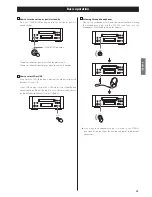
Страница 13: ...e is alternated between CD and USB Select USB to play files on the USB flash drive or iPod iPhone connected to the iPod USB port Use the USB cable included with the iPod iPhone to connect it to the US...

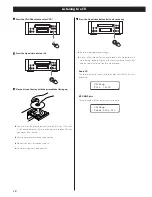
Страница 14: ...ick labels or tape on the disc Do not use irregularly shaped discs Listening to a CD 4 Press the Open close button L to close the tray Be careful not to pinch your finger It takes a few seconds for th...

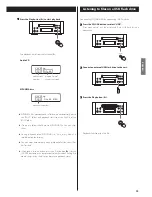
Страница 15: ...ayback of an MP3 WMA file title_artist_album is scrolled across the display The unit stops automatically when playback of all the tracks files has finished If you load a disc and then press the Play b...

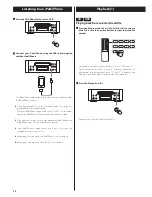
Страница 16: ...is paused If an iPod iPhone is connected to this unit it will only be recharged when this unit is ON Recharging will stop when the iPod iPhone is fully recharged Recharging is not possible when this...

Страница 17: ...in sleep mode only in Direct mode Hold down the Play button y for more than 5 seconds The iPod iPhone enters sleep mode To cancel sleep mode press the Play button y again CD USB Playing back files in...

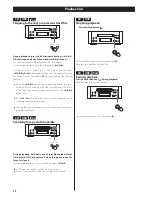
Страница 18: ...ess the m button twice Press m when the playback time is three seconds or less to start playback of the previous track During programmed playback the next or previous track file in the program is play...

Страница 19: ...number 5 press 0 then 5 Optionally you may press just the number 5 and wait for a few seconds 3 Within 10 seconds press the PROGRAM button When CD is selected P 01 T012 T016 72 00 When USB is selecte...

Страница 20: ...previous track file is replaced with the newly selected one If you want to add a track file to the end of the program press the PROGRAM button repeatedly until P END briefly appears on the display The...

Страница 21: ...n an MP3 WMA disc or USB flash drive have been played iPod During playback press the SHUFFLE button to change the shuffle mode RDM off RDM Songs RDM Albums RDM random When shuffle mode is on appears o...

Страница 22: ...t select RPT Folder mode while in the stop mode Repeat All RPT ALL All the tracks files will be played repeatedly In the program mode all the programmed contents are played repeatedly When the Stop bu...

Страница 23: ...fle playback of a CD the remaining playback time of the disc being played is not shown Time CD USB During playback of WMA MP3 files press the DISPLAY button to scroll the information on the display De...

Страница 24: ...maximum number of files that CD H750 can operate is 2000 If more than 2000 files are stored on the USB flash drive CD H750 can not play correctly and cannot record any files A track recorded onto a US...

Страница 25: ...u need to change a setting that you have already passed return to the ordinary display and repeat these procedures from step 2 Bit rate You can set the bit rate of MP3 files for recording CD Stop REC...

Страница 26: ...on the selected setting the selected song will be recorded or recording starts from the beginning of the first song on the CD Recording will stop automatically when playback of the single song or of t...

Страница 27: ...The delete mode will be cancelled if you do not press the CLEAR button within 3 seconds If the unit is not working properly restoring the factory settings might restore it to proper operation 1 While...

Страница 28: ...a CD R RW disc Try again with another disc e You cannot play back unfinalized CD R RW discs Finalize such a disc using a CD recorder and try again Sound skips e Place the unit on a stable surface to...

Страница 29: ...Supported specifications MPEG 1 Audio Layer 3 File name extension mp3 Bit rate 8 kbps 320 kbps Sampling frequency 16 kHz 48 kHz WMA Supported specifications Windows Media Audio Standard DRM not compat...

Страница 30: ...PORATION 1 47 Ochiai Tama shi Tokyo 206 8530 Japan Phone 81 42 356 9156 TEAC AMERICA INC 7733 Telegraph Road Montebello California 90640 U S A Phone 1 323 726 0303 TEAC MEXICO S A DE C V R o Churubusc...

Страница 31: ...nual del Usuario CD H750 Wichtiger Hinweis Dieses Prod ukt entspricht der europa ischen ErP Richtli nie zur Regulierung des Standby Stromverbrauchs Hierzu ist die Energiesparfunktion des CD H750 im Au...

Страница 32: ...omatico activado Funci6n de ahorro de energia automatico desactivado I No aplicable Status CD USB Fiash iPod iPhone Speicher Keine Disc keine Verbindung Stopp Pause Aufna hmebereitschaft v Pause Autom...

Страница 33: ...ayment of shipping charges is covered in the next section D01160400A Ce produit est garanti par TEAC AMERICA Inc ou TEAC CANADA Ltd selon le pays d achat initial contre les defauts de pieces et de mai...

Страница 34: ...obtenir une intervention sous garantie Votre unite doit etre reparee par un service apres vente agree par TEAC dans le pays d achat du produit Si vous ne trouvez pas de service apres vente agree dans...

Отзывы: