background image

INSTALLING THE BATTERY

See illustration IV

Please install the provided lithium battery correctly as shown in illustration IV:

1. 

Switch and hold the Battery Cover Switch (11) upwards  to release the  

battery cover.

2. 

Simultaneously slide the battery cover to the right to release and remove it.

3. 

Place the battery inside the battery compartment. Make sure the 

electrodes of the battery correspond to the symbols on the cover. 

4. 

Slide the battery cover back in place and switch the Battery Cover Switch 

(11) downwards to lock the battery.

5. 

CHARGING THE BATTERY

1. 

Make sure the battery is installed.

2. 

Make sure the Guardo Action Cam is 

turned off.

3. 

Connect the micro USB cable (13)  to the Micro USB Port (8)of the Guardo Action Cam.

4. 

Connect the other end of the micro USB cable(13 to the USB port of your computer or 

the optional Guardo USB home charging device, optionally available on www.guardo.be.

5. 

The camera will be turned 

21

 automatically (PCU or CAR will be displayed), and starts 

UHFRUGLQJZKHQȟ&$5ȠLVˊDVKLQJ6WRSUHFRUGLQJE\SUHVVLQJWKH5HFRUG%XWWRQ

6. 

During charging, the blue LED Indicator (12) will light continuously. 

When charging is completed the blue LED Indicator (12) will turn off.

Note:


x

The camera can be used while charging.

x

When the battery runs out of power, the Guardo will turn off but will save the part that was 

recorded until the camera turned off.

x

When the camera is ON but not in use it will automatically turn off after 5 min.

x

:KHQWKHEOXH/('LQGLFDWRUZLOOˊDVKLQVWHDGRIOLJKWFRQWLQXRXVO\WKLVPHDQVWKDW

there is no battery inside the camera.

x

Extra batteries and charging devices/accessories can be ordered from our website:  

www.guardo.be 

USE

(11)

Содержание Guardo Action Cam +

Страница 1: ...1 USER S MANUAL GB NL D More languages available on www guardo be FR...

Страница 2: ...FW KDV EHHQ testHG DJDLQst following stDQGDrGV DQG VSHFL cations applying versions vDOLG RQ XO 1 1 1 0DQXDO XDUGR FWLRQ DP V3 Copyright GU RDO We the unGersigneG Company TE GROUP nv GGress Kapelsestra...

Страница 3: ...OUNTS A Universal helmet mount with strap B Universal Head strap mount C Seatpost Handlebar Medium D Suction Cup mount E Shorter screw Safety plug GETTING STARTED 1 PLACE MICRO SD CARD 2 TURNING ON OF...

Страница 4: ...t Timelapse duration Set White Balance Set Frequency Format SD Card on Camera ADJUST SETTINGS ONLY APPLICABLE IN VIDEO MODE Set Slow Motion Function Set Upside Down Recording ADJUST SETTINGS ONLY APPL...

Страница 5: ...5 2 3 4 5 6 7 8 9 10 11 12 1 2 3 5 13 14 15 16 25 0 0 0 20 1 ILLUSTRATIONS Illustration I...

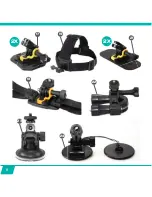
Страница 6: ...6 17 19 21 18 22 23 24 2X 2X...

Страница 7: ...7 Illustration II Illustration III Illustration IV 1 4 3 5 6 7 9 2 4 3 5 6 8 9 0 0 Peel off screen protector...

Страница 8: ...only visible when micro SD card is inserted 5 Resolution setting 0XWH PRGH RQO YLVLEOH LQ 0XWH PRGH 21 7 Photo counter displays number of photos left to capture cannot display more than 999 8 Video t...

Страница 9: ...the other end of the micro USB cable 13 to the USB port of your computer or the optional Guardo USB home charging device optionally available on www guardo be 5 The camera will be turned 21 automatica...

Страница 10: ...oof housing as it is the element that keeps you camera waterproof The rubber strap can be removed to clean it in fresh water Do not use a damp cloth to dry but dry it by shaking it 3 Whenever used in...

Страница 11: ...hese may cause condensation fog Note 0XI HG VRXQG LV LQHYLWDEOH ZKHQ XVLQJ WKH FDPHUD ZLWK WKH ZDWHUSURRI KRXVLQJ MOUNTING THE CAMERA USING THE DELIVERED MOUNTS Attaching the camera to any mount is al...

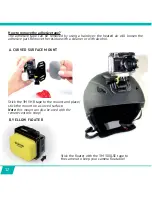
Страница 12: ...ive part Remove the residue with a cleaner or with alcohol A CURVED SURFACE MOUNT Stick the 3M VHB tape to the mount and place stick the mount on a curved surface Note this mount can also be used with...

Страница 13: ...SURFBOARD MOUNT Stick the 3M 300LSE tape to the surfboard mount and place it on the desired surface D FLAT SURFACE MOUNT Stick the 3M VHB tape to the mount DQG SODFH LW RQ D DW VXUIDFH VXFK as a snowb...

Страница 14: ...al helmet mount to the holes in your helmet and fasten B UNIVERSAL HEAD STRAP MOUNT C SEATPOST HANDLEBAR MEDIUM Turn the tightening screws to enlarge the RSHQLQJ DQG WR W WKH VHDWSRVW KDQGOHEDU in bet...

Страница 15: ...camera WITHOUT the waterproof housing Safety plug 6RPH PRXQWV DUH WWHG ZLWK D VDIHW SOXJ DQ DGGLWLRQDO VHFXULW IHDWXUH that helps to prevent the fastener of the mount to come loose Make sure this saf...

Страница 16: ...FUR 6 DUG VORW DQG SUHVV JHQWO ZLWK RXU QJHU nail so that it clicks into place To remove the Micro SD card press the card gently again ZLWK RXU QJHU QDLO VR WKDW LW SRSV RXW Note x When there is no mi...

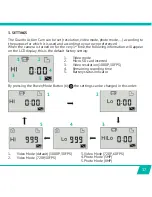
Страница 17: ...lowing information will appear on the LCD display this is the default factory setting 1 Video mode 2 Micro SD card inserted 3 Video resolution 1080P 30FPS 4 Remaining recording time 5 Battery status i...

Страница 18: ...en this indicates your SD card is full and recording is no longer possible You need to empty or format your SD card via computer tv or app again This of course after having copied saved your photos fo...

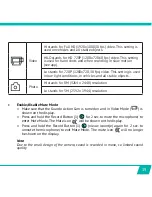
Страница 19: ...con g will no longer be shown on the display Note Due to the small design of the camera sound is recorded in mono so limited sound quality Video HI stands for Full HD 1920x1080 30 fps video This setti...

Страница 20: ...the camera s infrared eye 7 and press the Photo Button once to make a photo x Turn OFF Aim the remote control to the camera s infrared eye 7 and press the Power Button once to turn the camera off Note...

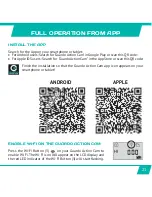
Страница 21: ...sers Search for Guardo Action Cam in the App Store or scan this QR code Finish the installation so that the Guardo Action Cam app icon appears on your smartphone or tablet ENABLE WI FI ON THE GUARDO A...

Страница 22: ...nect again Note x During Wi Fi connection and connection with a smartphone tablet the camera will turn warm This is normal and not a malfunction x A Micro SD Card needs to be inserted before you can m...

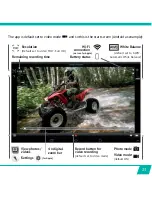
Страница 23: ...Balance default set to AWB Automatic White Balance View photos videos 4 x digital zoom bar Record button for video recording default set to video mode S v Photo mode Video mode default ON e e 00 28 1...

Страница 24: ...Resolution Default set to 8M Wi Fi connection Battery status White Balance default set to AWB Automatic White Balance View photos videos 4 x digital zoom bar Photo button for making photos S v Photo...

Страница 25: ...ur start screen ZOOM 3UHVV LQ WKH DUHD MXVW DERYH WKH WRROEDU EHORZb D RRP EDU ZLOO DSSHDU 3UHVV WR RRP LQ SUHVV WR RRP RXW 0D LPXP LV SET TIMELAPSE INTERVAL 7LPHODSVH IRU YLGHR D ZD RI OPLQJ VRPHWKLQ...

Страница 26: ...RATION I 7LPHODSVH QWHUYDO LV 21 RX FDQ DOVR FKRRVH the duration of the interval Press Android or Apple on your start screen and press Timelampse duration You can now choose from Note In time lapse no...

Страница 27: ...lected In case you do a pop up screen will warn you to turn off the other option ADJUST SETTINGS ONLY APPLICABLE IN VIDEO MODE SET SLOW MOTION FUNCTION Press Android or Apple on your start screen and...

Страница 28: ...ce The Record Button will start DVKLQJ VORZO start of recording Note Depending on your device s model type there could be a delay between the camera and the device The recording will be OK and normal...

Страница 29: ...a snapshot sound indicating that the photo will be taken As soon as you KHDUG D EHHS FRPLQJ IURP WKH FDPHUD DQG VDZ WKH UHG RQ RXU FDPHUD DVK WKH shot was made VIEW SELECT DELETE VIDEOS AND PHOTOS Pre...

Страница 30: ...check marking them o Press The selected video s photo s will now be downloaded to the photo video album of your Apple iOS or Android device Delete photos video s Press until appears Select the videos...

Страница 31: ...PSXWHU RU SORUHU LQ FDVH RX KDYH a Windows pc or in Finder in case you have a Mac Windows PC Apple Mac Click on the DCIM folder to open it The following folders will be shown Contains videos photos ma...

Страница 32: ...ting the Guardo Action Cam to your FULL HD TV using a HDMI cable This cable is optionally available on www guardo be Note Before connecting or removing the HDMI cable please make sure the camera is in...

Страница 33: ...ain to stop playing Delete a photo video press and hold the Record Button 1 You will have the RSWLRQ WR GHOHWH RU IRUPDW WKH OH R 3UHVV WKH L EXWWRQ to switch between deleting or formatting o Press th...

Страница 34: ...USB car charger or the home travel charger Q GDVKFDP PRGH WKH FDPHUD GLVSOD ZLOO DVK 5 GXULQJ UHFRUGLQJ During recording the camera will turn warm This is normal and not a malfunction CUSTOMER SUPPORT...

Страница 35: ...rovided as is without warranty of any kind express or implied including EXW QRW OLPLWHG WR WKH ZDUUDQWLHV RI PHUFKDQWDELOLW WQHVV IRU D SDUWLFXODU SXUSRVH DQG noninfringement In no event shall the aut...

Отзывы: