background image

EPP-4024-7/22 • 10/12

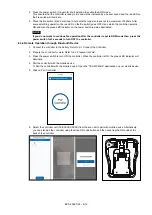
10. On the controller info screen, hold the ‘Arm Controller’ button for a second and release to set the controller 

ready to fire.


When the controller is ready to fire, the fire switch LED indicator should illuminate and buzzer should beep 

continuously.

 NOTE 

If the controller is armed manually before connecting to the bluetooth device, then the arm and 

fire functionality is disabled on the application. Turn OFF the manual mode to enable the bluetooth 

functionality.


11. 

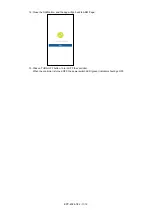
Slide the ‘Slide to fire’ button to fire. After successful completion of fire, the fire switch LED (red) indicator 

and buzzer should go OFF, but power switch LED (green) should be ON. 

A ‘Fire completed’ notification should pop-up in application.


 NOTE 

If the fire operation is initated without connecting the load, then you will see a error message and 

the controller will go back to ready to arm state.

Содержание EPP-4024-7/22

Страница 1: ...determine the suitability of the installation method in the user s field conditions TE Connectivity s only obligations are those in TE Connectivity s standard Conditions of Sale for this product and i...

Страница 2: ...Safety 3 1 1 Important Instructions 3 1 2 Product Compliance 3 2 Introduction 4 3 What s in the Box 4 4 Technical Specifications 5 5 Product Features 6 6 Operation 7 6 1 Connect the Controller 7 6 2 P...

Страница 3: ...ructions are not intended to supersede or replace existing safety and operating procedures CAUTION Changes or modifications not expressly approved by the party responsible for compliance could void th...

Страница 4: ...18V 2415598 2 Introduction This manual contains information on the setup and operation of the AMP Weld Controller The AMP Weld Controller is designed to perform the exothermic welding operation remote...

Страница 5: ...y 0 5 sec Tungsten Output Voltage 18 Vdc 22 Vdc Tungsten Output Current 26 A 35 A Tungsten Length 0 015 0 25 inch Operating Temp 20 C 50 C Operating Humidity 90 RH 4 1 AMP Weld Application Minimum Req...

Страница 6: ...arness Controller side connector 5 Connection harness Weld side connector 6 Battery 18V 5 1 Power Switch The power switch is a push button with green LED indicator which is used to power ON ARM and po...

Страница 7: ...oint to be welded Refer to the manufacturer instructions 2 Connect the cable to the controller NOTE Before you connect the cable to the controller make sure the controller is turned off 3 Connect the...

Страница 8: ...set to ARM mode then press the power switch for 3 seconds to turn OFF the controller 6 3 2 Remote Operation through Bluetooth Device 1 Connect the controller to the battery Refer to 6 1 Connect the Co...

Страница 9: ...e controller and select pair NOTE The pairing code is the last six digits of the TE ID imprinted on the product For example if the TE ID is TE 0123456789 then the pairing code is 456789 9 After succes...

Страница 10: ...etooth device then the arm and fire functionality is disabled on the application Turn OFF the manual mode to enable the bluetooth functionality 11 Slide the Slide to fire button to fire After successf...

Страница 11: ...22 11 12 12 Close the Notification and the app will go back to ARM Page 13 Click on TURN OFF button to turn OFF the controller When the controller is turned OFF the power switch LED green indicator sh...

Страница 12: ...EPP 4024 7 22 12 12...

Отзывы: