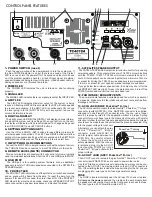
CONTROL PANEL FEATURES
1. POWER SWITCH (reset)
Push the upper portion of the power switch to turn the system on. If
the blue POWER indicator is on but there is no sound or the Protect
LED is on, reset, turn the power off for 10 seconds and then turn it back
on. If the problem persists, check for; a) lack of Input signal, b) external
speaker impedance being too low for the amp, c) bad speaker cable, d)
damaged speaker, or e) blocked fan intake.
2. POWER LED
The POWER LED indicates the unit is turned on and functioning
properly.
3. SIGNAL LED
The SIGNAL LED indicates there is a signal present at the INPUT XLR.
4. LIMIT LED
The LIMIT LED indicates maximum output of the system is being
reached. A flashing LIMIT LED is acceptable, the DSP will reduce peaks
to prevent amp clipping. If the LIMIT LED is continuously ON, reduce
the level going in to the INPUT XLR. As with any system, reduce the
volume if distortion is heard.
5. DIGITAL DISPLAY
The bright green LED DIGITAL DISPLAY will display various informa-
tion about the system and its settings. When you first turn on the unit,
the display will indicate which preset is loaded. To change settings use
the UP/DOWN (SET) and LEFT/RIGHT buttons.
6. SETTING BUTTONS (SET)
Use the UP and DOWN (SET) buttons to load different presets for
external speaker connections. The LEFT and RIGHT buttons will allow
editing of more advanced settings, which are explained in the SETTINGS
MENU section of this manual. There are only a few to select from.
7. INPUT/THRU XLR CONNECTORS
Connect the INPUT XLR to a signal source such as the output of a mixer.
The THRU XLR can be connected to more TC4018A’s or other units.
8. REMOTE LEVEL (MUTE) CONNECTOR
This is a terminal block connector with 5 volt control of volume, typically
used in permanent installations. Short the CTL and GND pins to MUTE.
9. USB PORT
The USB port is for updating system firmware such as additional
speaker presets for TCS Audio speakers connected to the SATELLITE
SPEAKER output.
10. PROTECT LED
The PROTECT LED indicates one of the protection circuits has activated
and no sound will be heard from the amp. To reset the amp, turn the
power off for about 10 seconds, then turn it back ON. If the PROTECT
LED stays lit for more than 5 seconds, check your SPEAKER OUTPUT
cable connnections, speaker impedance or a blocked fan intake.
11. SATELLITE SPEAKER OUTPUT
The SATELLITE SPEAKER output is a twist-lock connector for powering
external speakers. This output will drive two TC4300’s or combinations
with the TC4330, TC4331, TC4335 mini column elements down to 3
ohms. Other speakers can be chained together for a minimum of 4 ohms.
A preset for driving the TC4300 series speakers is pre-programmed.
If there is no preset for your speaker, manual settings are available.
If you go below the minimum speaker load, the amp may shut off or the
red PROTECT LED may light. To reset the protection circuit, turn off the
POWER switch and connect the recommended load.
12. FAN INTAKE / EXHAUST VENTS
The power module features a variable speed fan, which runs silent at
low speeds. Make sure the fan intake and exhaust vents are free from
blockage at all times.
13. AC IN JACK (BLUE P
owEr
C
oN
™ A-
tyPE
)
The AC IN connector accepts the blue Neutrik™ PowerCon™ “A-type”
connector (part# NAC3FCA). One NAC3FCA connector is supplied,
attached to a short length of 3-conductor wire. You can use a longer
wire if it is properly rated for the application. Attach a proper 3-prong
connector for your voltage type to the other end of the wire, with careful
attention to follow the correct pinouts and safety standards. No attempt
should ever be made to use the unit without the ground connected. Plug
into the proper voltage for your unit.
Alternately, you can attach the grey
Neutrik™ PowerCon™ “B-type”
connector (part# NAC3FCB) for
an A-B jumper cable between two
TC4018A’s. Pay careful attention
to follow the correct pinouts and
safety standards. With the connec-
tor attached, plug into the AC OUT
jack of another TC4018A, or into a
PowerCon™ “B-type” outlet with the
proper voltage.
14. AC oUt JACK (GrEy P
owEr
C
oN
™ B-
tyPE
)
The AC OUT connector accepts the grey Neutrik™ PowerCon™ “B-type”
connector (part# NAC3FCB), and is used to power other units.
Use the VA rating on other devices to determine how many can be con-
nected to the AC OUT. The maximum limit on the AC OUT connector is
15A. Other limiting factors include the breaker rating for the AC line you
are plugging into, wire type and (if used) generator capacity.
FUSE
The FUSE is located internally near the AC input. To check or replace,
first
remove the power cord
and then remove the amp module from
the speaker enclosure then remove the front panel to access the fuse.
The fuse type is a 250V Slow Blow rated at 10A.
7
1
2
5
8
12
3 4
6
9
10
11
N
L
PowerCon™ wiring
14
13

