background image

7


4.3.  Turn On and Off 

To turn the product on press the 

button once. To turn off press the 

button again. When you 

turn the product on for the first time, it will ask you to set the date and time. Use the 

buttons to 

select the correct time and press the   

button to confirm. Then use the 


buttons to select the 

correct minutes and press 

. Use the   

buttons again to select the correct day and press the 

button to confirm.


4.4.  Submenu configuration 

Press  the 


button  to  access  the  configuration  menu.  Then  use  the 

buttons  to  navigate  to


settings.  Press  the 

button to access.


4.4.1.  Set the day and time 

To set the day or time select the 

CLOCK 

option.


Use the 

buttons to select the correct time and press the   

button to confirm. Then use the 

buttons to select the correct minutes and press the 

button to confirm. Then use the


buttons to select the correct day and press the 

button to confirm.


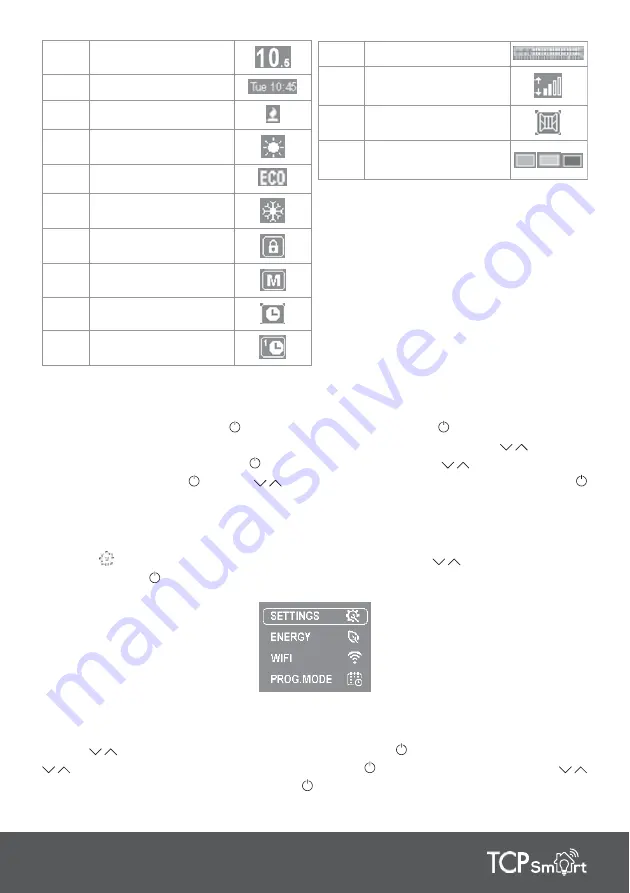
11


Hourly programming


12


Wi-Fi connection


indicator


13


Open Windows indicator


14


Energy consumption


indicator


1


Selected temperature


2


Current time and day


3


Heating element on


4


Comfort  mode


5


Eco mode


6


Anti-Frost mode


7


Locked keypad


8


Manual mode


9


Automatic mode


10


Pre-program mode


Содержание CRI0500RAD

Страница 1: ...TCP Smart Wi Fi radiator Digital electric radiator with thermal fluid and Wi Fi inside module EN INSTRUCTION INSTALLATION GUIDE...

Страница 2: ...enance should not be carried out by children without supervision Children must be supervised at all times to ensure that they do not interfere with the product This product is filled with a precise am...

Страница 3: ...r Information Instructions 6 4 1 Touchpad 6 4 2 Screen 6 4 3 Turn On and Off 7 4 4 Submenu configuration 7 4 5 Locking touchpad 8 4 6 Selecting MANUAL AUTOMATIC or PILOTE WIRE 8 4 7 Advance features o...

Страница 4: ...12 16 24 Finish White RAL 9010 ELECTRICAL CHARACTERISTICS Nominal Power W 500 750 1 000 1 500 Voltage V 230 V 230 V 230 V 230 V Current A 2 2 3 3 4 3 6 5 INSTALLATION PROTECTION Template Installation...

Страница 5: ...left from any wall or brickwork in order for it to function correctly Figure 2 3 2 Fixing the supports Inside the packaging you will find a fixing kit Please find the instructions below 1 Choose the...

Страница 6: ...10 2 9 1 12 14 3 11 4 TCP Smart radiator Information Instructions 4 1 Touchpad Settings Back Decrease Temperature Move down ON OFF Confirm Increase Temperature Move up Manual mode Automatic mode 4 2 S...

Страница 7: ...menu Then use the buttons to navigate to settings Press the button to access 4 4 1 Set the day and time To set the day or time select the CLOCK option Use the buttons to select the correct time and p...

Страница 8: ...orrect one and press 4 4 4 Firmware This option displays the current software version and the release date To see this press the FIRMWARE option 4 5 Locking touchpad To lock the keypad press and hold...

Страница 9: ...y of the week In Manual mode you can choose a temperature and the corresponding icon will be displayed on the screen according to the ranges set in the table below COMFORT 19 30 o C ECO 7 5 18 5 o C A...

Страница 10: ...un PRE PROGRAM 4 0 1 2 3 4 5 6 7 8 9 10 11 12 13 14 15 16 17 18 19 20 21 22 23 Mon Fri Sat Sun COMFORT ECO OFF If you want to create your own programming STEP 1 1 Select COMFORT Temperature between 19...

Страница 11: ...the top right it will indicate which hour you are pro gramming b In the left side it will show you the days selected c The programming bar will show I COMFORT mode 2 filled squares II ECO mode bottom...

Страница 12: ...CE function The BALANCE submenu causes the product to work in Manual mode with a constant temperature of 19 C Once selected the product returns to the main screen with the temperature set at 19 C and...

Страница 13: ...of the container crossed out over a horizontal line is marked on all of TCP Smart products to remind the consumer of the obligation to separate them on disposal The consumer should contact the local...

Страница 14: ...he product that may not comply with the current technical standards of safety Corrosion caused by direct exposure to salt water is excluded from the guarantee When the product is installed no more tha...

Страница 15: ...heat output and no room temperature control Two or more manual stages no room temperature control With mechanic thermostat room temperature control With electronic room temperature control Electronic...

Страница 16: ...W TCP France Quai Gabriel P ri 1 Joinville Le Point France 94340 Technical Consumer Products Ltd Unit 1 Exchange Court Cottingham Road Corby Northamptonshire NN17 1TY https www tcpsmart eu faq custome...

Отзывы: