TCL S62 Series Скачать руководство пользователя страница 7

6

Chapter 2

Getting Started

Switching On

Follow the instructions on this page on how to switch on your TV set 

and the remote control before going on to following pages describing 

how to use the channel set-up procedure.

1. 

Insert two AAA batteries in the remote control. 
Precautions on using batteries:

- Only use the battery types specified.

- Make sure you use the correct polarity.

- Do not mix new and used batteries.

- Do not use rechargeable batteries.

- Do not expose batteries to excessive heat such as sunshine, 

fire or the like, throw them in a fire, recharge them or try to open 

them, as this could cause them to leak or explode.

- Remove the batteries from the remote control if you are not using 

it for a long period of time.

- Attention should be drawn to the environmental aspects of battery 

disposal.

2. 

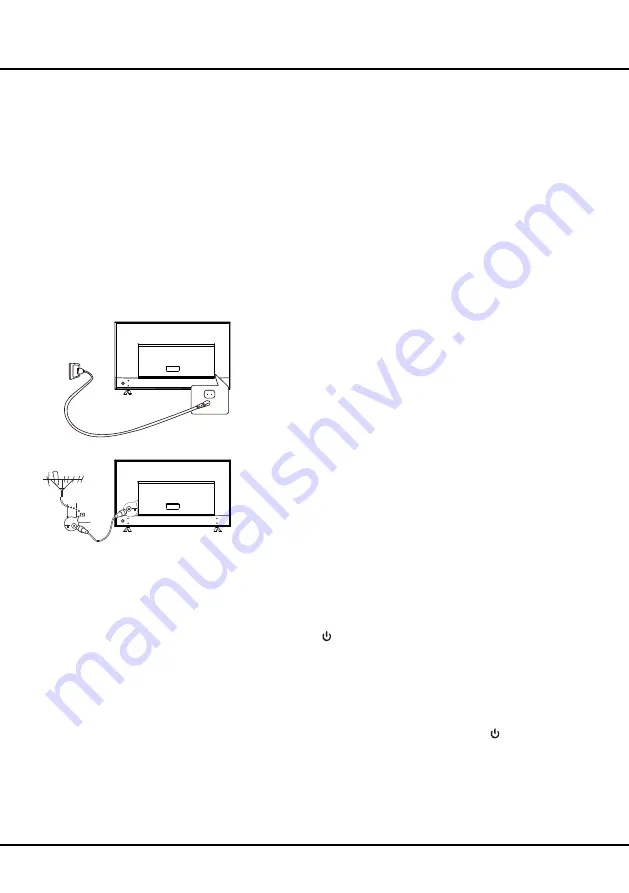
Connect the power cable FIRST to the television, THEN to a mains 

socket. (

Note

If the power cable is connected to the television, 

please only connect the power cable to the mains socket.

)

Your TV set should only be connected to an AC supply. It must 

not be connected to a DC supply. If the plug is detached from the 

cable, do not, under any circumstances, connect it to a mains 

socket, as there is a risk of electric shock.

Note

The figures are for representation only, the location of power 

socket of the television may differ depending on the model.

3. 

Connect an outside aerial to the ANTENNA/CABLE IN socket at 

the back of the TV set. 
The aerial socket (75 OHM - VHF / UHF / cable) can be used for 

connecting an external aerial or other equipment fitted.

Note

If you want to receive the signal from your cable or cable 

box, please connect a coaxial cable to the ANTENNA/CABLE IN 

socket at the back of the TV set.

4. 

When powered on, the TV will be turned on directly or be in 

standby mode.
If the power indicator lights up, the TV set is in standby mode. 

Press the   button on the remote control or on the TV set to turn 
on the TV.

Switching Off

•  To put the TV set into standby mode, press the   button on the 

remote control. The TV set remains powered up, but with low 

energy consumption.

•  To switch off the TV set, unplug the mains socket from the mains 

outlet.

Содержание S62 Series

Страница 1: ...ns in this User Manual are provided for reference only and may differ from actual product appearance Product design and specifications may be changed without notice OPERATION MANUAL LED TV For use wit...

Страница 2: ...irements while maintaining optimum picture quality Changes to certain functionalities of this television TV Guide Picture sound etc may change the power consump tion Depending upon such changed settin...

Страница 3: ...ng TV Settings Menu 10 Chapter 4 Using More of Your TV Installing Channels 11 Using Subtitles 11 Turning On Off Subtitles 11 Enabling Subtitle Languages on Digital TV Channels 11 Selecting a Subtitle...

Страница 4: ...If this happens unplug the set and refer to the service personnel If the set is subject to impact or has been dropped and the cabinet has been damaged Where the mains plug or an appliance coupler is...

Страница 5: ...rding to TV model ANTENNA CABLE IN socket input This socket can be used to connect the outside aerial or cable network COMPONENT IN YPBPR sockets input These YPbPr sockets can be used to connect a dev...

Страница 6: ...a digit PRE CH To return to the previous channel LIST To display the channel list To control the volume To display program information if available To display the Settings menu P To change channels To...

Страница 7: ...he mains socket Your TV set should only be connected to an AC supply It must not be connected to a DC supply If the plug is detached from the cable do not under any circumstances connect it to a mains...

Страница 8: ...ifferent depending on your actual network configuration If you have any questions about your home network please refer to your ISP Connecting to a Wired Network To connect to a wired network 1 Ensure...

Страница 9: ...Wireless settings and press OK to enter You can set the wireless network connection in 3 ways a Scan Press to select Scan and press OK to enter The TV will search all access points within range Access...

Страница 10: ...ls it could be caused by poor broadcasting and therefore is not covered by manufacturer warranty Manufacturers cannot be held responsible for lack of or poor broadcasting in some areas TV Buttons If t...

Страница 11: ...fore using Smart TV applications Slow responses and or interruptions may occur depending on your network conditions If you experience a problem using an application please contact the content provider...

Страница 12: ...K to confirm 3 Press EXIT or to close the menu Installing Channels This section describes how to search and store channels automatically This may be done in any of the cases below you have skipped the...

Страница 13: ...protection HD content recording protection Please use on the remote control to check if the feature is available in your product 1 Press on the remote control and select PVR 2 Press OK to enter and s...

Страница 14: ...Picture JPEG PNG BMP Music MP3 WMA LPCM 4 Press to stop recording manually the recorded file will be saved In normal operation the recording will stop automatically when the recording duration expires...

Страница 15: ...irelessly i e without cables This makes it possible to view on your TV at the same time what your smartphone or tablet is showing For example you can launch a video on your smartphone and display it s...

Страница 16: ...l of your router Make sure your TV is connected to a router and make sure your router is powered on Check that your router modem has an internet connection and that your Ethernet cables wireless conne...

Страница 17: ...the reception Radio frequency interference This interference produces moving ripples or diagonal streaks and in some case loss of contrast in the picture Find out and remove the radio interference so...

Страница 18: ...vices either express or implied including but not limited to warranties of merchantability of satisfactory quality fitness for a particular purpose of accuracy of quiet enjoyment and non infringement...

Страница 19: ...is symbol indicates that the product and its electronic accessories should not be disposed of as general household waste at their end of life Instead the products should be handed over to the applicab...

Отзывы: